Ikea Rast Dresser Hack | Fabric Wrapped with Custom Ring Pulls and Acrylic Casters

Over the weekend we finally finished our fabric wrapped Ikea Rast dresser!

These dressers are such an amazing price, only $35! The wood and building materials to make this yourself would be more, so buying is definitely worth it! While Rast hacks are nothing new, I couldn't help putting my own spin on it! Here are a few of my favorite fabric wrapped pieces, Centsational Girl, Hello Boudreau, and Recently.

I basically followed Martha Stewart's instructions to cover a table top with linen, here's how we did it!


First I used heavy starch to make the fabric stiff; however, it didn't work very well with this fabric, mine got much stiffer when I used a linen in my fabric wrapped parson's table. So a linen might work best for getting the fabric really stiff, though this worked fine too once it was ironed on to the wood. 
 
I placed the Rast dresser pieces on top of the fabric, a drapery panel from Target, and cut it out with enough to wrap around to the back. (Make sure to be mindful of the pattern direction, I had to redo one drawer front ...) I brushed water based polyurethane (satin finish) and then ironed. I also placed a piece of white paper on top to protect the iron from the poly (use your craft iron, you will probably still get some on your iron ... like me :)

We ended up wrapping the pieces individually, which meant the sides the top needed to be attached first with the fabric between the top and side since the screw holes are exposed and then insert the screws, and then apply poly and iron. It would be quicker to assemble the entire outside and then wrap that verse the individual pieces, so also consider doing it that way. I don't think that it would of looked very different, but would save time :)

I decided to line the inside of the drawers with extra white fabric and trim that I had, I think it gives a more polished finish!

To seal it, I applied a few layers of poly and then a layer of Briwax clear wax on the outside of the fabric to seal and protect it, like Martha Stewart's tutorial suggested. 

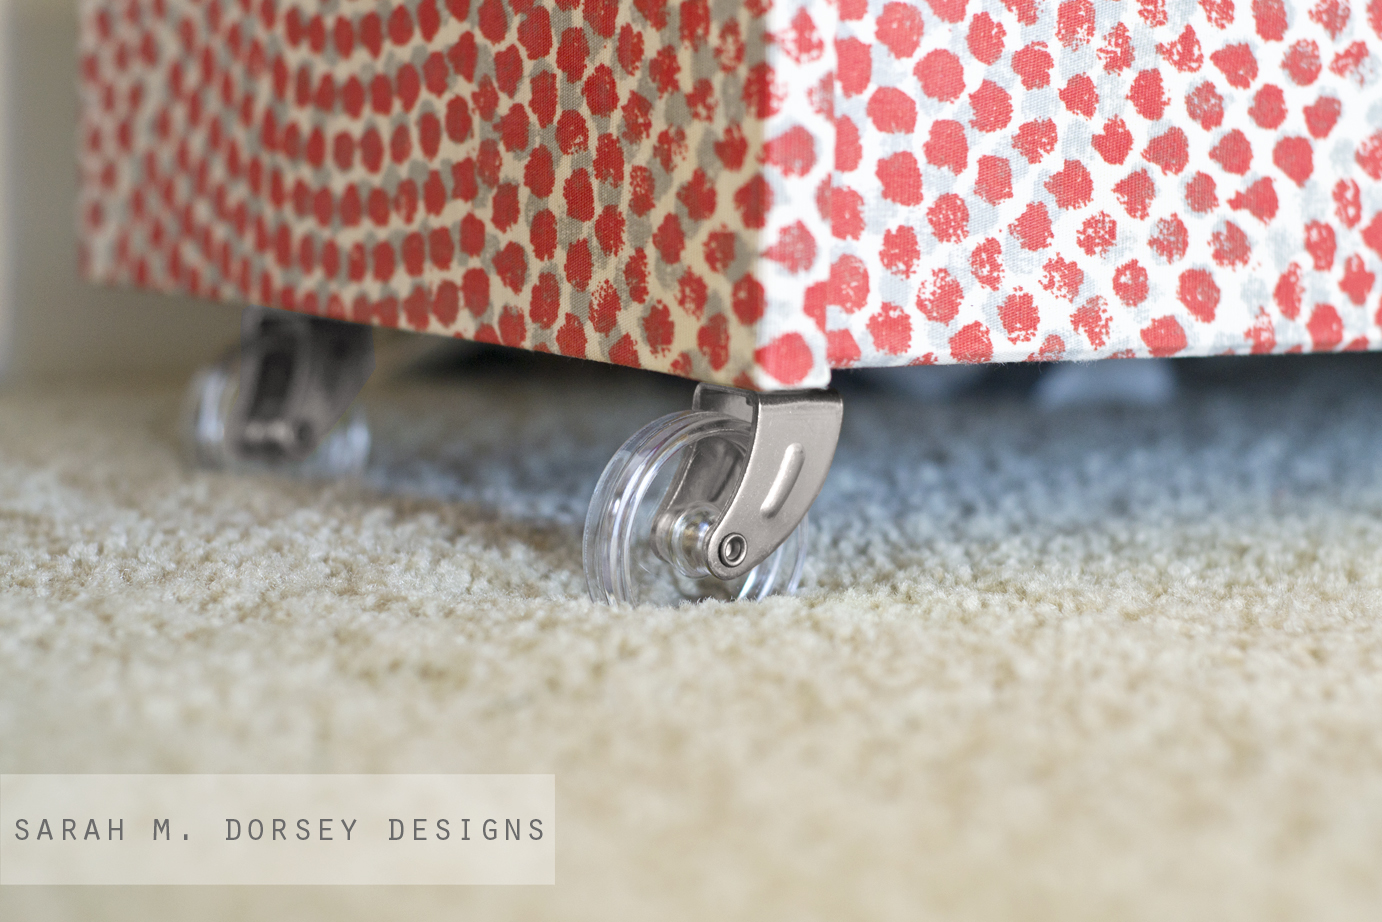
Before assembling the dresser, David drilled new holes to make the plate below the drawers flush instead of inset. We installed supports for casters out of extra 2x2s and followed the instructions to install the casters. We found brass and clear plastic casters from Ace Hardware, love them!! I then applied silver rub n buff to match the ring pulls.

I made my DIY ring pulls out of a cotter pin, inset washer, and 1" ring. The silver cotter pin was harder to open than the brass so I used pliers to open them instead of by hand. The cotter pin is inserted through the hole and then bent back on the inside of the drawer. (prior to applying the poly, I cut through the fabric at the existing hole with an xacto knife on both sides. I started on the back, where I could see the hole and the stuck the cotter pin through to find the other side, and then cut the front with the xacto knife) These ended up being only .96 each!! Such a good price!


How great are these clear casters? I really loved the brass with the clear, but silver works best with the fabric so I applied a little silver rub n buff.  
The flowers are from a friend's wedding this past weekend, love hydrangeas! 


and I borrowed the acrylic tray from the driftwood herringbone table. 


Cost Breakdown:

Rast Dresser: $35 (Ikea) 
Fabric: $25 (Target)  
Ring Pulls: $6 (Parts from Ace Hardware) 
Casters: $9 (Ace Hardware) 

Total $75

Not the cheapest diy, but for unique fabric and custom hardware, I'll take it! 

Have you tried a Rast dresser hack or fabric wrapped furniture project yet? I'm officially obsessed and can't wait to do more!! 

Ryobi Gift Card Giveaway WINNERS!!!


Hope you all had a great weekend!! Did you participate in the Ryobi gift card giveaway last week?? Read on to see if you won!

-- p.s. we finally finished our rast dresser hack ... stop back later today or tomorrow to see finished pictures!!

--

Big HUGE Happy Father’s Day to you, your daddy, your husband, grandpa, brother… ETC! These men deserve to be celebrated!!

And that brings me to the fact that today is THE BIG DAY that we announce the winner of our Massive RYOBI Power Tool Giveaway! Luckily, our little Rafflecopter form did the dirty work for us and pulled up our winner in the most random of fashion! Congrats to (drumroll please!)…
Hilarie Sullivan!
Check your inbox asap!
We were so honored that so many of you participated in the ‘Blog Hop’, and were surprised by how quickly we had our winner (Congrats Stephanie Richardson for winning the matching contest!). We got tons of positive feedback and are so glad that everyone enjoyed surfing around each blog! We just might make it harder next time!!!

In case you missed it, the premise of the contest was to match each blogger with a popular project of theirs. Here are the correct answers!


There’s an overwhelming amount of creativity and talent in this group, and you should definitely hop on board and keep up with each one! You’re sure to be inspired to the fullest.

And HUMONGOUS thank you to RYOBI Nation for supplying our giveaway prize! For even more inspiration, check out these great projects!


Get the Look | Bright and Airy Modern Foyer

For today's get the look, I'm featuring a bright and airy foyer with just the right amount of pattern and whimsy to keep it fun and current! I would love to have this amount of light in my foyer! Hello windows!


via pinterest (not linked to original source)


1.  |  2.  |  3.  |  4. + 4.  |  5.  | 6. 


1. If you've read my blog for a few months, you probably know how obsessed I'm with this folded pendant, I even DIYed my own version!

2. This wallpaper is so good! Maybe even stenciled instead? I love how it is just above the high wainscoting so that if you get bored it is less to switch out. Though harder to apply to the ceiling, it really adds so much more impact!

3. I decided to include this dining settee because it isn't too deep - perfect for a narrower hallway! It's not leather, but the price is great! 

4. Upholster a thrift store bench with a fun new fabric like this one from Premier Prints, I also love this one from Waverly! This may be the exact bench from the image (it may scare Annabelle (my puppy) though ...)

5. A blue glass lamp gives this space the perfect pop of color! I love how it balances the blue abstract painting on the other side.

6. A classic parson's table brings in classic lines to balance the bench. 

I love love love this space! Having a settee and a console table in a foyer (as shown in the picture), probably isn't an option for a lot of homes. Maybe our next place will have the space :) We can always dream, right?

--

You still have time to enter to win a $400 gift card for Ryobi tools!! Make sure to ENTER by Sunday!

--

I hope that you all have a fabulous weekend!! See you Monday!

How I Use Photoshop to Visualize Before Buying

For the past week or so I've been looking for hardware for the fabric covered Rast dresser. It's a little trickier because of the pattern. The knob/pull needs to be simple so it doesn't compete with the fabric, but it still needs to stand out so it doesn't get lost in the fabric.

So today I thought I would share how I work through design decisions when sourcing products through the internet. ** this isn't a tutorial; however, if that interests you, let me know in the comment section :)

I take a photo and then use Photoshop to combine the two photos so I can see almost exactly what it will look like.

Below are a few options, some work, some don't ...


I love the shape of this knob, but I think the contrasting blue is too much against the pattern ... 


Again, like the shape, but this one I'd have to see in person since the colors are so similar ...


hmm ... not so much, a little too solid, maybe if it was smaller (size is approximation based on measurements give on website)


DIY Ring Pulls? So far this is my favorite ... I use them a lot, but they work well in SO many places.


Maybe in silver?


We also spent a large part of the weekend cleaning out closets and organizing (aka looking for the extra small white knobs we used on the credenza with no luck). I think those might look good too ...

So I'm still deciding, but in the meantime I thought you might enjoy seeing how I visualize things.

I know everyone doesn't have Photoshop, but if you're interested in a tutorial, let me know and I'll try to find a free program online that is similar :)


DIY Striped Painted Rug in about 2.5 Hours!

After the time intensive driftwood herringbone table, we were definitely ready for a quick and easy project! Painting stripes is probably one of the easiest projects to tackle. Laying out the tape takes about an hour, and painting (depending on amount of coverage you want) takes about 1.5 hours (a little more for drying time in between coats) Definitely achievable as a day or less than a day project!

He's how we did it! 

We decided to give the rug a little extra interest by offsetting the stripes, similar to this rug from Ikea. It only took a little extra effort and probably made it a little easier to keep the tape straight. Definitely worth it! 

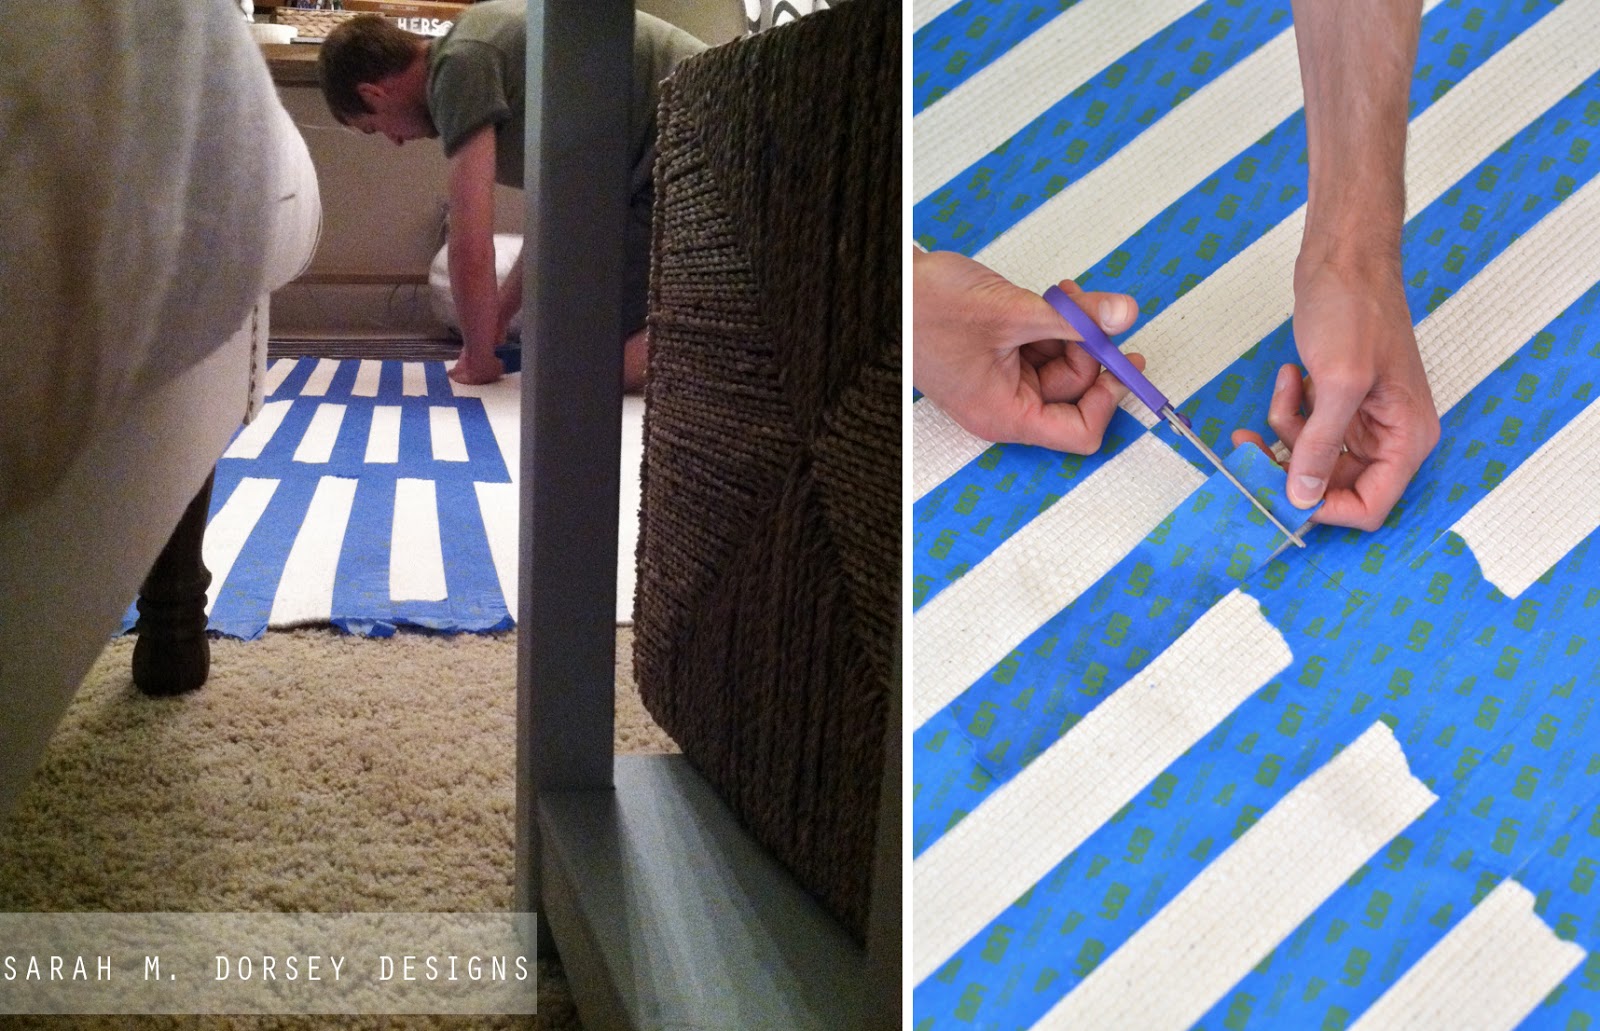
We divided the rug into thirds, starting in one corner we laid a piece of 3m edge seal 2" tape (a little over a third of the rug so there would be overlap). We repeated, using little pieces of the 2" tape to set the offset between stripes. 

After all of the tape was laid out, we measured the thirds again, drew a line with a pencil, and cut the tape down the pencil line. At first we used scissors, but then moved to lightly cutting it (not through to the rug) with and xacto knife. It moved faster since we didn't have to lift the tape up and reattach it. 

I then walked around on the tape to make sure that it was secured to the rug... Annabelle thought I was crazy ... I put paint tarps around the edges to protect the carpet (always a must!) Then I mixed up a custom gray with flat paint that I had laying around the house and started rolling it on! I did three light coats (letting it dry in between) until there was even coverage. 

The only thing that I would of done differently was carry it down to the garage. As you can see from the first picture, we did it in the office area and it was very cramped! It took some interesting maneuvers get around the wet paint. Rolling on an even surface (instead of the carpet underneath) would of been easier too. 

I took the tape off and that was it! This was such an easy and fast way to get a large graphic pattern.


I picked up an acrylic picture frame to use as a tray, idea thanks to Just a Girl! I love that you can see the herringbone pattern through the tray!


The living room is really coming together! Just a few more finishing touches!


Sources/Price breakdown:

Ikea Erslev rug: Already owned, but Ikea doesn't carry it anymore (anyone know of a good substitute?)
Painter's tape: 2" 3M Edge Seal painter's tape $8 - Wal-Mart (we used exactly one roll, I know random!!)
Paint: Custom mixed light gray from leftover Behr and Glidden flat paint - Home Depot

Total Cost: $8 (since I had everything but the tape on hand!)

If you haven't tried a striped rug yet, you MUST! It is super fast/easy and can add the perfect punch of contrast, pattern, color to a space!

Match that BLOGGER! {a contest and $800 RYOBI Father's Day Giveaway!}

Would you like to start or add to your power tool arsenal?? If so, I have a very special giveaway for you today! I've teamed up with some fabulous bloggers to give you the chance to win $800 worth of Ryobi gift cards!! Read on to see how to enter! Thanks so much to Beth and Brooke for organizing this fantastic giveaway!

(p.s. make sure to stop back in a few hours for pictures and a tutorial for our latest diy project!)

Take it away Beth!


{UPDATE: We have a big winner for the Matching Contest part of the giveaway (but the $400 gift card random drawing is still open till Sunday)! Stephanie Richardson was the very first one to match us up like a PRO! We still encourage you to see if you can figure them all out too! Make sure to still enter for a chance to win the random $400 gift card drawing. There's so much amazing talent in this group, and you're sure to stumble upon some serious inspiration. Thanks for playing!}


Gooooood MORNING!

We’ve got a special surprise for you today… who doesn’t love a little friendly competition and GIVEAWAY?!?! (there will be a randomly drawn winner in addition to the winner of the contest, so you should enter both ways!)

The premise of this contest stems from the fact that ALL OF US are guilty of Pinning an idea without ever checking the source… guilty as charged! But there are likely pins on your boards that are from your favorite bloggers, and you don’t even KNOW it! (amiright?)
And that’s where the contest comes in:


Here’s the line-up! SUCH an amazing group of bloggers that we wrangled!!


And below are projects from each blogger that you’ve likely seen viral all over Pinterest!


Before we get to the rules, can we talk about how
RYOBI is giving away $800 worth of POWER TOOLS?
Just… in time for Father’s Day!
Perfect timing if you ask me.


$400 RYOBI Giftcard goes to our randomly selected winner, and $400 RYOBI Giftcard goes to the first person to correctly match up all 16 bloggers with the correct projects!
SO!

When you click on the Contest Form (at the bottom of this post), it will direct you to a page that will show you an image of the project, and a drop-down menu of bloggers. You just go down the line and select away! Some projects you probably know already, but some you may need to SNOOP AROUND blog-land to find!

We call this BLOG-HOPPING. And it’s highly encouraged in the blogging world. Smile
Here’s the links to the home page of each blog (in no particular order). Now get busy!
      1. Sawdust and Embryos
      2. All Things Thrifty
      3. Interiors by Kenz
      4. Whatever Blog
      5. Home Stories A to Z
      6. Sarah M. Dorsey Designs
      7. Twist Me Pretty
      8. The Idea Room
      9. DIY Village
      10. Pretty Handy Girl
      11. Domestic Imperfection
      12. One Good Thing
      13. Kara Paslay Designs
      14. Nine Red
      15. Vintage Revivals
      16. East Coast Creative

Entry #1
(Randomly drawn)
‘Like’ us ALL on Facebook, and let us know that you did on the Rafflecopter form below!
Entry #2
(Contest!)
Click below to match up each blogger with their amazing project!


a Rafflecopter giveaway
Click Here!


  • One entry per person, per entry method.
  • Winner of matching contest will be emailed, and publicly announced on Facebook.
  • Winner of random-drawing giveaway will be announced on Father’s Day here on the blog, as well as Facebook.
  • Be sure to hop over to RYOBI Nation and check out some amazing inspirational projects!
  • Be AWESOME today (that’s a given)
    Ryobi Nation - leaderboard1[6]
    This contest/giveaway is in NO WAY affiliated with Pinterest or Facebook, and we hereby release them of any liability related to this promotion, the receipt of prize winnings, etc. The giveaway prize has been generously provided by RYOBI Nation. All prizes will be mailed by the sponsor and all participating blog owners are not held responsible if the prize is not fulfilled. Giveaway starts Monday 6/10/13 at 5am est and ends at midnight on Saturday 6/15/13. Alternate entry available by sending your entry via email to wehopeyouwin@gmail.com. Winner will be announced on Sunday 6/16/13 and will need to respond within 48 hours to claim their prize, or another winner will be chosen.Winner must be 18 years of age or older and a US citizen in order to win.   May the force be with you.

    Favorite Clearance Finds

    One of my favorite things to do is browse the clearance section of stores. Since we're moving soon, I've basically cut off my home decor buying. So maybe I can live vicariously through you??

    Here are a few of my recent clearance favorites:


    1. Navy and peach polka dot pillow from Anthropologie. $39.95.
    2. Metallic polka dot napkins from Anthropologie. Set of four for $4.95 (only 12x12, but still super cute! and you can't beat the price!)
    3. Tassel blanket from West Elm.  $29.99, add customization for $7 additional
    4. Tassel hand towel from West Elm. $7.99-$10, add customization for $7 additional
    5. Small Black pendant from West Elm. $6.99. are you kidding me?? SUCH a great price!!


    I'll be sharing our painted rug on Monday AND an awesome giveaway that I'm participating in!! Make sure to stop back to check out our rug and for info on entering the giveaway!!

    Hope you have a GREAT weekend!!
    Powered by Blogger.