Make It Over | Magazine Feature and Cover

Hi! I hope that you had a Merry Christmas!

We have some BIG news!! We've been included in the first issue of Make It Over magazine!!! AND our bedroom made the cover! #pinchme Definitely a dream come true!

If you want to check it out in person, it's a part of Well Styled Home magazines (produces Cottages and Bungalows and Flea Market Decor), so it should be available in most stores that sell those. I've seen it in Barnes and Noble and Target. It should be available on Well Styled Home's website shortly too.

Most of our CA rental made it into the magazine, so that was a nice summary of our time there!


Here's a few pages from our feature. Lots of our DIY tutorials and tips from me too!!


David and I love DIYing and we can't wait to get started on our home!! (still scheduled to close early Jan.) We are in MD for a little bit around Christmas and New Years, and taking advantage of our tools. A lot of our tools (and borrowing some from David's Dad and my Grandad) are here, so we're trying to get lots done. So we should be back in full force in January.

Being here for Christmas and talking to family has got us thinking about about ancestors ... the first settler in America on David's side was a ship builder and his great great grandfather made molds for decorative iron work. I have lots of seamstress and crafters on my side - my great great grandmother would dry out Christmas trees (hanging inside down in the attic so all of the needles would fall off) and then meticulously wrap each branch with cotton felting and then decorate it beautifully. My grandfather has always been a DIYer and has a love for carpentry. After a hurricane went through at his last house, he brought in a portable mill and saved lots of trees that were going to be thrown away. He still has some wood and we're using it for our next project.

So it kind of seems like we're destined to be thrifting/renovating and building things :)

I'll be away from the blog until the New Year, but you can follow our projects on Instagram if you'd like!

Make sure to stop your local store to see Make It Over and for more info, check our their Facebook page!

My 2013 Holiday Wish List

Would you believe me if I said I haven't started my Christmas shopping yet? I haven't ... guess I better get busy! ha!

If you're behind like me, here's a few things on my holiday wish list! Hopefully David's reading ;)

Here's what I'm loving at Anthro - guess I'm loving white, gold and neutral :)

White chevron wallpaper - love the subtle pattern | Gold and white monogram mug - perfect for holding  pencils or your morning coffee | Script bracelet - this would be great for layering - love the simplicity | Gold polka dot pillow - enough said :) (original anthro is out of stock so I added PB Teen) | Measuring Hedgies - oh my cuteness, I suppose you could actually use these to measure things - I'd probably use them to hold odds and ends on my desk | Wishbone stamp - again super cute!

The cold weather in Ohio has got me craving cozy things! Here's my top picks!


Monogram throw - I'll take one in white and black please! | Mint glittens - how great is the color!? | black pom hat - who doesn't love a pom pom :) | Stripe infinity scarf - perfect for throwing on as you head out the door | Riding boots (or if you're a 6.5 they're on sale at Piperlime!!) - I've been looking for the perfect boot for years, yes I'm picky :) I just ordered these, fingers crossed! | Love a long sweater, this one looks so cozy - long version out of stock, boo! but here's the pullover!

Happy Friday! I hope that you have a great weekend - full of relaxing, yummy food and maybe a little shopping! :)

Panel Paintings to Chalkboard | Contributing Post at Infarrantly Creative

Today I'm at Infarrantly Creative sharing a chalkboard created from two dated paintings found a thrift shop. Make sure to stop by and check it out!!


Driftwood Tiled Tabletop | Tutorial

Today I'm sharing our last project from our CA rental! In case you missed it at Infarrantly Creative, check out the tutorial below for adding wood tiling to a table top. This is our last project with CA driftwood (I still have the driftwood frames to finish and I'll be selling a few)

Adding wood instantly adds texture and warmth to contrast the shine of the metal. I love it!!

I used driftwood left over from our herringbone driftwood table, but for something a lot less involved, try thin hobby board.

Supplies:

1/4 MDF
Wood strips
Wood glue
Brass edging
Brass screws
Table base
Jigsaw with metal and slow cut wood blades
Polyurethane


The other weekend I picked up this gold metal accent table from Target. 


Amazing as is, but what if we made a removable top so that it could either be metal OR wood!? That way if/when I change my mind, I can swap the top. Perfect! 

Our original plan was to leave the metal top intact, but since we couldn't find brass trim wide enough to cover the wood and the metal top, we decided to remove the existing top and make them interchangeable. 

Here's how we did it!


We traced the tabletop on a piece of MDF. **Note: If you would like your top to fit over the existing top without removing it, make sure that it is slightly bigger so that it will fit. 


Next, cut your wood into thin strips (varying lengths works well), or use precut, strips of hobby board (Home Depot has a good selection). 

Start at one end of your board, if your top is a circle, make sure that the wood goes slightly over the edge so you have a little wiggle room. 

Alternate the number used in each row to give a more staggered appearance. Apply wood glue on the bottom of all sides that touch, so that there is a strong bond. 


Let the wood glue dry overnight. Retrace your table top. If you tracing it from underneath, make sure to carefully check that the wood is lined up on the other side. 

Use a jigsaw blade designed for slow cutting for extra control to cut out the top. 


We liked the slightly uneven top, but feel free to sand down any imperfections too. 


Next, we moved onto the edging. We picked up 2 - 1" x 36" bendable brass strips from Ace Hardware. Since we needed about 47", we cut two 23.5" strips using a jigsaw blade designed to cut metal.


We measured and countersunk a few holes, so that the screws would sit flush once attached to the top.


Next we predrilled holes in the wood top to avoid the wood splitting when the screws were attached.


We used small brass screws to secure the trim, leaving an overhang so that it wouldn't slide once on the base.


We guided the trim along the edge and secured the remaining screws, using three per side, six total for both pieces of trim.


Since the 1" trim wouldn't cover both the original top and the new top, we decided to remove the top by cutting the welds with the dremel.


Finally, we sealed the top with a few coats of polyurethane.


and that's it!


I LOVE the variety of wood grain!


I'm crazy about our new custom side table! It's a great mix of rustic and glam. I also LOVE the price. I picked up the side table for $17.99, it was mis marked on the display, so my Target honored the price. The brass edging was $15 for two pieces and the rest of the materials, I had on hand! One of the advantages to having multiple projects going on at the same time :)

Click here and here to learn more about our refinished mid-century modern chairs and our DIY abstract black and white art.

Weekend Recap + Project Updates

Hi! I hope that you had a great weekend! I got a good start on projects before David got home on Friday, but I didn't have everything that I needed to finish (HATE when that happens!). Saturday it snowed and the roads weren't great, so we couldn't get everything to finish.

We did have fun in the snow! Annabelle is EXTRA crazy, she loves it!


I didn't get any projects complete, but here's a few peaks of our weekend.


I found this pair of lamps and a coffee table. Love the mini casters!


Also, I painted. I can't stay away from coral, love it!

Finally, did you catch the reflection from Friday's post? Coming soon!


I also worked on reupholstering my chair (I forgot to snap a pic) but need jet black fabric for the cording, I couldn't find any locally, just softer blacks, so I'll have to keep looking.

I hope that you had a great weekend!!

Pottery Barn Inspired Mirror | Krylon Looking Glass Spray Paint

Happy Friday friends! If you're stopping by from The Shabby Creek Cottage, welcome! I'm so glad that you're here!

I was recently given the opportunity to try Krylon Looking Glass Mirror-Like spray paint and today I'm sharing my project. I've been wanting to try it for a while, so I was super excited to see the result!

Inspired by Pottery Barn's Eagan multi-panel mirror, we created our own, simplified version. Instead of inserting individual mirrored panels we used the existing mullions on the window and the Looking Glass spray paint for a mirrored effect.  


Here's how we did it!

First, we carefully removed the exterior frame. Since our window was double paned, we also removed one of the panes. This would eliminate weird reflections from the side and make it look like a real mirror.


Once the exterior frame was removed, we sanded the inner frame.


Then, we worked on the new exterior frame. Since the frame was uneven on the edge, we added a 1" x 1/4" poplar strip - mitered at the corner. We used screws and then wood filler to even out the imperfections. Once dry, we sanded.


Next, we added a 1 - 1/4" piece of poplar trim to the front to give it a more finished look. I love how it seamlessly blends into the frame!


We used wood glue and clamped it around the outside of the frame. A scrap piece of plastic (or cardboard, etc.) in between the trim and clamp helps prevent the wood from denting.


After the frame was done, we were ready to paint!

Following the instructions, the Looking Glass spray paint is applied to the back side of the glass, so we flipped the window over and gave it a good scrub. We finished with a paper towel and window cleaner to make sure it was dirt and oil free.


We sprayed 4 light coats (1 can), allowing it to dry a few minutes in between. When wet, it looks a little uneven, once it evens out, it's dry and ready for another coat.


Then we painted the frame. We applied painter's tape to the edge and tapped sheets of paper together and slide underneath the mullions.


We finished it off with a glossy black, and that was it!

I'm crazy about the finished result!


Love how the frame seamlessly blends into the existing window.


The Looking Glass spray paint has a beautiful reflective quality - it's hard to believe that it came out of a spray can.


I LOVE the new addition to my office!! Can't wait to finish up the rest of my space!

p.s. since this is one of the first looks of my office, it's a "4 seasons" sunroom, so there is an exterior sliding door between this room and the rest of the house (just in case you were confused about the reflection :)

Make sure to stop by Desiree's - The 36th Avenue to see her awesome project using Krylon Looking Glass spray paint - you won't want to miss it!!

** I was provided Krylon Looking Glass spray paint, as always, all opinions are completely my own :)

Simple Gift Wrap Idea

Hi! Today I'm at Jamie's blog, C.R.A.F.T sharing a simple gift wrap idea. Stop by and check it out!


Don't you just LOVE that pom pom yarn? I found it at Ollie's! Thanks so much to Brittany for the polka dot inspiration!!

Tomorrow I have an awesome project featuring Krylon's Looking Glass spray paint. You won't want to miss it!! Make sure to stop by tomorrow!

Projects!! | A pair of chairs, a chair, and a desk + Houzz Article

I've been in project planning mode! Yesterday, I was looking for a piece to convert into printer/paper/office storage and found a pair of chairs in instead. Ohio has been the land of chairs, since we've been here, I've bought 5 chairs. Mostly for our new house.

It is reeeeeally cold and windy here and winter hasn't started, I'm scared. Yesterday I had to fight the wind to get to the front door and when I got inside I realized that half of my shopping bag had blown out in the driveway.

BUT the thrifting is SO good!! Look at those arms!! I just about died. Getting closer, I saw the $35 price tag, I was so excited. I was on the fence because I wasn't sure about the front legs (no pic, but there is more detail on the front, I figured if it bugged me too much I could fix them somehow). Good condition, price, and there was a pair! Sold!

Project 1:


We're planning on replacing the back cushion for one that is square and no tufting. Those arms are so pretty, I don't want too much competing with them.


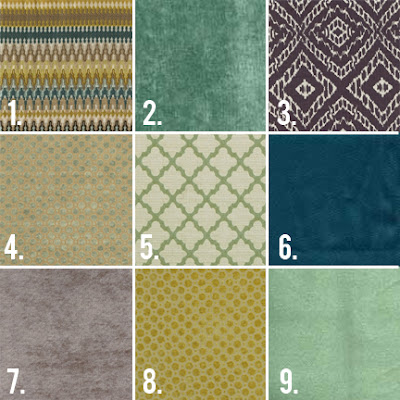
When I got home, I came up with a few fabric options and shared on Instagram (thanks for your input, insta friends!). I'm leaning towards a solid velvet (maybe a print on the back panel, but probably not). The stain is worn, but not horrible, I might leave it as is for now, or I might paint it white or black. 

Project 2: 

My office (in Ohio) 

Last week I worked on an article for Houzz on panels to conceal those pesky wires (see end of post for link)

I'm finally getting around to reupholstering my chair (legs have been spray painted black). 

I've narrowed it down to black and white stripe. I picked up some fabric from Ikea, it's heavy weight, like duck cloth. Has anyone used it to upholster furniture? I want to make sure the quality is good before spending time .. 


and Kravet Xu Garden (sorry for the bad photoshop, I just dropped it in there) 


Project 3: 

Also, I'm probably going to be swapping my desk for this one (found at Goodwill). If I do, I'll use my existing desk as a side table. Unfortunately the top corner is damaged so it will be easiest to paint, I'm thinking about leaving the drawers wood. We are currently without a t.v. stand so we temporarily had it here .. since then, it's been sanded and waiting for primer. 


So, tons of project ideas floating around my head! David is going to Baltimore at the end of the week for work .. so I'll have lots of time on my hands, hopefully I'll get a few things done!

--

Here's a first look at my office (first image is before :)! Make sure to check out my article on Houzz - how to have an open desk and hide wires! 


Remodeling, decorating, and more ∨

Home improvement can start with something as minor as installing track lighting or a ceiling fan.
Work with a home decorator when choosing floor rugs or hanging new window shades in your home.
Powered by Blogger.