Big Sur and Long Weekend


We're starting our long weekend heading up to Big Sur and Monterey ... follow my on instagram to see what we find :) @sarahmdorseydesigns

Hope you have something fun planned! :)


Recent Obessions: Attic or Cap Code upstairs spaces

I'll call it a recent obsession, since I've been think about it a lot lately, but it really has been an always obsession.

I LOVE attic or Cap Code upstairs spaces! I guess its the dramatic drops in the ceiling which create interest, but i think where is really gets me is how I feel in the space. Dropped ceilings create a cozy feeling, like you are being hugged by the room, making you feel comfortable.

all images via my Pinterest boards 

They can be the perfect place to create a nook for reading or maybe a nap

via

via
or a cozy vanity
via
or fabulous double workspace

via
and of course a relaxing bedroom

All are absolute perfection!

I've decided that one day, I will have a similar space to work with! How about you? Whats on your dream list, or what are recently obsessed with?

My DIY Must Haves: Painting

Painting is one of the easiest ways to transform an outdated piece, so painting and prepping supplies are definitely on my DIY must have list!

Most pieces will need a little TLC before painting, here are some of my basic prep tools:


1. A variety of sandpaper - course, fine and medium grit sanding blocks are great for a lot of surfaces because they bend slightly, sand paper with foam back is good for curved furniture legs, and sheets are good to reload your sanding block or to tear of pieces to get in the little cracks

2. Power sander - a must for large amounts of sanding! Best for flat surfaces, hand sand curved surfaces to avoid taking away detail. I use a Black and Decker Mouse, I like it because it is light and can get into corners easily 

3. Wood filler and putty knife - great for minor repairs

and a microfiber or tack cloth is also needed to make sure the surface is clean prior to painting.


Onto the fun stuff :)

Here are my favorite painting supplies and tips that I've picked up along the way!

1. Invest in good brushes - I use Purdy 1.5" and 2.5" Clearcut glide. This will help the paint to go on smooth and if cleaned thoroughly after each use, they will last a long time!

2. Smooth foam roller - Great for painting flat surfaces, help to reduce brush strokes and speeds up your painting time

3. A good primer - I've tried a few and like SW Premium Wall & Wood Primer I always add a little water to my primer before painting, because it is very thick!

4. Durable paint - For painting furniture, durable paint is a must! I typically use SW Pro Classic which has a hard enamel finish while being latex. The key to this paint is applying it on in thin coats and not over brushing (it will self level when drying) I also like Annie Sloan Chalk Paint, it goes on without primer (even on laminate), it is durable, and clean up is a breeze! I like to finish it with clear wax to seal and protect it.

5. Painters tape - Perfect for taping off what you don't want painted!

6. Paint drying extender - I use XIM Extender -  helps reduce brush strokes while painting, I add this every time I paint!


Spray paint can be the fastest and easiest way to paint a piece! Great for painting a something that has a lot of nooks and crannies!

1. Good spray paint - I like to use Rustoleum or Krylon - both get good, even coverage

2. Spray Paint Comfort Grip attachment - great for even coverage and saving your pointer finger! Don't buy the cheap one  - been there, done that, the can drops out of it!

3. Paint Mask/Respirator - SO important to use this every time your spray paint, breathing in all of those paint particles in air = no good!

And there you have it, my must have list for painting! Did I miss anything?

I'll be back soon to share the rest of my DIY must haves! 


Chartreuse and White Caning Chair Finished!


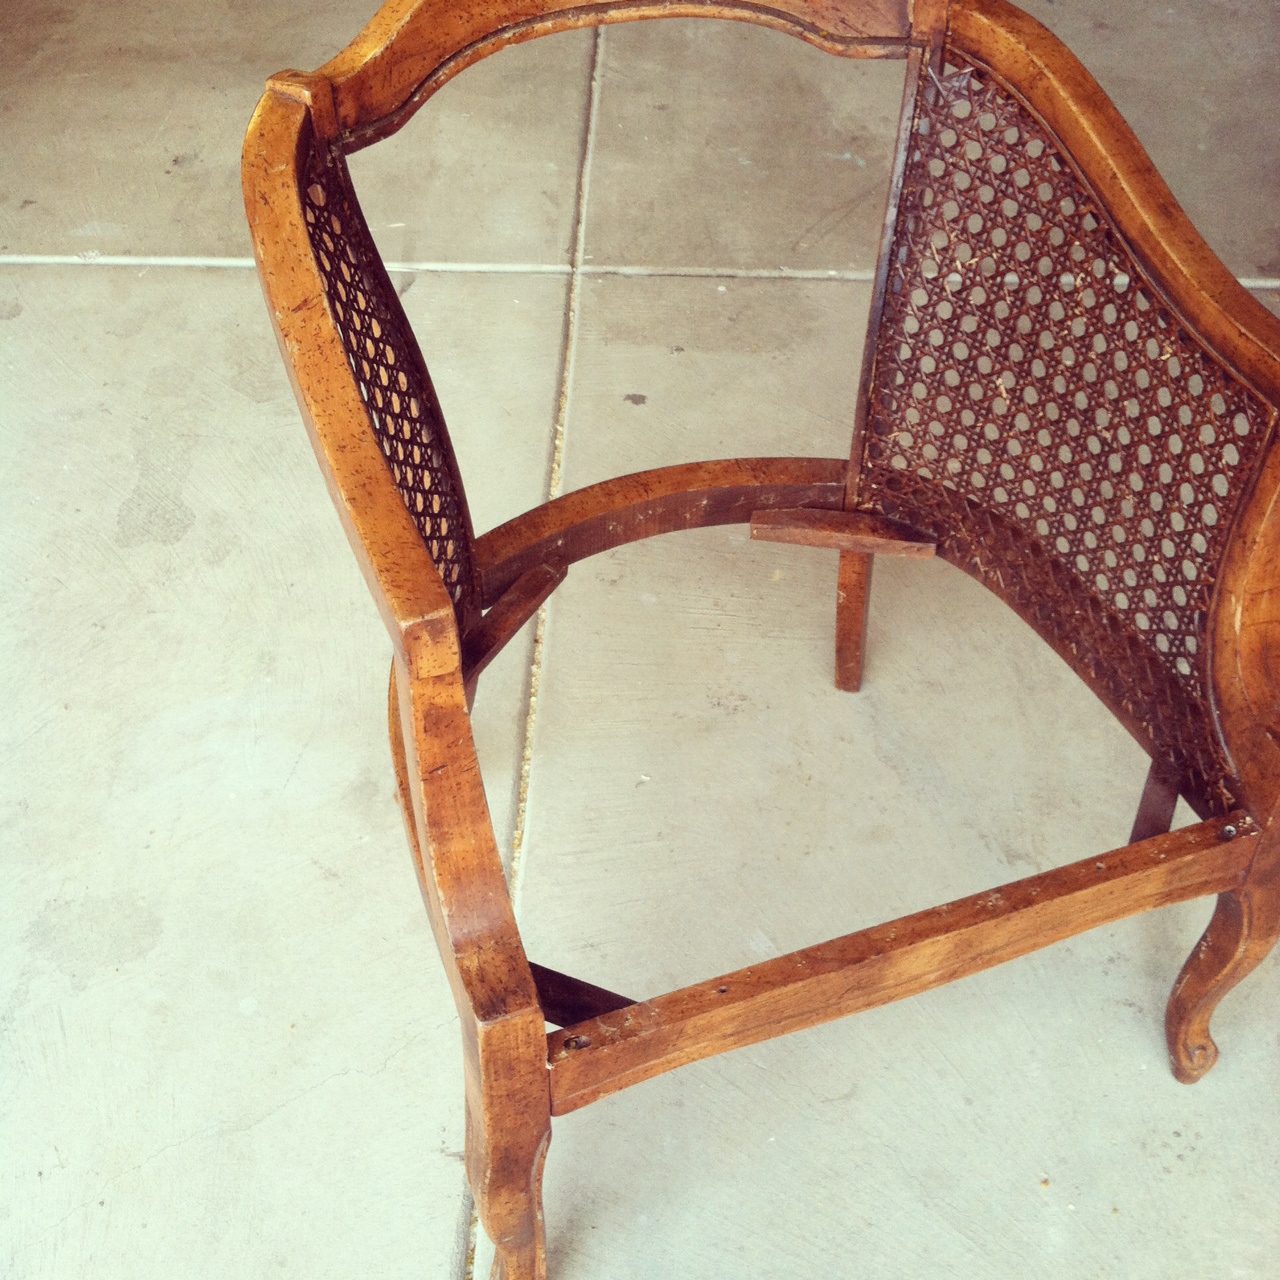
Yesterday I finished the cane chair! I found it last weekend at a consignment store for $35 (not bad considering the caning was in perfect condition!)

 This chair is probably one of the easiest chairs to reupholster (which was good because this was the first one that we've done!)

We unscrewed the seat and popped it out, tore off the cording with pliers (needle nose would have been better, but work with what you have, right?)


Tore off the back fabric ... and then removed all of the staples with pliers (probably the most time consuming part, but still not too bad!)


We decided to replace the foam because it was dusty and pretty gross - we picked up this 3" thick piece at home depot for $20 when we upholstered the desk chairs


Using the old foam as a template, we used a very sharp kitchen to cut out the new seat


We repeated the step above for the back cushion, but we also cut the foam in half so it was about 1.5"  thick


David used the sander on the straight parts and I used a sanding block on the curves and caning.

After wiping down and priming, I mixed a bright chartreuse from left over paint - BM Citron, SW Decisive Yellow, and Annie Sloan Versailles

As always, I added a little XIM Extender to reduce brush strokes ...

 
I brushed while David airbrushed the caning. I tried to brush the caning, but it was taking forever, so I am glad that we have an airbrush too! 


After the paint dried, I applied a coat of clear Briwax to seal and protect the finish, which also gave it a slight sheen.

And now onto the upholstering fun :) It was really pretty easy, just pulling tight and stapling.

After debating back and forth about the white, I decided to go for it because 1. it won't be used everyday 2. if it stains quickly, I can easily (like in a few hours) reupholster again

We chose Waverly's Full Circle Sail for the fabric and sprayed it with Scotch Guard

We cut the batting and fabric allowing a few inches to overhang (we could of cut it a little smaller, but better too long than too short, right?)


While David pulled tight, I stapled ... We do a few staples and repeat on the other side, and then on all four sides to make sure it is even pulled, and then finish at the corners.


For the corners, we pull it generally how we want it, pull the part that will be under the fold and staple, then mark off the extra fabric with a pencil (pretty easy to see what is extra once we started on the corner, basically anything that got in the way :) and being careful not to cut too much! and then folded corner, until we got the fold just right, this can be tricky! and then stapled in place underneath.


and a few process shots of the back, we reassembled exactly as we took it apart. Stretched the fabric across the back, layered the foam, batting, and fabric, stapled and cut off the excess fabric.


Finally for the cording to hide the staples, I followed Jenny's instructions from the Little Green Notebook for double cord welting (a lot easier than you would think!) and simply glued in place with permanent fabric glue.


and that was it!


I purchased the feather pillow insert from Ikea for about $7 and made the envelope pillow cover with Annie Sloan Links Indigo. 


 Without the pillow, you get a better view of the double cord welting around the back, it hides the staples perfectly!


I was considering doing a contrasting fabric on the back, but I am loving the simplicity of the white.


It fits perfectly next to our Annabelle's ottoman's and the bookshelf


 Our little watch dog - they lift her up perfectly to see out the window! Better than the chair, right?


and one last detail shot of the fabric!

I couldn't be happier with our first time re-upholstering, it was super easy! So if you see one of these chairs, grab it!

I've been hearing a lot about caning chairs, anyone else finish one recently?

Cane Chair Peek

I am almost done with the cane chair,  but couldn't wait to show a little peek of what it is looking like!


There is a lot of gray going on in the corner where it is going, so I went with a bright chartreuse. I just have the cording on the back panel to do, and then I am finished! 

Looking forward to sharing finished pics! and since this is the first chair that we've upholstered, I'll be sure to share my experience too!

Karlstad Sofa with Nailhead Trim


Doesn't my sofa look so much classier now? I love how nailhead can make an Ikea sofa look higher end (not high end, but higher :)

Yesterday, I shared my tips on how to apply nailhead, since the sofa is made of a plethora of different plywoods, not all of the nails went in the same, so I had to remove more than usual, but about an 1.5 hours later I was finished!


Due to the padding on the side, I couldn't get as close to the edge as I would of liked ...


and a little preview of our not so exciting light in the office area ... don't worry, I have a new one to swap it with :)

Hopefully, I can make some final decisions on the cane chair this weekend ... I'm being indecisive!

Happy Friday, hope you have a great weekend! 


Tips for Applying Nailtrim (and what I'm nailheading!)

As I finish the cane chair, I thought I would share another project that I've been working on ...

Yesterday I decided to put nailhead trim on our sofa. The other week I mentioned it to David and he was unsure, because of what was underneath ... so I forgot about it. Today as I was looking at it and I decided to try it, whats the worst that could happen a few little holes?


After applying nailhead to the Tufted Headboard and the Ottoman I've learned what works best for me, so here are my tips!

First, one of the most important things is to buy better quality nailheads (i.e. not from wal-mart). It will help keep the nails straighter as they go in, mine are from DIY Upholstery Supply

Also, I like to use a tack hammer rather than a rubber mallet because I have more control (I haven't had an issue with damaging the nail ... as long as I don't hit it too hard :) 

Here's how I do it:

1. Align the nailhead as close to the edge as possible to keep a straight line - this was pretty easy on the headboard since the wings didn't have a lot of padding, the sofa was a little more difficult.

When aligning the next nail, hold it above and center it, aligning it with the edge of the previous nail

2. Hold the edge of the nail with your pointer and thumb and lightly tap the other edge with your hammer until it grabs the wood


3. Hammer harder (once your thumb is out of the way!) till it is almost all the way down


4. Then tap back and forth until the nail is straight


5. and then hammer all the way!


It takes a little practice, but eventually you get in a rhythm and goes by pretty fast!

It's almost done - finished pictures soon!


My DIY Must Haves: Power Tools


Last week one of my reader's asked for a list of my must have tools for DIY projects. Since we move every few years (and pay to move most of it) we don't want to have a lot of extra stuff, so we try to keep our DIY supplies to a minimum (which can be hard!)

Today, I thought I would start with power tools, because 1. they are the key to building most things 2. they typically make projects easier and faster!

So here we go!

1. Cordless Drill/Drill Bit Set - We use this for pretty much every project ... for the most part it floats around our home! Cordless is a lot better than corded because it has better mobility. Our drill is a Craftsman from Sears and is still working great after several years ... there are a lot of great drills on the market (I think I would prefer something a little smaller, because it can be a little awkward, but David is fine with the size ...)

2. Jigsaw with wide straight cut blade (on ground in photo) - This is a great compact, versatile saw. Yes, typically used for cutting curves, but with the straight cut blade it can make fairly accurate cuts (not perfect)
 
Another tip for getting straight cuts is screwing a 1x3 or similar board to the what you are cutting and run the jigsaw along for a guide line, when done remove the screws and admire your cut! (make sure to screw into the part that won't be used)

The jigsaw may not be the correct saw for everything, but can get the job done (for most DIY projects) if you don't have a chop saw or table saw.

3. Dremel tool - has lots of great attachments to cut a variety of things, we mostly use ours to cut small amounts of metal, like the brass tube for the pendant light in the bedroom

4. Chop Saw - You can get by without (depending on the project), but if you are making a lot of straight cuts, this will save a lot of time increase precision! Ours is a Dewalt 12" Double-Bevel Sliding Compound Miter Saw. Since it slides, we can cut up to a 14" board ... we used this to build the sofa table and the tv stand - these projects would of been basically impossible (or taken too much time/not accurate) without it. It is also crucial for cutting 45 angles like the frames for our floating gallery wall (This can be done with a hand saw and miter box, but if doing a large amount, the chop saw will save a lot of time and blisters)

An electric sander is definitely on the list, but I will talk about that with sanding/painting! 

And last but definitely not least, below is the safety equipment that we use on a regular basis with these tools


A respirator (don't want to be breathing wood particles in!), Ear muffs to protect hearing while cutting or using the electric sander , and goggles to protect your eyes from flying debris! Thick gloves are also good when handling wood to prevent splinters

In the future? a table saw would be perfect for long cuts and a finish nailer/compressor would be great for upholstering! (I think my hands are going to be tired after finishing the cane chair!)

I'll be back soon to talk about the rest of my DIY list must haves! 

--


I primed the cane chair yesterday ... painting up next!

Weekend Find: Cane Chair

If you follow my instagram feed @sarahmdorseydesigns you might of seen this neat little chair found at a consignment shop ...


Love the caning and the interesting lines, but the upholstery's time has past. There was so much dust when removing the fabric and foam that I think I'm going to replace the foam as well and nix the tufting.


Here it is after demo - it's kinda hard to see in the photo, but the wood has a weird speckled finish, so I plan to paint as well. Luckily the caning is in great shape!


I am thinking of using this white Waverly fabric (actually very white, instagram darkened it up) with Scotch Guard, but am having second thoughts ... does any have any experience with that on a piece that isn't used everyday?

I'm off to prime and paint!

I've come full circle

I am revisiting my very first post, the first nightstand/dresser in the master bedroom. I've wanted to paint it for a long time, like ever since I finished the other nightstand/dresser in SW Anew Gray.

For some reason I have a habit of seeing something I want changed, walking by it every day (in this case sleeping by it), thinking about it, but then put it off, and once I do fix it, I feel soooo happy ... you think I would learn! ha

Anyways, the dresser had a blue tint (grays can go blue so easily!) SW Anew Gray is a nice warm neutral gray.


I gave it two coats with XIM Extender mixed in to reduce strokes, rolled it on with a foam roller (which works great for flat surfaces!)


The drawers have been lined too, I found this on Amazon, but my latest favorite is drawer liner from Marshalls/TJ Maxx, cute prints and cheap!


Happy Friday, I hope that you have a great weekend! :) 


Powered by Blogger.