Friday Finds: TJ Maxx and Habitat Restore

Here's what I've found this week ...


I love Wednesdays at TJ Maxx and Marshalls, their shipment arrive then so I have first pick! I found these gorgeous Danny Seo runners. I grabbed two because I wasn't sure what size I would need, so one might be going back ... I am considering painting, but was concerned about the height of the jute, maybe just one thin coat would work? Anyone painted a similar one?


My fascination with ugly light fixtures continues ... maybe another mirror and mini mirror? Those little panes of glass are too cute!

I've got a lot of projects on my list, now I just have to decide what to work on ...

Hope you have a great weekend!


New Prints in the Shop!

Humpday Giveaway: Fretwork Inspired Stencil

Today's Humpday Giveaway is a custom fretwork inspired stencil designed by David and I!

If you follow me on instagram (@sarahmdorseydesigns) you may have gotten a peek yesterday ... 


It is 12"x12", clear and reusable ...


I stenciled a little canvas to give an idea of the pattern, but this would look great on the back of a bookcase or a feature wall, a stenciled lampshade would look fabulous too!

I'll be selling this and other designs on my Etsy page, let me know if you have any other great ideas for a stencil!

To enter for a chance to win use the widget below!

a Rafflecopter giveaway

Good Luck!

Online Design Consultation

I recently finished an online design consultation and thought I would share!

My client and her young family live in an 80+ year old bungalow, which is full of character, but not space. The living room is only about 13'x12' and needed to function for both relaxing/tv watching and entertaining/conversation.

To maximize seating and storage in a small space I made a few items multipurpose to fit the scale of the room while meeting their needs.

To stay on budget, I decided to mix new items like a new sofa with a few DIY projects, such as a refinished dresser and chair.

My client loves color and pattern and wanted to include colors inspired by a peacock, so that is the direction that we headed in!


She found an amazing serpentine dresser at a local flea market for $25. It needs refinishing, but since it has a beautiful wood grain, refinishing it in medium brown would be a great option ... 

or a fun peacock blue would look fabulous too! 


Here are some of the features of the room:

Seating was maximized by a long sofa, chair, upholstered ottoman/coffee table which can be pulled away from the sofa when additional seating is needed and a few poufs that are able to be moved around as needed. 

The dresser will provide much needed storage and rustic crates on wheels under the sofa and upholstered ottoman will be great to store kids toys and blankets. 

My client currently has a rectangular coffee table that she will be upholstering with foam and a faux ostrich; however, if more storage is needed a flip up storage ottoman would be perfect!  

Fabric trimmed Lenda draperies from Ikea were a great way to stay on budget while adding a custom look that brightens up the room. 

Hanging framed art around the TV was a good solution to incorporate the TV within the gallery wall. 

and frame shelves are a great way to add a little extra visual interest to a narrow walkway! 

Finally, a few 3D shots to get a sense of the space:


I really enjoyed worked on this cozy living room, and I am looking forward to seeing finished photos when its complete!

If you are interested in design consultation for all or part of a room, feel free to contact me at sarah dot m dot dorsey at gmail dot com

Drapery Panels for Closet Doors

Mission accomplished! This weekend I set out to improve my closet situation ... I considered hiding the mirror with vinyl (thanks for the comments!), but ultimately decided that I hated moving the doors back and forth, they were heavy and I like being able to access the whole closet at one time, so I decided to remove them ...


and put the ruffled draperies in their place! Yes it is a little confusing to have them in the before photo (I wonder if that is where I got the idea from?)


This was super easy, here is how I did it:


I measured the length needed, luckily it turned out that I just needed to be one ruffle short. So I could hang these as 90" panels again, I simply folded one ruffle under and pinned on the back (about 8 safety pins per panel) This worked well on my draperies because the ruffles hide the pins, since I only pinned through the back panel of the drapery.


I purchased a drapery tension rod from Wal-Mart for $6.97 that would work for the 58" opening (if it was 48" or less it would of been only $2.97)

I adjusted it to the correct length and installed inside the upper track for the previous doors.


Then I cut a 3M picture hanging stripe in half, and installed it on the back of two hooks purchased from Joanns last fall on clearance (Urban Outfitters has identical ones here


Since these aren't actual tiebacks they don't hold the entire drapery, just kinda pinch it open


I think I actually prefer that look ...


And that's it, a super easy/cheap update that took about a 1/2 hr total and only $6.97!

I have plans for new draperies for the windows ... involving Ikea. I was going to make the 3 hr. trip this weekend, but yet again they are out of stock of an item that I want, and making the trip for some and not all the items didn't make sense. So new draperies will be put on hold for at least one more week. I wish Ikea shipped more things!

I hope that you had a great weekend!


My Closet Doors ...


I'm on a mission this weekend to improve my boring closet, while keeping the doors unharmed! If you done or seen anything fabulous, let me know!

Wish me luck!

What's in my Cabinets

Recently I got a Silhouette Cameo and I've finally put it to use! A year or so ago I purchased a container for the flour and as odd as this sounds, I couldn't be happier with it. I know what you are thinking ... is she really that excited about a flour container? Well this one is perfect, it has a wide opening so I can measure and level the extra off without flour going everywhere. The top snaps on an off like a breeze and it also seals really well (it's Food Network brand found at Kohls).

Anyways, I decided to invest in a few more containers that will hopefully make me equally happy, while organizing my mini pantry.


I love things organized, but I tend to get overwhelmed when I try to do it all at once,  so I've decided to tackle it little by little (like cabinet by cabinet little)

For now we just have a few cabinets devoted to our pantry (hopefully a full size one will be in the future next time we move!)

So I took everything out and decided where it should go and how it should be stored (moved somethings to another cabinet, and moved somethings in)


I moved these baskets from Ikea on top of the microwave, don't they fit perfectly there? They hold coffee/tea items and canned goods that I use on a regular basis for easy access. The jar to the right holds Annabelle's treats, David gets up way to early for work and she always goes to the kitchen (half sleepy eyed, I hear) to get her treat while he eats breakfast. So having that within reach was important too!

I moved my flour container from another cabinet and put the vinegars and other like items on a lazy susan, which makes them so much easier to access!


I covered a few jars in tissue paper from a Kate Spade purchase and mod podge. 

I found containers like my flour one at TJ Maxx, these were sold in a set of 6 that perfectly stack and are proportioned so that they are the same height. (They ended up being about $4 each)

I used the Silhouette Cameo to cut out these cut out a few labels ... 


For the top shelf, I put lighter items (so it would be easier to get down) that I don't use very often ...


I covered a peacock blue bin found at Target for $2.50 with fun polka dot paper from World Market 
to put medicine and vitamins in. Individually packaged mixes are next door in a plastic bin, but I would like to find something a little bigger to fill the space. 


Such a big improvement! I'm looking forward to tackling the other cabinets! 

How to install a drum shade over a chandelier

Today I thought I would share with you how we made the drum shade chandelier. We started with a massive chandelier with a glass shade. One advantage of a HUGE light fixture is that there are lots of parts! We were able to get everything (but one little part) out of the this fixture - hooray for not having to buy extra parts!

Below I drew a section (drawing cutting through the fixture) to explain how we put it together.


Here's how we did it:

1. The piece that covers the electrical housing was taken from the top of the chandelier (ours was just big enough to cover the hole)

2. The long rod with treaded ends was the main brass tube that the chandelier hung from. It was simply screwed into the existing housing at the top. This piece was about 8" long.

3. A lampshade with a spider/harp fitting was held in place

4. and a small threaded rod connector (~.5") was screwed into place holding the lampshade. I purchased a threaded rod kit from Home Depot for the folded rope dome light and had this piece left over ...

5. A shorter rod with threaded ends was taken from the top of the fixture (inside the top rounded piece to connect the chandelier to the very top of the fixture) This piece was about 5"

We then installed it in the existing electrical housing. It was a little awkward to install, so I held it in place while David connected all of the wires.

and that's it! a definite upgrade!


80s Chandelier to Glass Mirror | How To

Friday I finished my DIY glass pane mirror and I am in love with the finished result!


Like I mentioned on Friday, we decided to hang it in the guest room above the desk (from the master bedroom) and moved the coral dresser next to the closet (I plan to also turn this into my sewing/diy room)

Here's how we did it ... (with a few tweaks of what I wish we would of done to make it faster)


We took apart this 80s chandelier (in EVERY thrift shop) and removed all the metal from the slanted glass panes.

Our chandelier had 16 (7.25” long and 5.75” at the widest point) slanted glass panes - we used 15. The finished mirror was 28.75” in diameter with 1/4" spacing between the panes.

After gathering our supplies:

1/2 sheet of 3/8" plywood (Ace Hardware lets you buy 1/2 a sheet)
Paint
Weldbond glue
Jewelry wire
Melamine edging
15" round mirror
Grout
Rub n' Buff

We laid out the glass panes in a circle on a piece of plywood slightly larger - since our panes wouldn't work without a gap, we gradually adjusted until the spacing was equal (about 1/4" between each)


Once all the panes were equal, we marked all of the corners and outer edges so that we could easily line it back up and for the outer cut.

 
We painted the panes before this step, but I wish I would of done it after, since moving them around removed some of the paint, and touch ups were needed.

After the panes were marked, David cut out the plywood back following our outer pencil marks with the jigsaw and then sanded the edges.


Now onto the pretty stuff! 


We used an airbrush (we have this one), since we wanted to use the same paint that we used on the chandelier - BM Bali - Spray painting would work great too! (prior to painting, make sure to tape off the front to avoid over spray)

Next, our mirror selection ... 

We ended up getting a 15" round 1/8" thick mirror cut at a local glass shop to slightly overlap the glass panes since getting it cut to meet the 15 angles created by the glass panes would be hard to get precise, and very costly!

Instead, David cut 1/8" pieces (any shape will work since it is covered) of lauane with the chop saw (slightly smaller than the panel) to glue to the back of the glass so that the glass panels would fit just over the mirror and be flat, rather than tilted (tip: ask for a scrap piece of 1/8" board, we got ours for a whopping .25 from Ace Hardware)


These were glued on the back of the painted glass panel with Weldbond glue - our paint looked discolored for about 24 hrs until it fully dried, but then evened out perfectly!


I glued the mirror with Weldbond glue to the plywood (using the pencil marks that I created earlier to center it)


Then I laid the panels out, applied Weldbond glue to the back side and allowed to a few hours so that they were firmly in place (tip: place heavy objects on the glass to hold it down while drying, I used a few books).

After it dried, I applied grout (like you would tile), but instead I would recommend putting the frame first to avoid redoing work like I did :)


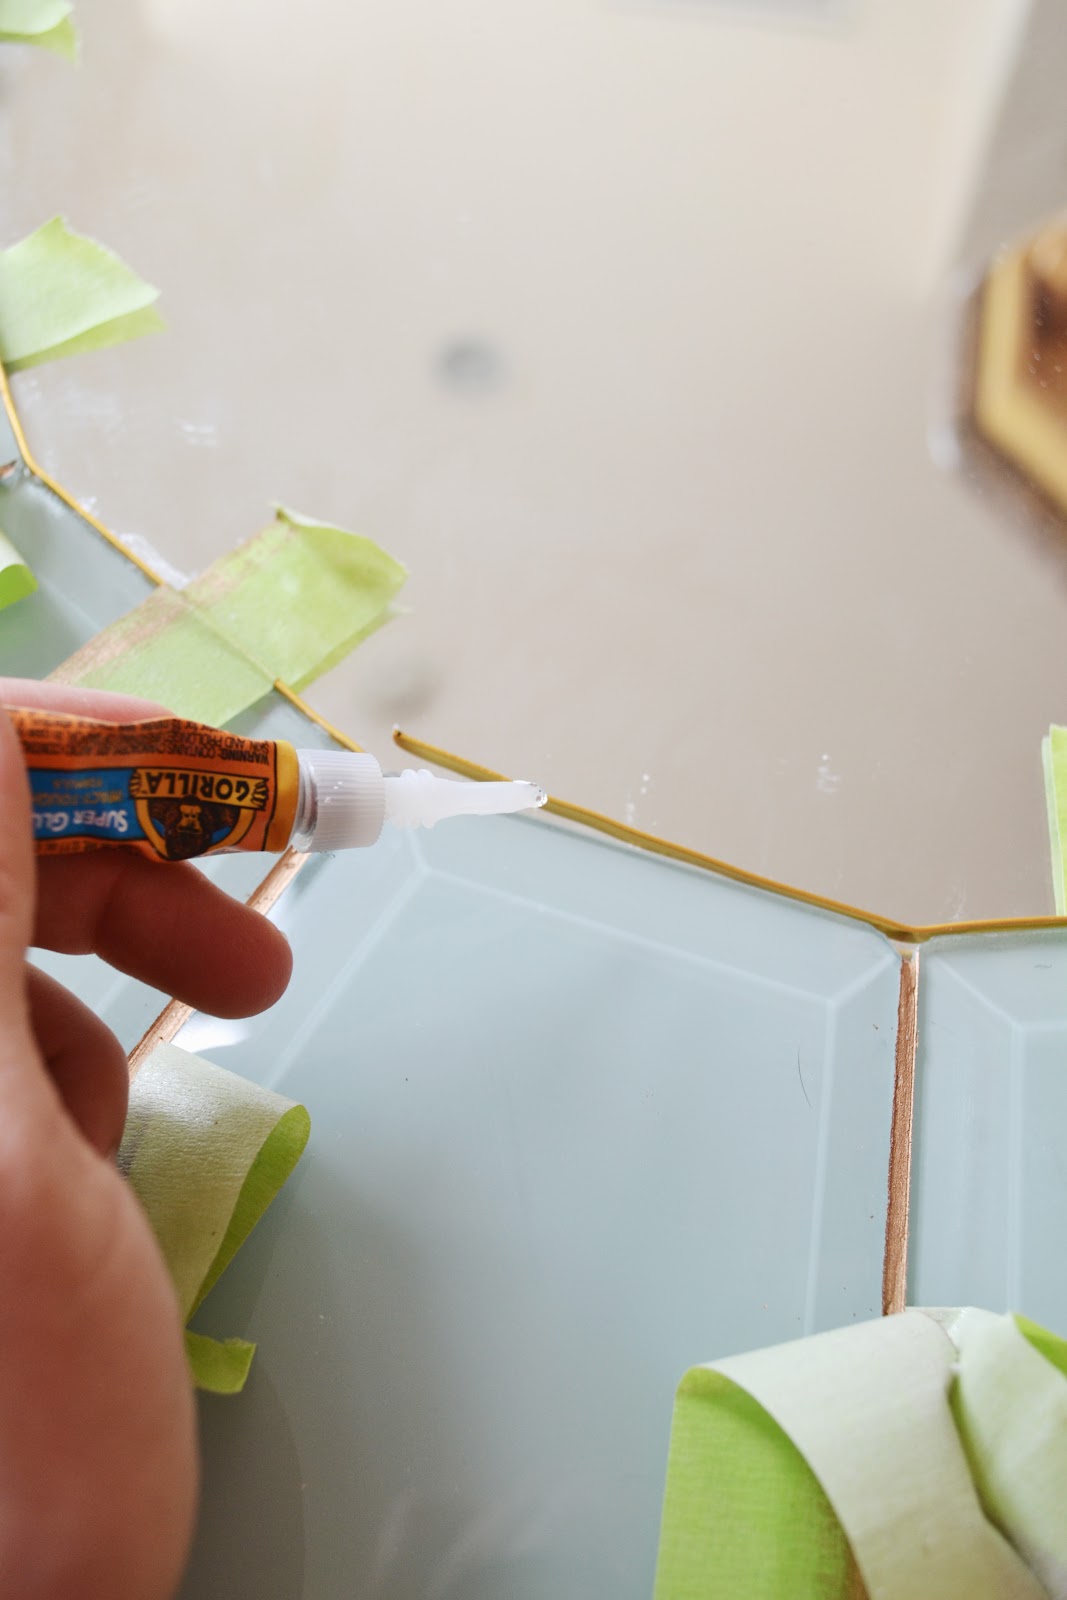
I used rectangular jewelry wire to build the frame for the inside (it was slightly taller than the glass panels) First I laid out the overall shape by bending in the creases and then applied a super glue to secure it (note: to smooth out the wire as you go use something firm - I used a wood putty knife to straighten it by gently pressing against the pane to get it even. I also used tape after the glue was applied to hold in place until dry)


I would of preferred a similar metal strip for the outside, but since I couldn't find one wide enough (and flexible enough) at a local store, I purchased melamine edging, for the outer edge. Mine was too wide so I cut it to the correct width with a ruler and xacto knife. I glued it with the Weldbond glue, but wood glue would of worked fine too. I also used tape to hold it in place while it dried.

Once the outer edges are dry, its time to grout!


Apply the grout as you would to tile, make sure to fill in all of the crevices!


Once the grout is dry, I taped off the glass and mirror and then applied Rub' n Buff (I used Antique Gold) over the grout and the trim and then wiped away any exces.

After removing the tape, we used D rings and heavy gauge wire on the back to hang it, since the mirror is very heavy we also applied a little Gorilla Glue in the screw holes for added strength and wire rated for 100 lbs (just to be safe) We then used a drywall anchor like this for the wall that could handle the weight (always look for a stud if possible!)

I did all the finishing touches bent over the floor, I wish I would of used a lazy susan turn table on the table (would of made it much easier!)

and that's it! The mirror ended up at 28.75" in diameter. The perfect size for above the desk in the guest room!


Cost Breakdown and Sources:

Chandelier (already purchased for the drum shade chandelier)
Paint BM Bali (already purchased for drum shade chandelier)
Rub n' Buff (already purchased at Michaels)
15" round mirror ------------------- $14 (local glass shop)
Brass Jewelry wire ---------------- $3 (with 50% coupon at Michaels)
Melamine Edging ----------------- $5 (Home Depot)
1/2 sheet 3/8" plywood ----------- $6 (Ace Hardware)
Weldbond glue --------------------- $3 (Micheals)
D Rings ------------------------------$2.50 (Home Depot)
Heavy Gauge wire (already had) 
                                   
Total --------------------------------- $31 

It helped that I already had some of the supplies, but I would say starting from scratch, it could be done for under $50 easily, with supplies left over to make another!

This mirror looks high end for the price (at least I think so :), so be on the hunt for a chandelier with a massive glass shell!

--

Update: After hearing from a few people that the glass panes were difficult to remove from the fixture I wanted to mention that our frame was pretty loose and fairly bendable. I have seen ones that are very tight around the glass, so if you would like to try this, I would definitely recommend looking for one that is looser around the glass panes :)


Creating with the Stars
Powered by Blogger.