Weekend in Photos: vintage furniture, swapping lights, and beach time

David's brother and his wife moved to CA earlier this month and this weekend they came to see us! We had SO much fun spending time with them - going to a few of our favorite places!

Before they got here, we stopped by one of our favorite shops (I guess you would call it a vintage boutique?) Ruby Rose. They have a wide variety of collected items, such as this awesome old motel sign.


David found a money bag and I added a few more letters to my collection. 


We haven't had a pendant in our room since CWTS in March (We took it down so it wouldn't be in photos for the final week). So we finally got around to installing one! We grabbed the the guest room pendant and put the one that used to be in the office there. I'm always moving stuff around :)


Friday night we relaxed under the outdoor heater's and had dinner at Custom House and Saturday we all relaxed on the beach.


After dinner we visited  the seals / sea lions on the pier


and took photos near the water.


Sunday afternoon while we were picking up a few supplies for projects we stopped by a consignment store. They had a pair of chairs that I got for $20 each! The caning is in great shape and the wood (oak) looks great too! I'll probably sand and re-stain them. The upholstery is old, so that will need to be replaced. I wasn't really looking for more chairs, but these were too GOOD to pass up!! Love them!


Every weekend doesn't include great deals on furniture, nice drawn out meals near the water and tons beach time, so we'll enjoy and celebrate when they come! After all, we'll be moving at the end of summer/fall so we better enjoy it while we can!

We didn't finish a project this weekend BUT we made design decisions on a lot of things!! For now, I'll say that our round roadside find table is looking A LOT different! Can't wait to share it with you soon! I see a lot of time spent in the garage in my near future!

Hope you had a great weekend!

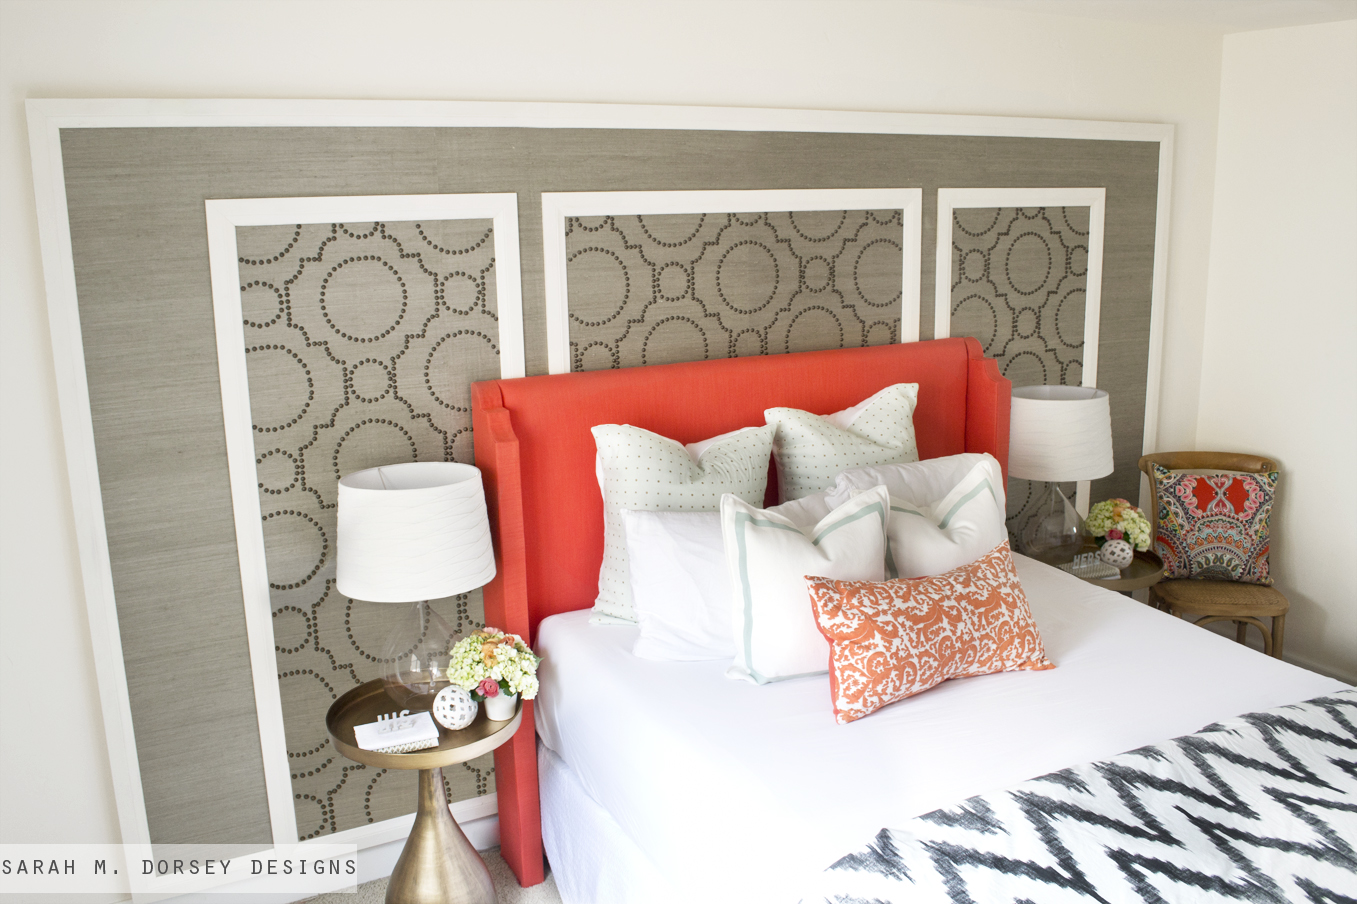
DIY Coral Upholstered Headboard with Curved Arms

Today I'm sharing how we built our coral custom headboard. If you missed the tutorial for Creating with the Stars, read on to see how we made it! 


The headboard was kinda a spur of the moment decision, I went from a wood headboard with nailhead (prior to deciding on the nailhead wall), to a black or white upholstered headboard, and then finally I decided that the room needed a punch of color. Using a coral drapery panels from Target was perfect because it was fairly heavyweight and readily available (perfect on short notice!) 

We made a plan and gathered our supplies.

1/2" plywood (1 sheet cut to width of bed frame, the 8' side was cut to 62.5", 4' side left as is)
2x8" (x2)
1x8 (x2) 
1x3 (x4)
heat n' bond
batting 

I drew a few diagrams for the basic construction and dimensions of the headboard. See below for some the specifics on the upholstery. Measurements are for a queen bed frame. Note: make sure to measure your bed frame first, in case yours is different! You want to make sure that the frame will fit inside of the arms. 


For the arms, we screwed a 1x8 and a 2x8 together, measured and drew the circle with a lid. We then followed the line with a jigsaw to cut it out (we did remove any screws that were in the way first!). 

We were originally going to leave the arm square, but then decided that mimicking the edge of the nailhead design would tie in with the wall and give it a custom look. 


For the foam, we cut a 3" camping pad in half and attached to the plywood with spray adhesive.

Next we upholstered the back piece by wrapping in batting and then fabric. To make sure that the top was pulled evenly, we attached a thin strip of scrap wood and pulled tight. This made it much easier to get an even look! 


We cut the fabric to wrap around the entire arm, starting at the inner part of the arm, we put a few staples in (on the inside so it stays in place while you attach the arm), we cut little holes in the fabric at the pilot holes (where arms attach to the frame). We then installed the arms with heavy duty screws (we used cabinet anchors) and attached it to the 1x3 frame. 

Sorry for the late night, low light pictures (proof that we we're working late into the night :) The top left image shows after the fabric was placed between the center section and the arm (fabric hanging loose) then the arm was secured to the center section with cabinet anchors. The top right image shows the fabric wrapped around the arm, then it was pulled tight and stapled. The excess on the top was cut about .5"-1" (making sure not to cut too close to the edges that would show) above the top of the arm, folded over, stapled and ironed. It doesn't have to be pretty on the top because that will be covered next. 

We cut a band of fabric the total height of the arm (accounting for the bends) plus a few inches and the width (2.5") of the front of arm plus enough fabric to fold under (at least .5" on each side, so at least 3.5" total). We folded the raw edges under and pressed with a hot iron so that the edges were crisp and attached the band to the arm with no sew adhesive (my preference is heat n' bond) and a hot iron. Finally, the top and bottom ends were stapled to the back of the arm.

and that's it! 


I finished the bed off with a few DIY pillows. The euro pillow shams are made from a white table cloth and a mint polka dot scarf from World Market (March 2013). Since the scarf was translucent, I doubled it up with the white table cloth. The throw pillows are white shams from Ikea, I then painted a border using painters tape and BM Bali latex paint with fabric medium. The bolster pillow is a kitchen towel from World Market (March 2013) and the left over headboard fabric. 


Finally, here's where we got everything!

Headboard: Fabric Coral drapery panel from Target (x2), Batting, 3" camping foam from Home Depot only $20! Wood: 1/2" plywood (1 sheet cut to width of bed frame, ours was 8' side was cut to 62.5"), 2x8" (x2), 1x8 (x2) , 1x3 (x4) Home Depot

Bedding: diy Euro Sham - mint and polka dot scarf from World Market, accent pillows from Ikea border painted with BM Bali with fabric medium added, bolster pillow - dish towel from World Market (like this, but in coral), Duvet cover, West Elm Organic Chevron 

Want to see how we built the grasscloth + nailhead feature wall? Check out the tutorial here 


Grasscloth + Nailhead Feature Wall Tutorial

I realized that after Creating with the Stars, I never shared the full tutorials on how we built our grasscloth + nailhead feature wall and our custom upholstered headboard. So today I'll be sharing how we built this massive feature wall and tomorrow I'll share the headboard.  


Living in a rental makes it nearly impossible to install classic wallpaper and nailhead, so we decided to build a seperate feature wall! 

We wanted to incorporate two of my favorite materials, nailhead and grasscloth wallpaper. I love the texture of the wallpaper and the dimension of the nailhead. So I was determined to find a way to make it work! 

Want to know how we built the wall? Here we go! 


We purchased three sheets of plywood from Home Depot and had them cut to 7' high. Since the feature wall is 12' long, it would need to be built inside of the room. We designed it so that it could easily be dismantled into three pieces to be removed. We tied the seams together with 1x3s and built a frame on the back with 1x3s so it was extra sturdy and straight. We then flipped it over and primed it so that they wall paper adhesive wouldn't soak in. **side note: it was SUPER tight in the room, we basically had about a foot on all sides to walk around and yes, that is the mattress shoved into the bathroom, it barely fit!) 


Once dry, we cut the wallpaper to the correct height, placed it to the side and rolled wallpaper adhesive over the primer. We then used a wallpaper smoothing tool to remove any bubbles. The steps were repeated with 4 rows across, lining up the seams. It was helpful to have two people so that it could be adjusted as needed!


For the design, I was inspired by this fantastic headboard by Annie Selke. We created the design in Illustrator, and calculated the distance between the nailhead and printed it on two sheets of 11x17 which were taped together (You can download our version HERE, print on two sheets of 11x17 - design overlaps so use the extra design to help line it up before taping). We then punched little holes through the dots and used a felt tip pen to lay it out on the wallpaper. 

Nailhead isn't the most fun thing to apply, but once you hit a rhythm you move pretty fast!  Here are a few tips that I found helpful as I went. 1. To help protect my fingers from the hammer and to grab the nailhead more easily, I used rubber finger tips on my thumb and index finger (you know the ones that they sell in the office supply stores for sorting paper and such?) When I did hit my fingers, it hurt a lot less, and they weren't even sore when I was done! 2. If your wood is soft enough, push a few in with your finger first and then hammer. This saves time since you are putting the hammer up and down less frequently. Since our plywood was soft and hard in different spots, this wasn't always possible, but it helped when we could! 3. Lastly, this feature wall took about 2,000 nails. Wow, that's a lot of nails! So it was helpful to have two people or if you have the time, break it up over a few days. Total install time for the nailhead with two people was about 8 hrs. 

We installed the trim (we painted first) before the nailhead reached the edge, so we knew exactly where to stop it. We used finish nails to secure the trim and then filled the holes with wood filler , sanded and painted once dry. 

Next, we decided that we wanted the wall to sit just above the trim, so we cut legs to height out of a 1x12 and secured it to the back frame. We then installed a few cabinet anchors through the trim into the wall to make sure that it was firmly attached. 

This wall was pretty massive! Almost the length of the room, but I LOVE the impact that it has on the space! Just because we are renting doesn't mean that without a little creative thinking we can't have a statement wall!


I love how the grasscloth slightly shimmers depending on the lighting.


The nightstand is from World Market, the sphere from TJ Maxx and I picked up little letters (to spell his and hers) from a local antique store, books were wrapped in paper from the Paper Source.


Hydrangeas and Ranunculus are two of my favorite flowers!


This week was sponsored by Home Goods, and if you read my blog, you probably know that I'm pretty obsessed with the Home Goods/TJ Maxx/Marshalls brand! I love the thrill of the hunt, designer names and the affordable prices!

I picked up a cute accent chair, fluffy white rug (my puppy love it too!) and the white sphere!


Finally, here's where we got everything! (headboard resources tomorrow)

Feature Wall: Grasscloth wallpaper, Nailhead (we used about 2.25 boxes), Trim- I found 2.5"wide synthetic trim from Home Depot on clearance for $4/8ft board

Accessories: Night stand (World Market - not on website), decorative sphere (TJ Maxx), His and Her letters (local antique shop), Throw pillow on chair, chair (TJ Maxx), lamp and lamp shade, duvet cover

DIY in 1 hour or Less | Fabric Mousepad

Yesterday I was looking down at my mousepad and it I was thought, why have I left it this ugly for so long?? Do you ever just have to fix something right away?

I grabbed a few supplies that I have on hand and 10 minutes later I had a brand new mousepad!


Here's how I did it ...

I did it two ways, so here's the first.

I tore off the top of the mousepad (it was loose and came off easily, but it could have stayed on) and then I traced the mousepad with a pencil on the fabric.


I cut along the pencil marks with an xacto knife.


and then took it outside to spray the top of the mouspad with spray adhesive. I laid the fabric on top and trimmed any stray fabric. To help seal the edges I applied a little Mod Podge (any clear craft glue would work) with my finger along the edge. 


For the second mousepad I decided that it would be easier to not trace the mousepad and cut the fabric separately, but to apply the spray adhesive to the mousepad and then put it on the fabric (right side out). I then simply cut carefully along the edge with scissors. To finish, I used Mod Podge to seal the edges. I'd recommend this method since it was faster (maybe just 5 minutes), but both methods were super quick, so either would work well!


Here they are in their new homes! 


Such a great way to use extra fabric and match your space!

Total Cost ZERO - since I had everything on hand! Aren't those projects the best??  


Ikea Rast Dresser Hack | Fabric Wrapped with Custom Ring Pulls and Acrylic Casters

Over the weekend we finally finished our fabric wrapped Ikea Rast dresser!

These dressers are such an amazing price, only $35! The wood and building materials to make this yourself would be more, so buying is definitely worth it! While Rast hacks are nothing new, I couldn't help putting my own spin on it! Here are a few of my favorite fabric wrapped pieces, Centsational Girl, Hello Boudreau, and Recently.

I basically followed Martha Stewart's instructions to cover a table top with linen, here's how we did it!


First I used heavy starch to make the fabric stiff; however, it didn't work very well with this fabric, mine got much stiffer when I used a linen in my fabric wrapped parson's table. So a linen might work best for getting the fabric really stiff, though this worked fine too once it was ironed on to the wood. 
 
I placed the Rast dresser pieces on top of the fabric, a drapery panel from Target, and cut it out with enough to wrap around to the back. (Make sure to be mindful of the pattern direction, I had to redo one drawer front ...) I brushed water based polyurethane (satin finish) and then ironed. I also placed a piece of white paper on top to protect the iron from the poly (use your craft iron, you will probably still get some on your iron ... like me :)

We ended up wrapping the pieces individually, which meant the sides the top needed to be attached first with the fabric between the top and side since the screw holes are exposed and then insert the screws, and then apply poly and iron. It would be quicker to assemble the entire outside and then wrap that verse the individual pieces, so also consider doing it that way. I don't think that it would of looked very different, but would save time :)

I decided to line the inside of the drawers with extra white fabric and trim that I had, I think it gives a more polished finish!

To seal it, I applied a few layers of poly and then a layer of Briwax clear wax on the outside of the fabric to seal and protect it, like Martha Stewart's tutorial suggested. 

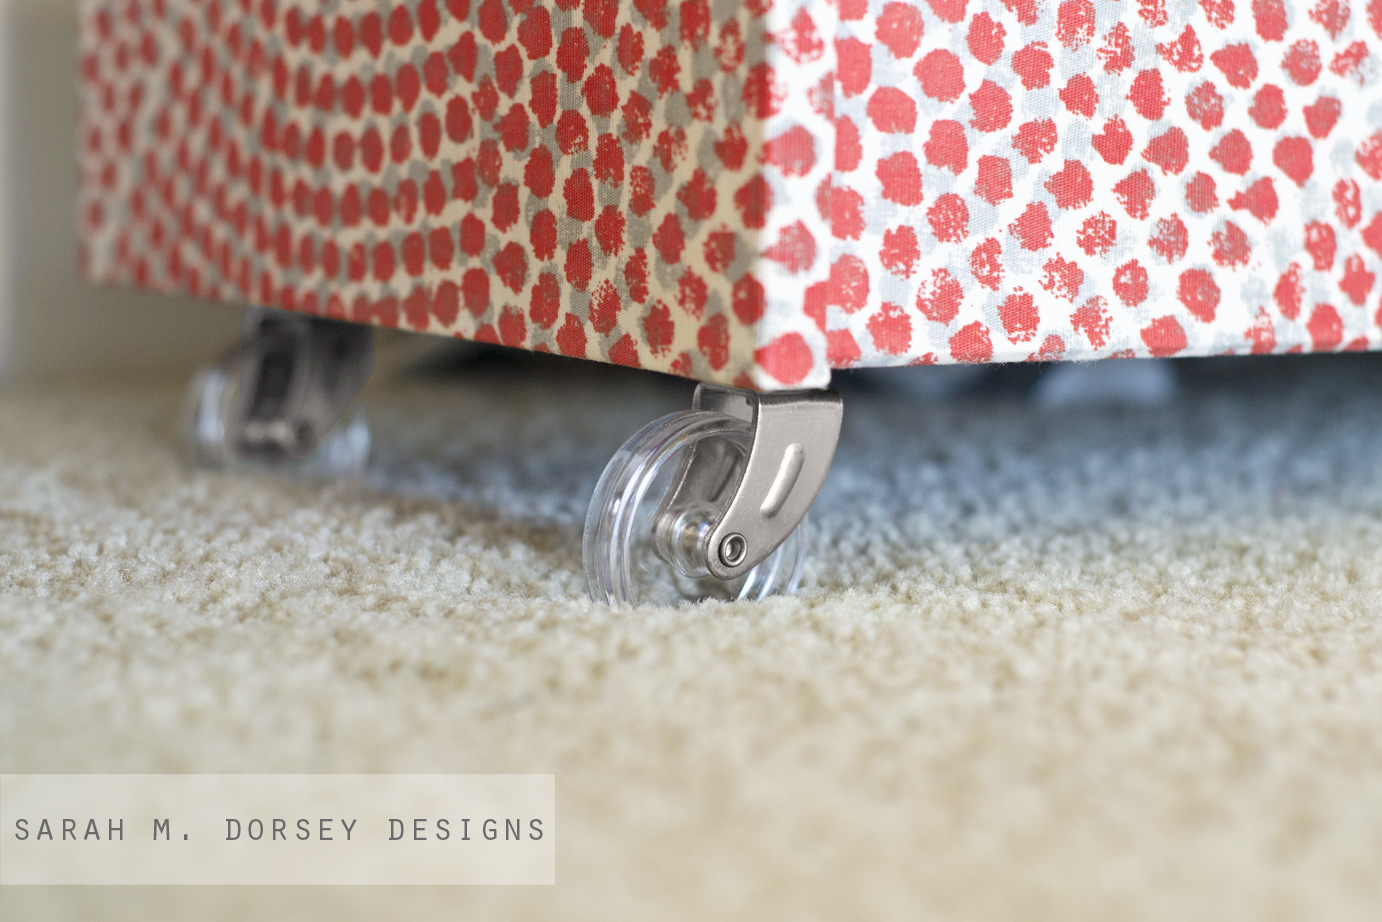
Before assembling the dresser, David drilled new holes to make the plate below the drawers flush instead of inset. We installed supports for casters out of extra 2x2s and followed the instructions to install the casters. We found brass and clear plastic casters from Ace Hardware, love them!! I then applied silver rub n buff to match the ring pulls.

I made my DIY ring pulls out of a cotter pin, inset washer, and 1" ring. The silver cotter pin was harder to open than the brass so I used pliers to open them instead of by hand. The cotter pin is inserted through the hole and then bent back on the inside of the drawer. (prior to applying the poly, I cut through the fabric at the existing hole with an xacto knife on both sides. I started on the back, where I could see the hole and the stuck the cotter pin through to find the other side, and then cut the front with the xacto knife) These ended up being only .96 each!! Such a good price!


How great are these clear casters? I really loved the brass with the clear, but silver works best with the fabric so I applied a little silver rub n buff.  

The flowers are from a friend's wedding this past weekend, love hydrangeas! 


and I borrowed the acrylic tray from the driftwood herringbone table. 


Cost Breakdown:

Rast Dresser: $35 (Ikea) 
Fabric: $25 (Target)  
Ring Pulls: $6 (Parts from Ace Hardware) 
Casters: $9 (Ace Hardware) 

Total $75

Not the cheapest diy, but for unique fabric and custom hardware, I'll take it! 

Have you tried a Rast dresser hack or fabric wrapped furniture project yet? I'm officially obsessed and can't wait to do more!! 

Ryobi Gift Card Giveaway WINNERS!!!


Hope you all had a great weekend!! Did you participate in the Ryobi gift card giveaway last week?? Read on to see if you won!

-- p.s. we finally finished our rast dresser hack ... stop back later today or tomorrow to see finished pictures!!

--

Big HUGE Happy Father’s Day to you, your daddy, your husband, grandpa, brother… ETC! These men deserve to be celebrated!!

And that brings me to the fact that today is THE BIG DAY that we announce the winner of our Massive RYOBI Power Tool Giveaway! Luckily, our little Rafflecopter form did the dirty work for us and pulled up our winner in the most random of fashion! Congrats to (drumroll please!)…
Hilarie Sullivan!
Check your inbox asap!
We were so honored that so many of you participated in the ‘Blog Hop’, and were surprised by how quickly we had our winner (Congrats Stephanie Richardson for winning the matching contest!). We got tons of positive feedback and are so glad that everyone enjoyed surfing around each blog! We just might make it harder next time!!!

In case you missed it, the premise of the contest was to match each blogger with a popular project of theirs. Here are the correct answers!


There’s an overwhelming amount of creativity and talent in this group, and you should definitely hop on board and keep up with each one! You’re sure to be inspired to the fullest.

And HUMONGOUS thank you to RYOBI Nation for supplying our giveaway prize! For even more inspiration, check out these great projects!


Get the Look | Bright and Airy Modern Foyer

For today's get the look, I'm featuring a bright and airy foyer with just the right amount of pattern and whimsy to keep it fun and current! I would love to have this amount of light in my foyer! Hello windows!


via pinterest (not linked to original source)


1.  |  2.  |  3.  |  4. + 4.  |  5.  | 6. 


1. If you've read my blog for a few months, you probably know how obsessed I'm with this folded pendant, I even DIYed my own version!

2. This wallpaper is so good! Maybe even stenciled instead? I love how it is just above the high wainscoting so that if you get bored it is less to switch out. Though harder to apply to the ceiling, it really adds so much more impact!

3. I decided to include this dining settee because it isn't too deep - perfect for a narrower hallway! It's not leather, but the price is great! 

4. Upholster a thrift store bench with a fun new fabric like this one from Premier Prints, I also love this one from Waverly! This may be the exact bench from the image (it may scare Annabelle (my puppy) though ...)

5. A blue glass lamp gives this space the perfect pop of color! I love how it balances the blue abstract painting on the other side.

6. A classic parson's table brings in classic lines to balance the bench. 

I love love love this space! Having a settee and a console table in a foyer (as shown in the picture), probably isn't an option for a lot of homes. Maybe our next place will have the space :) We can always dream, right?

--

You still have time to enter to win a $400 gift card for Ryobi tools!! Make sure to ENTER by Sunday!

--

I hope that you all have a fabulous weekend!! See you Monday!

Powered by Blogger.