Nailhead Metallic Linen Headboard | Tutorial

Thanks so much for your sweet comments on my post yesterday! Your support means so so much!

Today, I'm sharing our most recent headboard - a nailhead and metallic linen square headboard.


Nailhead can seem intimidating, but since working on several projects with nailhead (including this massive nailhead feature wall) we've found a few tips that make it go faster! 


Here's how we did it!

First, we used (for a queen bed)

Plywood (1/2" cut to 60" x 36")
2x2s for the frame (qty 4)
Metallic linen look table cloth (found at Marshalls) (I think it was around 76" x100", if you're buying yards, you need about 2)
Nailhead (UPS is the only shipping option listed online at DIY Upholstery, if you call, you can get USPS shipping which is about half the cost)
Cardboard upholstery strip
Upholstery stapler

First, we simply framed the back with 2x2s by creating a box on the outside of the backside of the plywood (legs extend from the top of the plywood to the floor. The total height of our headboard was 55"

We secured the plywood to the 2x2s by screwing from the top.


Since our fabric was semi transparent, we primed the plywood so you couldn't see any knots through the fabric.


We ironed and cut the fabric to size - enough so it could wrap around the sides.


Outside, we applied spray adhesive to the front of the plywood. Make sure to cover up anything that you don't want the adhesive on since it gets everywhere!

Then, we centered the fabric and applied it to the plywood, smoothing it. We lifted the fabric up and re smoothed as we went. Having two people for this step really helped!


You could just staple the fabric on the back, but for a more finished look we used a cardboard upholstery strip and an extra strip of fabric, stapled along the edge and then folded it over and stapled on the back.


Next, the pattern. We did a couple of versions and then landed on this fretwork inspired design. You can download our design HERE (it's a 10 page PDF, 1st page is the entire design, remaining 9 pages are the design, arranged top to bottom, left to right) Carefully tape them together. 


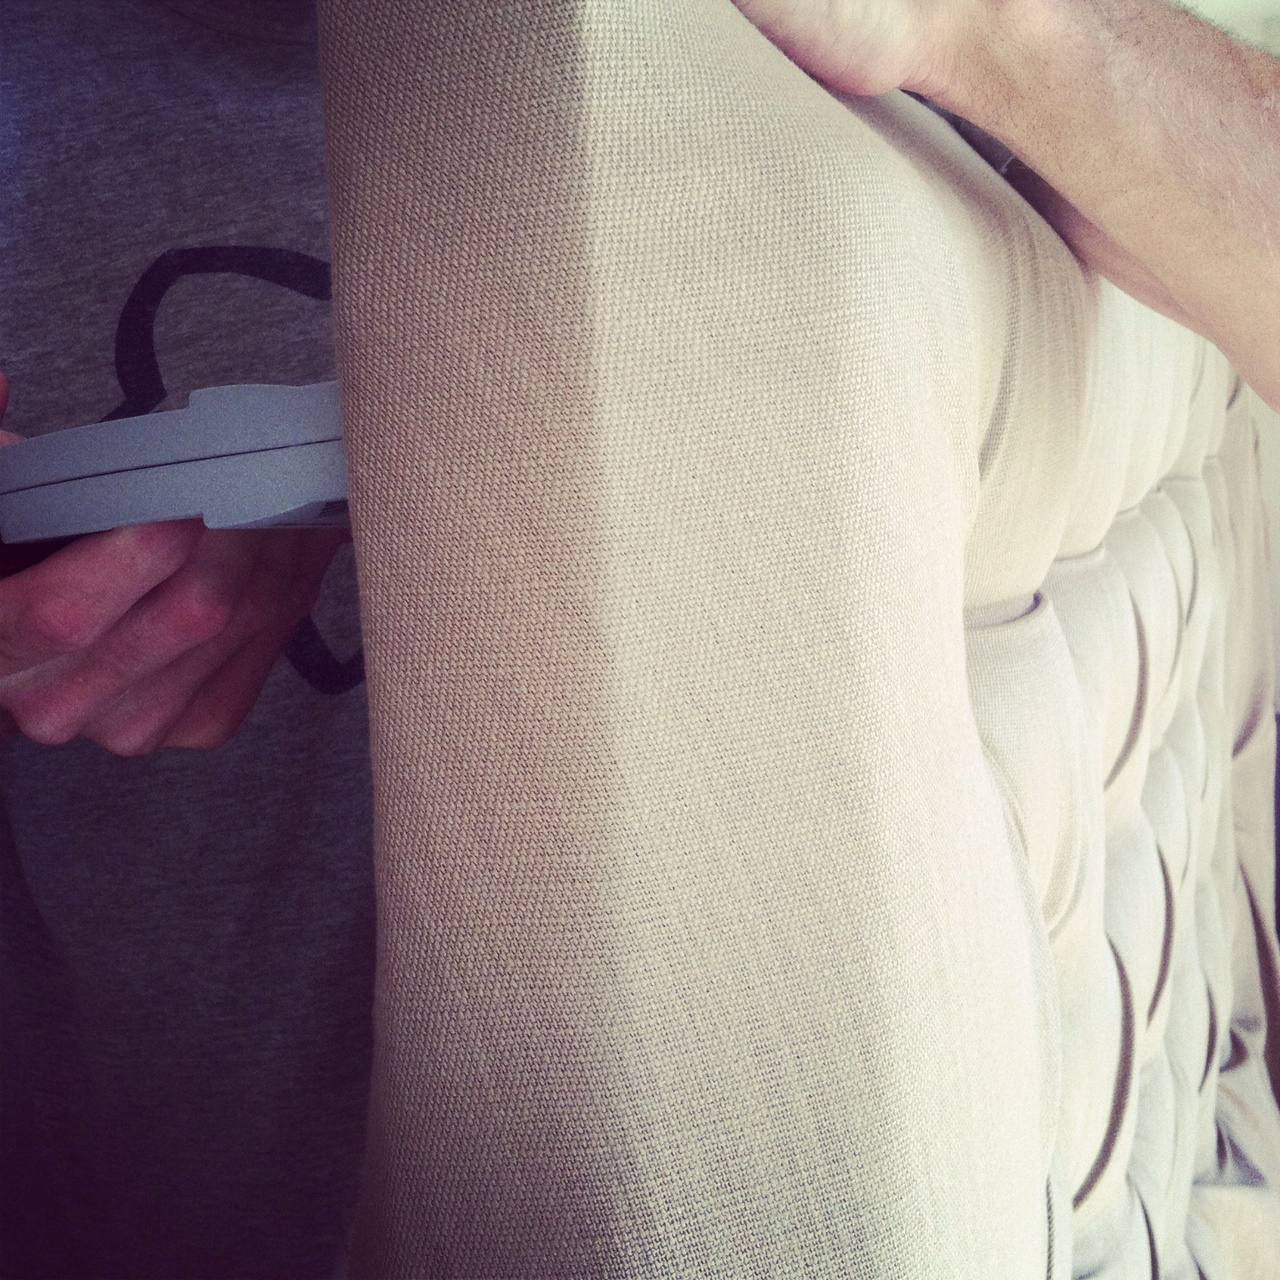
First, we poked holes through the center of each circle (we use an awl - used to mark metal) off of the headboard. Next, we centered and leveled the pattern - we took a lot of time ensuring it was even so the pattern would stay consistent. Then, we taped it to the headboard and marked each hole with a pen.


So here's the trick to make the nailhead super easy and fast. With a small drill bit (compare to the end of the nailhead and test on scrap wood first - you want the nailhead to sit in the hole, but it should be snug) Drill each previously marked hole a small amount - you want the nailhead to go in about half way. Again testing on a piece of scrap would is recommended till you get the hang of how deep to go.

It's an extra step, but trust me, it makes applying the nailhead SO much faster! Not shown in the image, but we covered the tip of the hammer with leather (for durability) and then painters tape to secure the leather in place - this protects the smooth surface of the nailhead. We replaced the leather and painters tape combo a few times throughout. They also make hammers specifically for applying nailhead, but this was a great substitute since we didn't have one.


We like to insert a few at a time (spaced at least one apart - otherwise they are too close and go in properly) and hammered a few at a time. This is so much easier than picking up hammer up and down every time you insert a nailhead.

I made a quick video to show how fast it is!

Note: A few of the nails went in crooked, so we used those to go in sideways in the few spots where the screws were underneath the placement of the nailhead on the edge of the plywood.


Depending how the light hits it - the fabric shows a subtle metallic glow.


I'm obsessed with the pattern!


The lumbar pillow is a hair on hide from Marshalls (Tahari) I love the cut out and subtle natural ombre. 


So if you've been wanting to tackle a nailhead project, don't be scared! It really is easier than it looks - dare I say, kinda fun!? 

Coral shams Crane & Canopy // Stripe pillows Nate Berkus // lumbar pillow is from Marshalls // Duvet is Marimekko for Crate and Barrel a few years ago // Print is from Artfully WallsTwos Company urchin found at the thrift store!! // lamps are from Ross. 


Nailhead + Linen Headboard Sneak Peek + BHG 2015 Blogger Awards

Hi! I hope that you had a great weekend!! I'll be back tomorrow to share our most recent headboard - here's a little sneak peek!


Also, I have some SUPER exciting news - Sarah M. Dorsey Designs has been included in the Better Homes and Gardens 2015 Blogger Awards DIY category!!


It is such an honor to be included in this talented group!! 


If you love reading, I'd appreciate your vote! :) You vote in a few categories before you get to DIY, but it's only a few clicks. You can vote more than once, so feel free to vote a few times if you'd like. Thanks friends!! 

You can vote HERE


Super Simple Upholstered Headboard | Tutorial

Hey! Did you have a good weekend? I hope so!! Today, I'm sharing a headboard that we finished a few months ago for our Tennessee rental bedroom. I was originally going this direction, but completely changed my mind when I styled it for my Mengel nightstand.

I wanted something a little lighter, so now our bedroom is looking completely different (reveal coming soon!) But first, here's our original headboard.

If you're looking for a quick and easy DIY headboard, this is it! It's SUPER simple! You can easily be done in just a few hours!


To get started, you will need:

Materials:

Plywood (3/8" to 1/2") cut to size 60" wide for a queen bed (height is variable, but about 3' - make sure that the plywood goes behind the mattress)
2x2 (qty 4)
Foam (bed topper, from Target, Wal-Mart etc. - smooth side out - size full or Joanns, Hobby Lobby, etc.)
2 yards of fabric (I used this) Since home decor fabrics are typically 54" wide - for a queen bed and larger, you will need to railroad the fabric - so run the pattern the opposite direction as shown online. If you're using a print, make sure that it looks good running the opposite direction.
Batting (size full)
Cardboard upholstery strip

Tools:

Drill
Saw - chop saw or jigsaw to cut the 2x2s (most home improvement stores will cut the plywood to size)
Scissors
Screws (1.25")
Staple gun

Cut the 2x2s to size and frame the back of the plywood.

From the front - pre drill holes and secure the plywood to the 2x2s using 1.25" screws.


Here are our cuts - image below shows back of headboard:

Plywood 36" x 60"
2x2s (sides) 56"(x2)
2x2s (top and bottom of plywood) 57" (Note: 2x2s actually measure 1.5", so 1.5"+1.5"+57" = 60")


Next, we cut the foam to size (we used an egg crate mattress topper - it was the cheapest way that we found to cover the entire surface without seams)

Cut the foam 1" larger than your plywood back (ours measured 37" x 61") you want the foam to crush around the edges for a more finished look. Secure the batting to the plywood with spray adhesive (liquid glue - thinly spread will work too) (this will make upholstering easier so it doesn't move around) Attach the foam, smooth side up. 


Cut a piece of batting to size - a few inches larger on each side. Note: if you have seams in your foam, apply an extra layer of batting to help conceal the seam. 


Cut your fabric to size - slightly larger than the batting. Tip: place the headboard on boxes or whatever you have on hand to lift it off the ground slightly


Secure the fabric. For a more finished look, we applied the fabric in two steps. The first is stapled about half way down the 2x2 (it will be visible from the sides, but it will be covered in the next step.)

We like to apply a few staples on the top and bottom - pulling tight as we go - alternating top and bottom (apply about 10 staples at a time) - then we repeat with the sides.

Here's a close - up of the corner.


Next, finish the edges. To get a super crisp line, we used a cardboard upholstery strip underneath the fabric.


First, we placed a strip of tape along the edge of plywood to keep a guideline.


We cut a strip of fabric to go across the top (about 66" x 5") Using the guideline, we secured the fabric in place. We like to cut our fabric a little large - it's easier to work with and you can always trim the excess off.


Lining the cardboard strip with the tape guideline, we stapled in place.


We repeat for the sides. And folded the fabric at the corners.


Then, we flipped the headboard over and secured the side pieces on the back with staples.

To finish the legs, we wrapped them with fabric and stapled on the back. The headboard was attached to the bed by measuring the holes on the frame and drilling two holes (trim fabric where drilling so it doesn't catch) - bolts and nuts secure the headboard to the frame.


That's it!


This headboard can easily be done in an afternoon or evening!


Wrapping the fabric around the cardboard strip gives it a super crisp edge.


Duvet is from Crate and Barrel (Marimekko a few years ago) Lumbar pillow is from Marshalls. Sheets and coverlet are from TJ Maxx. Euro shams are from Target.


Approximated total cost:

Plywood: $13
2x2s (qty 4): $8
Fabric (2 yards): $60
Foam: $15
Batting: $10

Total: $106

The fabric made this a little pricier, but it could easily be done for under $100 if you save on fabric. (Check out the clearance section of Home Goods, TJ Maxx, etc. for tablecloths, typically, you can find enough fabric for under $20!) So you could make it for about $60!

If you're looking for a super simple headboard, this is it!! SO easy!

P.S. This headboard (and lots of other things) will be included in a moving sale that we'll be having in a few months. If you're in east TN and would like to be first on the list for an item, let me know - you can email me at sarahmdorseydesigns@gmail dot com (dot added in place of . to reduce spam)

DIY Tufted Headboard with Nailhead and Wings | Bob Vila Thumbs Up Competition

Today I'm so excited to share that one of my very first projects has been selected to participate in the Bob Vila Thumbs Up DIY Competition!! 


Would you vote for me!? 

When we created this project, I had no idea how popular it would be! It's been the most re pinned project on my site and dozens of people have shared their versions with me! It's so awesome to see others complete projects that we've shared (makes writing tutorials worth it)!! 


Looking back at this post, makes me miss this headboard! (we sold it before we left CA) Maybe it's time to make another!


Voting is open till September 30th, you can vote once a day on all of your devices, so vote a few times if you'd like!! It's super quick, only two clicks! 

Vote HERE

Thanks friends!! :) 

Layered Headboard for only $20 | Contributing Article at Houzz

Want to see our new headboard!? Stop by Houzz for the full tutorial! Since we'll only be in Ohio for 6 months, we wanted something easy, inexpensive, but still a little lux. 

By eliminating wood and foam, we were able to make it for only $20!!

This would be perfect for renters, a dorm room, or anyone who likes to change their mind a lot :)

Make sure to stop by!

High-End Look for Less: Make a Layered Headboard for $20

General contractors, home builders, and more ∨

Ideas for your living spaces, lighting and landscape design.
Browse top designers interior portfolios, from high-quality pots and pans and a decorative dinnerware set to ideas for remodeling bath and kitchen.

Tufted Headboard with Nailhead | How To

I shared a few sneak peaks of our most recent headboard last week, here's the finished pics! When our friends mentioned that they were looking for a headboard, we quickly volunteered! I've been wanting to try a deep tufted headboard for a while now - so this was the perfect opportunity.


Here's how we did it:

First we picked up our supplies:

1/2" plywood
2x2 pine (qty 2)
2x4 (qty 1)
1 piece of 3" camping foam from Home Depot
Batting
Fabric (I used a drapery panel from Target - in tan)
Buttons to cover
Gorilla glue
Upholstery thread
Nailhead

Tools needed:

Chop saw
Long needle (for tufting)
Hammer (for nailhead)
Upholstery stapler

We decided to make the headboard flush with a queen mattress 60" wide, a few extra inches would work too.


First the boys worked on the frame.


Above is the completed wood frame, minus the 1/2" plywood behind the legs (to make it flush) - which was added last, minus the 2x4 at the bottom on the plywood, minus the extra 2x2 on the leg. Whoops ...  forgot to take another pic!

We measure and drilled holes for the tufting with a 1/4" drill bit.


Since the foam wasn't wide enough, we pieced it together at the bottom, using spray adhesive to secure it. Then from the back we poked through the holes with a meat thermometer. (We used an extra sharp kitchen knife - the filet knife cuts it like butter!)


Using a knife, we cut the foam at an angle (wider at the top) down to the plywood.

Using the instructions on the kit, we covered non upholstery grade with the same fabric as the headboard. Tip: use a little Gorilla Glue before you seal the button to keep them from popping off.


We laid the batting and fabric overtop and started tufting. Balancing the headboard against the kitchen island, David threaded the long needle with upholstery thread (doubled up) and threaded it through the back. In the front, I folded the fabric where I wanted it to go, inserted the button on the needle and sent it to the back to be stapled. I wanted the button to be pushed down to the plywood, so I used the end of a hammer since it was so deep. Tip: use the end of a thin paintbrush to help you find the hole. David pushed it from the hole in the back and I stuck the tip of the needle in end and pushed it back out. Finding the hole through 3" of foam can get tricky, so it helped us find the hole the first time.

TIP: With deep tufting, make sure to not to pull too tight between the buttons, the extra fabric should go into the folds, pushing the button down helps keep it tight. If you pull too tight, you won't have enough fabric to work with as you go to make the folds. Also, make sure to leave plenty of extra fabric at the sides since the tufts take a lot.

Tufting is a little frustrating and time consuming, but it gets easier once you get the hang of it. Expect to spend several hours. We had to redo a few tufts at the edge to the correct amount of fabric at the edge so it was smooth around the outside frame.

*Note: getting it smooth around the edges is tricky - it is easier to create folds (from the tufting) on the edges, which would require reconstructing the exterior frame or you could also cut a separate piece of plywood for the tufting and attach it to the back piece of plywood and frame (see this tutorial)


After we finished tufting, we started to pull tight on the sides and top and bottom.


Love this stapler! Makes the whole process a lot easier. We found ours at Ace Hardware for about $20, but I think Home Depot sells it too.


For the corners, we put a staple in and folded the front over. We didn't have any issues with it bunching in the front at the corners. At first, when planning, we thought we'd have to fold it at a 45 on the corners (on the front). But this worked well!

Next we finished the legs. Since our fabric wasn't long enough for the legs, we cut and stapled the fabric. Folded and ironed a seam on the piece for the leg - and stapled from the back.


To pull the edge tight, we added nailhead strip. I normally use individual nailhead, but since we weren't going against a straight line, this helped, plus this is SO much faster.


It took us about 30 minutes to lay out the whole thing!

Love how it turned out!!

Also, we let the headboard free stand between the mattress/box spring and the wall. Having the plywood go under the mattress and the legs to the ground helps lock it in place. We haven't had issues with it moving, but since it can move, I'd recommend using french cleats to secure it to the wall to be extra safe.


We photographed it in our house before taking it over to our friends. I loved walking past it and looking at it for the few hours that it was here. Made me feel like I had a put together bedroom again (at least from the hall :)


I added black and white Marimekko pillows purchased from a Crate and Barrel outlet a few years ago.
and my Caitlin Wilson Designs pillow in tall chevron mint.

The lamps were found at Target a few months ago for $16 each. Finally, we flipped the drawer on our nightstand so it was white. Still loving my organic chevron duvet from West Elm :)


Cost Breakdown:

Wood and Foam (home depot) $50
Batting: $8 (with coupon at local craft store)
Buttons: $12 (6 packs from Amazon)
Nailhead: $13 (Amazon)
Fabric: $25 (Target)

$95 Total

SOURCES:

Duvet: Organic Chevron | West Elm
Chevron Pillow | Caitlin Wilson (mint no longer in stock)
Black and White Pillow | Crate and Barrel Outlet a few years ago, Marrimekko Tuuli Pillow Sham
Night Stand
Lamp | Target Summer 2013

I love love love how it turned out!!!

We're already have a plan for our next headboard! Now we just need a place to put it :) The movers are coming in a few hours and then we're packing up to head towards Ohio. We're making a road trip out of it, so make sure to follow our progress through Instagram!

Stay tuned this week for a fall tour hosted by Lindsay and Kristen (I'm the 2nd!), and a few guest posts from some of my favorite bloggers!!


Powered by Blogger.