Friday Five


Hey! I hope that you had a great week! Here's a few things that have caught my eye recently!


I recently updated our DIY page .. Creating the thumbnails made me realize how much we've accomplished in a few months! If you missed any of our recent projects, click here! (this is just a screenshot, click here for the individual project links) 


This is from a few months ago, but if you're planning to paint a piece of furniture this weekend, make sure to check out my tips! This post also includes how we polished the brass hardware!


I love buffalo wings, but it's not exactly the healthiest thing to eat .. I found a vegetarian version several months ago and it's been a regular menu item at our house ever since! You HAVE to try this buffalo cauliflower recipe from The Curvy Carrot, so so good!! Personally, I like it better than normal buffalo wings! (though I'm not a huge meat eater ..) 

via the curvy carrot

I've always been afraid of sewing pillows with zippers, but The Chronicles of Home tutorial is so easy, I'll definitely be giving it a try next time! 

Please pin from the original source, here Thanks! 

the chronicles of home


*Contains affiliate link

Don't want to make your own pillow? This teal and pool pom pom pillow from West Elm might be it!


I love that it's the same hue, but different values. 


We have a busy weekend planned working on our MD living room!! Also, next week I'll be attending a super exciting event in NYC with BHG, so stayed tuned for details! Be sure to follow along on Instagram for behind the scenes peeks! Hope you have an amazing weekend!

Humpday Giveaway | Free Printable

Hey! Hope you're having a great week!

For today's free printable, I'm sharing two arrow prints.


 I love the simple geometric nature to them ..
Download your free copy HERE (three arrows is 5x7, two arrows is 8.5x11)

*For personal use only, resale is not permitted

--

Also, Don't forget to check out the Bob Vila Thumbs Up Competition. Our headboard has been nominated! I'd love your vote!! It's super easy - only takes two clicks! You can vote once a day through the end of the month!

Vote HERE Thank you! :)


What Would Sarah Do?


I often get asked, how do you pick out things at a thrift store? What do you look for? or What would you do with this? So I decided to start a little series, sharing second hand finds and how I would transform them into something that I'd LOVE to have in my home!


Look at this headboard!? Sure it's dingy and the brown painted frame looks a little cheap, but new fabric, and paint would make this look like a million bucks!


Headboards are pricey.. DIYing headboards can also be pricey (typically at least $100-$200) due to the amount of supplies (wood, foam, batting, fabric, etc) needed. Finding a headboard that needs a little work is a great way to cut costs and time!!

To get started, I'd remove the fabric panel and foam (I'd probably replace the foam - look for a 50% off foam sale at Joanns (last time I was also able to stack a 20% off regular and sale items too!) or use a 40% off coupon at Hobby Lobby, or purchase an egg crate and use the smooth side up)

Reupholster the panel in something like this


or this


Or go classic with a solid linen and nailhead trim around the edge, like this bed from Restoration Hardware.


Sand the frame and prime the frame with a durable primer, such as Zinsser Cover Stain or Kilz Bonding Primer. Finish with a top coat of durable paint, such as Sherwin Williams Pro Classic.

Reattach the panel and you're done! This project could easily be done in a day with limited supplies - upholstery stapler, scissors and paint brush/paint are all that you'd need! Depending on fabric choice, this project would most likely be complete for under $100!

p.s. anyone local to Knoxville, TN, as of today, headboard still available at Karm thrift store on Kingston pike! $50 for a king!

If you'd like to know what I'd do with a piece, feel free to email a photo to sarahmdorseydesigns{@}gmail.com with the subject line, what would sarah do? I might include it here next week!

Friday Five


Hey! I hope that you had a great week! Here's a few things that have caught my eye recently!

*Contains affiliate links


Have you seen Nate Berkus' newest collection for Target? I can't wait to check it out in store! Here are a few of my favorites! 


Trying to cut a straight line with a circular saw or jig saw? Clamp a straight piece of wood (on both sides) and run the saw along the edge. (Confirm that the board is firmly clamped before using the saw)


When we moved into our new place in Tennessee, we needed new shower hooks.. why am I writing about this? .. because our last set rusted within a week. We went to the store looking for a metal that wouldn't rust - we found a set that were solid brass (ironically none of the finishes looked like brass, so I guess they have a coating on them? ) 

BUT the important thing is that we've had them for a few months and they still look perfect! 

(I'm not sure if this is the exact link, since it doesn't list the material online, but they do look like this. In store, it says solid brass on the package) 


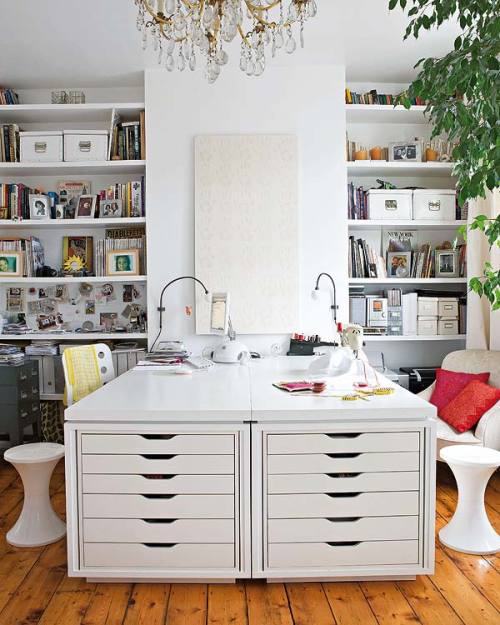
The other week, walking though Ikea I saw the Alex drawer unit, I love the flat storage to easily access a variety of paper! 

Love how it's built into this custom desk!


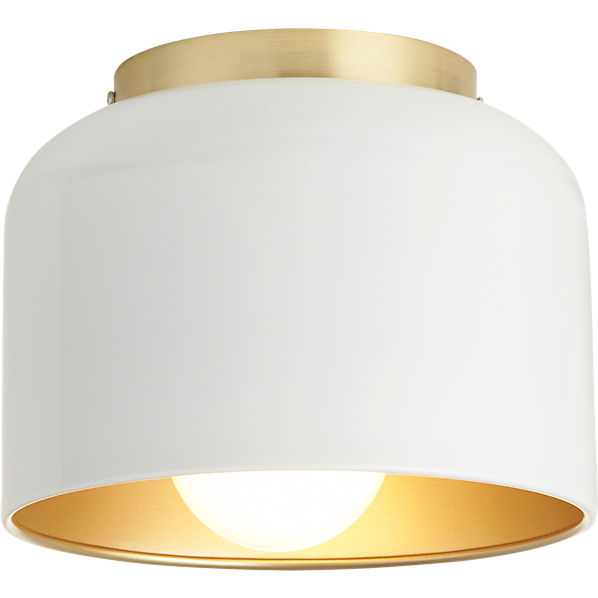
Finding a stylish flush mount light can be tricky .. I love this one from CB2, and it's only $59.95!


Hope you have a great weekend!! :)

DIY Tufted Headboard with Nailhead and Wings | Bob Vila Thumbs Up Competition

Today I'm so excited to share that one of my very first projects has been selected to participate in the Bob Vila Thumbs Up DIY Competition!! 


Would you vote for me!? 

When we created this project, I had no idea how popular it would be! It's been the most re pinned project on my site and dozens of people have shared their versions with me! It's so awesome to see others complete projects that we've shared (makes writing tutorials worth it)!! 


Looking back at this post, makes me miss this headboard! (we sold it before we left CA) Maybe it's time to make another!


Voting is open till September 30th, you can vote once a day on all of your devices, so vote a few times if you'd like!! It's super quick, only two clicks! 

Vote HERE

Thanks friends!! :) 

Marble Nesting Tables for the Living Room

Hey! I hope that you had a great weekend! We were in Maryland working on our living room there .. we completed 1 project and almost 2 more .. so it was a busy but productive weekend!

For the living room, I've decided to share our real time progress instead of finished, styled shots..

Here's our new nesting coffee table!


When thinking about the coffee table for the living room, I wanted something pretty large .. I've always loved the look of marble, so I called a few places and after getting quoted ~$400 .. that wasn't an option. David recommended that I check the materials section on Craigslist and instantly a listing came up for 3 pieces for just $50!! We picked them up and they were perfect - a little chipped on the edges, but not too bad.


It is heavy, so we originally wanted to weld a metal frame .. but since we don't have that equipment readily available and we're on a tight deadline, we decided to stick to wood. Using a hard wood increases the strength.

To make the marble slabs work with our space, we decided to make nesting tables. David and I both worked on design options and David came up with the final design, inspired by this Worlds Away table.

Here's how we did it.


David ripped 3/4" strips of a hard wood (not sure what it is .. it's from my Grandfather's collection). Our Grr-ripper push block came just in time - perfect for cutting small pieces of wood safely.


Then we drilled pocket holes with the Kreg Jig. If you do wood working and don't have one, you need one! We've used it for every wood project since we've gotten it - it's super easy to use, and you get a perfectly hidden pocket hole every time. We applied wood glue and then screwed it together.


Here's the close ups for how we put it together.


For the second table, we wanted something simpler so it 1. Wouldn't look too busy 2. So the tables could sit close together.

Here's a close up of the construction of the straight leg table.


We then sanded it with 120 then 220 and finally 320 grit sandpaper. To seal and protect the wood, we applied a coat of clear furniture wax.

Next, the marble top.


We trimmed the edge with the circular saw with a diamond blade designed to cut stone - I poured water over it while David cut (make sure to wear eye protection, little pieces fly - ear and a respirator should be worn too). Then we cut it entire piece in half (20"x74") so we had 2  ~ 20"x35" pieces. We didn't get a perfect cut .. user error? not enough water? blade error? not sure.

Next, we sanded the edges with the orbital sander, 60 grit, than 120, 220, 320, 420, 600 (final three were hand sanded and wet sanded (sand paper dipped in water) Lets be honest. Sanding is pretty miserable .. especially with a respirator and safety glasses when it's hot. We traded off with the orbital sander and we both worked on hand sanding so it went a little faster.


After 600 grit, the edges felt super smooth! Some of the edges aren't perfect, during cutting, a few areas cut too deep, but that's ok .. I'll take those minor imperfections over paying $400 any day!


To attach the top to the base, we thought about how marble countertops are installed, adhesive! So we picked up a tube of adhesive formulated for marble and applied it along the top of the base - being careful not to get too close to the outer edge.


We centered the top and clamped it in place. (p.s. these clamps are amazing!! super fast and easy to use .. we use them on almost every project now!)

After the adhesive dried, that was it!


Sofa in the background waiting for upholstery!


I love the leg detail - it provides a little interest, but it still lets the marble shine!


Rug is Tahari, found at Home Goods.


We still have to clean and polish the lower nesting table, it has some paint splatters on it ..

I'm also thinking about adding a few moroccan poufs in front .. maybe gold? If you have a gold one, has it held up well?

Total cost was ~$25 since we used the other piece of marble on our sofa table and the wood was free!

Can't wait to finish the rest of our projects for the living room!!

Blog Hop | Behind the Scenes at Sarah M. Dorsey Designs

Last week, I was tagged by the fabulous Jennifer of The Chronicles of Home for the blog hop that you might have seen going around. Jennifer is super sweet, an eloquent writer, an amazing chef, and a fearless DIYer (she reupholstered a sofa!! My main inspiration for tackling one!) Check out her amazing blog here

The blog hop allows you to get an inside look at what goes on behind the blog! Here are my responses!

Why do you write?

Honestly, I don't really like writing .. let me rephrase that .. I USED to not like writing. Maybe my aversion came from my 11th grade English teacher chewing up a piece of chalk and then licking my coat sleeve during class (yes, that DID happen. and I'm not sure why ..) or my 12th grade English teacher giving me a B- for every.single.paper. no matter how hard I tried (by the way, my friend, who was considered one of the top writers in our class said I should have done better AND I got straight As in English in college .. just saying ..) 


Now, I really love writing. I think the change came because I'm writing about things that I LOVE and I'm not trying to meet certain standards or guidelines, I can just be me. 

I started writing when we moved to CA, all of our family and friends were on the East coast and it was a way to stay connected. Then, I realized with our crazy moving schedule (due to David's job), it was a job that I could pick up and take with me anywhere. I also love the friendships and community that I've found online. This past year has been rough moving, (I'm embarrassed to say, but 4 times, not including our MD house) having a supportive community that goes with me everywhere has been a lifesaver! Thank you for your comments and support, it means so so much! 

What are you working on?


LOTS! We're currently working on getting our Maryland living room ready, so we have loads of DIY projects going on (i.e. chandelier, sofa upholstery, chair upholstery, coffee table, mantel, draperies .. I'm hoping we get it all done!). Stay tuned for some fun posts! Follow along on Instagram for sneak peeks! 

How does your blog differ from other in the genre?

This is tricky since there are so many DIY/interior design blogs out there. I'd say the main difference is that I have two homes, one that we own in Maryland and a rental in Tennessee. Due to David's job we are in TN for the most part, but make it to MD as often as possible. So right now, I'm sharing our renovation journey of updating our home and rental friendly projects. 

Our entry in our Maryland home, here


Our TN living room rental here


What is your writing process?

Hmm .. my writing process is pretty freeform. I don't have a firm editorial schedule, just a list of what projects I'd like to (or need to) work on next and share when it's relevant. Right now, I try to share 3-5 times a week. I typically write in the mornings .. I always include photos as I go (guess that's my visual side). I edit a little along the way, but primarily at the end. 

I hope you enjoyed learning a little more about me (or were at least entertained by a few of my responses!) 

For next week (September 8th), I'm tagging the fabulous Carrie from Dream Green DIY and Elizabeth from Little Black Door!! 

A few months ago, I was introduced to Carrie and it was love at first sight! I love how she effortlessly she mixes vintage and modern pieces! Check out her amazing home tour here

I've know Elizabeth for a while, she is a fellow lover of color and pattern so naturally we get along!! She is always posting the most amazing vintage finds on Instagram. Check out her awesome blog here!

Powered by Blogger.