Our Process | Demoing Tile

Time is flying by! We're planning to be in Maryland this weekend to work on our house .. So I thought today would be the perfect day to talk about our experience demoing tile. David did the majority of it since we only had one of each power tool .. so I worked on some other things around the house and popped in to take pictures along the way.

This is our first time demoing tile, so we're not pros .. but this is our process.

First, you NEED safety gear. Eye protection, hearing protection and a respirator. It's messy and loud, so all of these things are necessary.

We were lucky that the room was enclosed, so we just kept the door to the house closed, but if you don't have a door, tapping a tarp to contain the dust would be a good idea.

To get started, we removed the baseboard trim - ours was nailed in place so we wiggled it out using a screw driver (trying not to damage it). We forgot to mark the back as we took it out, so we would know how to put it back, but that would be a good idea :) It's not a big space, so we'll just do trial and error.

Using a hammer drill (David's dad had one we could borrow. Yay!) David first went along the grout line. Next, he broke up the tile - it was easiest to hold the hammer drill at an angle to get under the tile.


Here's about half way through. We used an old plastic bin to hold the broken tile. It's HEAVY, so this works better than garbage bags. It's also good to clean up as you go ..


Once the tile was removed, we were ready to removed the extra thin set. After a little research, we decided to use an angle grinder with this attachment. Looking back, a 6" or 7" would have gone faster and a vacuum shroud would have been helpful since it was MESSY! David had the shop vac nearby and vacuumed along the way.


You don't need to get all of it, but most of it .. you don't want any high spots, but a layer of thin set prior to placing the backer board will help even it out.


Then you sigh in exhaustion .. I snuck this pic in after David finished .. though I'll probably be banned from that now :)


Now that the thin set it up, we were ready to start the new thin set and backer board. Backer board is a sturdy board made out of cement that provides a rigid substrate that prevents the tile from flexing and breaking. Starting in the corner, we measured our cuts .. this was a little tricky since the beams stick out, and they aren't perfectly square. So we couldn't scour and break the board along the provided lines (typically how it's done) .. Maybe we could have filled in the gaps with thin set, but we wanted it as close to the walls as possible. Note: this will dull the blade of the circular saw fast (since it's cement ..)


We cut all of ours to fit and then picked up each piece individually to put a layer of thin set down. For the thin set, you mix it for about 5 minutes (use a mixing attachment on a drill - preferably corded to conserve the battery on your cordless) and let it set for about 10 minutes (Yours may be different, so follow the directions on the package). David got the edges with a smaller trowel and I got the center with a larger trowel.


Wear knee pads .. I get tired of telling David to wear them, maybe this will help remind him :)


Then using screws for backer board (next to backer board in the store) we attached the board with LOTS of screws. The board had pre set spots for screws, we put a few extra in along the edges.

Now we're ready for tile! Hopefully, we'll finish the tile this weekend (realistic?? I hope so :) Follow us on IG to watch our progress!!

Hump day giveaway | Flamingo Printable

Happy hump day! I hope that you're having a great week! For today's free printable, I'm offering a flamingo print inspired by West Elm's print


Here's a close up
Download your 8x10 copy HERE

I hope you enjoy! :)

*For personal use only, resale is not permitted 

Guest Posts at East Coast Creative + Houzz

Hi! Today I'm at East Coast Creative sharing the start of my office in Tennessee, it's a mix of projects completed in the last few months and a couple new ones! Make sure to stop by!


Also, if you missed my tutorial on how to make a marble table lamp on Houzz, check that out! You won't believe how easy it is using baseboard tiles.


Rattan Chair Makeover

Hi! I hope that you had a great weekend! It was hot here! We went almost directly from frigid winter in Ohio to unseasonably warm temps in Tennessee. But it was gorgeous, not complaining at all .. well maybe a little, I was attacked by several bees, so we'll have to figure that out .. as I was sanding and painting outside, I also had the fly swatter added to my tool arsenal!

If you follow me on instagram, you might have seen this rattan chair that I found on Friday! I love the shape, and the fact that it didn't need any major repairs / reconfiguring. Finding something that just needs a little sanding, painting, and simple upholstery is SO much easier than repairing and switching things around. Too often, I buy things that need a lot of work.

This was easily done in a day while we were working on other projects, so not bad at all!


I didn't prepare a full tutorial but here's a quick run down. 

1. Lightly sand chair with 120 sandpaper

2. Wipe off dust with microfiber cloth

3. Prime. My paint had primer built in, but I opted to add an additional coat for extra coverage and protection once dry. Apply in thin coats

4. Paint. Once the primer is dry, apply in thin coats letting it dry in between. I used 2 cans of spray paint. (Valspar - Mellow Spring)

5. Upholster the seat (here's a similar tutorial) Mine came with a piece of loose plywood, which made upholstering so easy!


BTW, did you know that it's the final week of Creating with the Stars!? Voting is open through Tuesday! Stop by and pick you favorite. I'll be there tomorrow, sharing our home decor project, make sure to stop by!

Friday Five


Sorry to be away for the the past few Fridays. Now that we've moved, I'm hoping to be back regularly. Here's what's caught my eye recently!


I found Tonic Living a year or so ago, and I was immediately hooked! I love that it's a carefully curated collection - so you don't have to search through pages and pages to find one thing that you like. You can start with one fabric to use as your inspiration and easily find ones that coordinate. Here's a quick board that I put together. I see this in a girl's room - floor to ceiling floral draperies and accent pillow on bed, gray and white geometric upholstered headboard, fuschia linen accent pillow, and an accent chair in the green trellis with a metallic ivory linen accent pillow.


sakura white tea // tuscany linen orchid // locked white tea // bethe leaf // alchemy linen


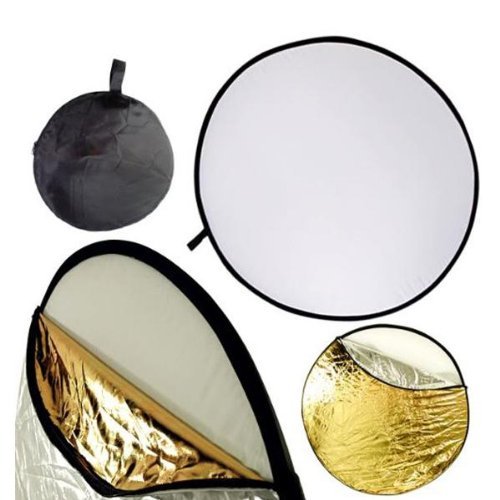
If you're interested in photography, than you probably know how important LIGHT is! But getting ideal lighting isn't always possible .. I recently purchased a combination reflector / diffuser and it's game changer! You can easily soften light or reflect a warm or cool light to reflect more light on your object. The translucent circle has silver and gold that zippers on and off and compacts down to fit in a case. 


Here's an example using the diffuser .. 


Pretty neat, huh? I have the 43" size, but it also comes in a 22" size. 


Dr. Bronner's Peppermint Castile Soap - this soap is amazing!! Admittedly, I have a love for all things mint (especially soap), but this is my fav! It is a great way to wake up or relax - you feel like a new person! It's also concentrated and versatile, so a good value. The cheapest I've found it is at Trader Joes, $10 for 32 ounces. 


Did you catch Mandi from Vintage Revivals bedroom reveal for her niece? I'm CRAZY for her wood ring stamped (yes STAMPED) feature wall! SO good!! Click here for the room reveal. Please pin from original source. 

vintage revivals 


I'm obsessed with the shape of this headboard! It has a custom look for less, a queen is currently $299.99. Available at Target 


Love this Penelope Large Nightstand from West Elm! The circular shape is a great contrast to the typical square shape of the dresser and bed. 

Hope you all have a great weekend! David has off today, so hopefully we can enjoy this beautiful spring weather!! After this winter, we need some SUN!! :) 

Knoxville welcomes us | Vintage Faux Bamboo Chair + TJ Maxx + Trader Joes + a FREE Printable

Hi! Yesterday I was browsing Craigslist (a must for when you're in a new city, right?) and found an amazing faux bamboo cane slipper chair. I sold my caning chair before we left CA and I miss it. So I decided that this would be perfect! At $85, it was a little more than I'd normally spend, but it was in great condition.

We may still have boxes everywhere, but David happily agreed to go with me to pick it up. Now, to paint or not to paint?


Knoxville has given use a warm welcome with vintage furniture AND with TJ Maxx, I found a look-a-like of my favorite Trina Turk pillow for $14.99!


AND Knoxville has gotten a Trader Joes since we were here last! So excited for the flowers and for meal planning. I got so used to meal planning using Trader Joes while in CA, dinner hasn't been the same since .. happy to have one that's close!


and on an unrelated note, our laundry issues continue. Our rental in TN came with a washer / dryer and a major mold / mildew / dirt issue in the washer. Looks like the last person didn't know that you have to leave the door open when not in use and wipe out the rubber gasket. I've gotten some great tips on Instagram, thanks IG friends!! I haven't tried them all yet, but I plan to today. I got all of the chunks, yes I said chunks of dirt out of the gasket. Ran the sanitary cycle multiple times with bleach, white vinegar, Tide washing machine cleaner (not together) .. and it's looking and smelling much better. I'm still kinda scared what's where I can't see .. The gasket has a mildew stain that I can't get out, any suggestions?

Finally, I didn't have time to work on a brand new printable, but I did an update per a request! Download your free copy of Mr. + Mrs. HERE It looks just like the images below, but Mr. Mrs. instead. Print size is 39.25" x 27.5" (This Ikea Ribba Frame, minus the mat)


I hope you're having a great week!!

*For personal use only, resale is not permitted 

Entry Updates | Painting!


Hi! I'm back! We just got the wifi set up today, so I wanted to give you an update on us and where we're at with our mudroom / entry renovation. 

Here's what we started with.  


We had BIG plans to complete this room in the 1.5 weeks that we had between jobs. David works for a project based construction company, so we move to where the project is. Depending on the project, it can last about 6 months to a few years. But our home base is in Maryland. Hopefully that makes sense. My head spins thinking about our past 6 months - September, started in California, moved to Ohio (had to move our stuff twice), bought a house in Maryland (needed a home base!), and April, now we're in Tennessee. Whew! Anyone else tired reading this? 

Ok, back to our progress. A few days in, we realized we wouldn't have time to finish, a few days later we were hoping to start on the custom closet, a few days later we were hoping to finish painting and tile floor. Then towards the end of the week, we realized that we would only have time to get the primer and backer board down for the floors. It's not where we wanted to be, BUT we did get most of the planning and all the prep done. DIY takes LOTS of planning, shopping for supplies, multiple trips to the home improvement store, and then there's actually doing the project! So when we make it back (probably for Easter) we'll be ready for the top coat of paint and tile (aka the fun part, I hope.) 

Today, I'm talking about paint. Since this room is enclosed and separated from the rest of the house we decided to use this as a trial run for the rest of the house. Our experience got us seriously questioning whether we'd be able to paint the rest of the house ourselves. The beams are roughly cut which = time consuming. Going back to paint or not to paint posts, (here and here) we've concluded that doing any sort of staining or white washing would be a major pain, so that's out. To me, the wall beams have to be white, it chops up the wall and looks heavy. I'd like to leave the ceiling beams natural wood, but it doesn't work with the style of the house. Since the line of the wall beam continues to the line of the ceiling beam, if one was wood and the other was white, it would look unintentional. So right now, we're thinking all white for the rest of the house. I know everyone won't agree, but in the end, we have to do what makes us smile :) 


First, we vacuumed all the wood. It was so dirty. Since it was rough cut, we couldn't wipe it down...  


I liked using Kilz high hide stain blocker primer on the credenza, so we decided to use it here to prevent the wood from bleeding through the top coat. 


Here it is after one coat. We quickly learned that even after vacuuming, the wood was still dirty. So a large portion of the color was from dirt. I'm not sure how to remove all the dirt without pressure washing it, which doesn't seem like an option for inside .. If you have experience with this, I'd love to hear about it! 


We quickly realized that a roller and paint brush wouldn't cut it .. so we bought a paint sprayer and borrowed a compressor from David's dad. The output of the spray was pretty weak - the size of the compressor was on the lower end of the recommended, so that was probably why. As is, I think it would work fine for furniture, but not to paint a room. We used it to spray the crevices between the planks in the ceiling and brushed and rolled the rest. For the rest of the house, we'll have to rent a commercial sprayer or hire it out. 


Here it is after two coats of primer (the second coat went on a lot faster). There was a little bleed through on a few of the knots, so I put a little extra primer on those spots and it's perfect! The coverage was great and I love that it has practically zero odor (oil based works well too, but the smell is horrible!)  Prior to applying the top coat, we'll have to remove the paint build up between the ceiling planks, but other than that we're ready for the top coat of paint! 

We decided to finish working on the entry Friday, so we could clean up on Saturday and leave for TN on Sunday. We pushed all week to get as much done as we could and we were both exhausted. We were going to drive both cars down, but decided last minute to just drive one. We got in late Sunday night, the movers came on Monday, that afternoon when David got home, we unpacked the mattress and passed out before putting mattress cover, sheets etc. These past 6 months have been A LOT.. David's been working tons and helping me with projects when he's at home. So while his job has us moving around a lot, I'm so thankful for his constant support and willingness to help. Our 5th wedding anniversary is in May, so we're definitely planning a much needed vacation. We haven't taken a real one since our honeymoon .. 

We're hoping to have another update around Easter (maybe all the tile finished? We went with a 3x12 of this, it's a little darker in person) All the supplies are ready to go, we just need time to finish! 

In the meantime, I'll be working on projects in our Tennessee rental! 

Thanks so much for sticking with me in this transition .. I'm thinking that 2014 will be a BIG year for us with the house and projects. So hopefully it will be worth it! :)

p.s.

today I'm at ECC sharing our upcycle project for the mudroom! Stop by!


Powered by Blogger.