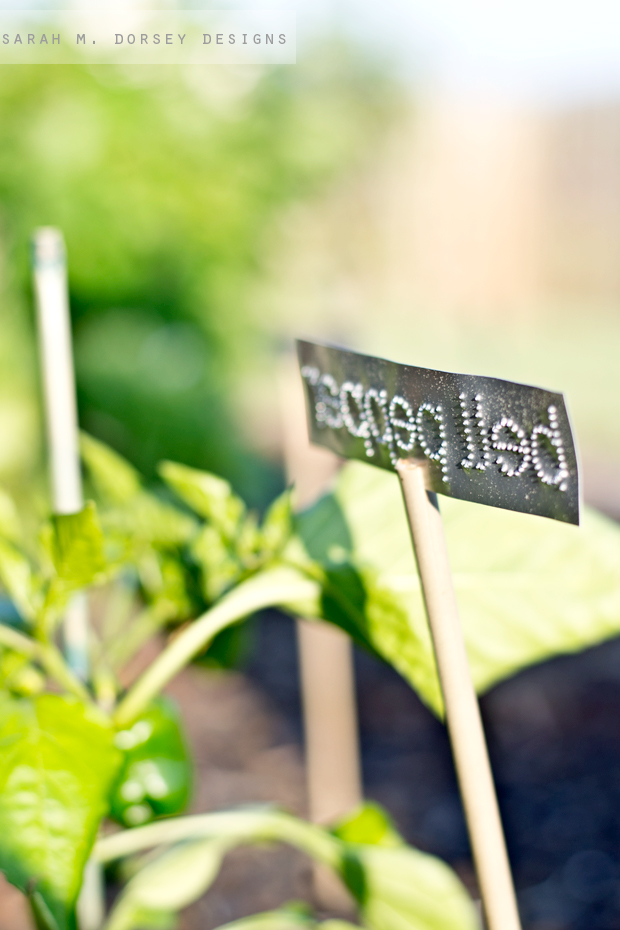
DIY Aluminum Plant Markers

David and I don't disagree on too much but when it comes to gardening we do. Every year, I want to plant anything and everything, but we've never had an ideal situation. Mostly not enough light or space. So David reluctantly agrees .. This year we have a good bit of space and 8+ hours a day of light, so I went a little crazy, 14 tomato plants to start and lots of peppers and other veggies and herbs.

I'm not the best gardener (probably part of the reason David is hesitant) but practice makes perfect, right?

This summer, I'll probably be doing a few garden related posts and today I'm sharing these simple DIY aluminum plant markers.


Here's how we did it:


*Note: these are raw aluminum, so the edges are sharp - probably not good for houses with kids or pets that might bump into them. Just a heads up. You could take an extra step to seal the edges (maybe hot glue?) but we wanted to keep it simple and streamlined. 

_________________________________________________________________________________

MATERIALS + TOOLS:

6" wide aluminum flashing
Awl (like a screw driver, with a small rounded point. Used for marking metal)
Raleway Dots font, available here
Scrap block of wood
Masking/Painter's tape
Bamboo sticks (available in garden section)
Scissors
Gardening shears
Safety gloves when handling aluminum

SKILL LEVEL:

Easy

TIME INVESTED:

About 10 minutes per sign

_________________________________________________________________________________

1. 

First we cut the the 6" aluminum flashing into strips. We made it the width of a ruler to make it easy - marking the line with a pencil.


2. We cut the flashing with general craft scissors. Since we weren't bending and handling the metal a lot, we didn't wear safety gloves. It is very sharp, so we would recommend wearing them to be extra safe.


3. Next, we squared up the the metal, placed our template on top (font is Raleway Dots) and secured it with tape on a scrap piece of wood.

Here's a close-up of the tip of the Awl.


4. Then we punched every other hole on the template with the Awl. It was pretty easy just pushing down.


5. Next, we prepared the bamboo sticks. We cut them into 18" sections (12" out of ground and 6" in the ground) with garden shears. Then we cut a small slit in the center of the top of the stick to slide the aluminum into.


6. We put a little gel super glue in the crack.


7. Then we slide it in and held it for a few seconds until it set.


and stuck it into the ground!


I have one pepper growing! Success!


I like the raised back. 


and the way the light reflects off of them. 


I love the simplicity. 


So are you a hopeful but novice gardener like me? Or a pro? If you have any tips on how to make my garden successful, I'd love it hear your advice!

Friday Five


Today I'm sharing a few things that have caught my eye this week! *links contain affiliates


Joss & Main is one of my favorite sites to browse daily! It's a curated daily deal site that has new discounted items every day.

Here's a few of my favorites!


Hathaway Sofa // Cybil Table Lamp // Adana Bench // Jessa Leather Pouf // You Are Beautiful Print // Droby Cocktail Ottoman // Turquoise Scalloped Pillow // Seraphine Garden Stool //
Abioye Pillow

or browse all the categories here


Carry a measuring tape on your keyring! For design, proportions are everything - being able to measure  furniture, accessories etc. while your out is so handy! 


I use mine practically every day .. plus I almost always know where my keys are, so I use it at home  when I can't find a larger tape measure. 

I found mine at Home Depot or Sears (and covered it with gold duck tape). It's 6' and plastic, you want a light one so it doesn't weigh down your keys. 


Have you tried Amazon Prime yet? If not, you should! You probably already know the benefits of Amazon .. they sell practically anything you can think of and the prices are typically competitive or cheaper. 


If you're not familiar with Amazon Prime, it includes:

- Free 2-day shipping on Amazon Prime eligible items
- Unlimited streaming of TV Shows and Movies (selection is similar to Netflix, but a little different) 
- 30-day free trial, easy to cancel online too (I started it and canceled a few times before I kept it) 

Cost is $99 for a one year membership. 

If you're interested, you can sign up for a free 30-day trial, click here


Did you catch Kirsten and Erin's playroom reveal? I fell head over heels for this DIY octopus art! I love large scale art, but if purchasing it can be pricey, and DIYing can be time consuming .. would you believe that this was made from a shower curtain!? Genius! 

Please pin from original source. Thanks!

via 6th street design school


Who says that office chairs can't be comfortable and stylish? I've never sat in this bentwood office chair from West Elm, but it looks so comfy! I'll take the white and gray for my office and I recently specified the wood and gray stripe for a client's boy bedroom. 

I hope you all have a great weekend!! Saturday David and I celebrate 5 years of marriage! It feels like just yesterday, time flies when you're having fun! :) 

Hump Day Giveaway | Holly & Martin Console Table

Did you catch my fabulous new console table from Holly & Martin last week?

Today you have a chance to win your own! Holly & Martin is giving away the Lydock Console table to one lucky reader!


To enter, use the widget below!

a Rafflecopter giveaway

Giveaway will be open for one week - good luck!

Upcycled Chevron Wood + Duck Hook Coat Rack

Hi! I hope that you had a great weekend! We spent ours relaxing and working on a few projects outside - the weather was SO pretty!

Today I'm sharing a mini sneak peek of our mudroom .. if you missed the original post at East Coast Creative, read on!

Our goal for our upcycle project was to cost zero, and source everything from the house. We succeeded! We found a few duck hooks in my office (image in our upstairs before house tour here) and extra oak hardwood floor found in the pit (used to work on cars) in the garage.


I'll spare you the before picture of pit (I don't want anyone loosing their breakfast) but it was disgusting!! VERY dirty and wet. Here's David working on his car (after cleaning it) ..


The wood was GROSS.


But, with a little vacuuming and wiping it down with vinegar, it wasn't too bad. 


After letting it dry in the sun, David cut off the tongue and groove with the table saw. Then I cut them in ~20" sections on the chop saw so they would be easier to handle. Next, using the table saw, David ripped it in half lengthwise and then turned it on the skinny end and ripped them in half lengthwise (make sure to keep your hands from the blade at all times and use a push stick when you're close to the blade) (p.s. we recently purchased a used commercial table saw through a government liquidation site, a definite upgrade from our $15 garage sale table saw that we sold before leaving California)  


As David was cutting the boards down on the table saw I started cutting the angles.


I set the chop saw to 60 degrees, cut off the end and slide the board to the first metal stop (no measuring!) and cut again.


Since we ripped the wood down the middle, we were able to use the interior for the face of the chevron pattern. So our pieces had a front and back. We cut half with the lighter (interior) side up and for the other half we cut with the darker (exterior) side up so that each side would be an interior piece.


We counted the rows needed (12) and stacked them to count so we knew exactly the amount we would need.

We had an extra piece of 1/8" plywood laying around, so we used that for the backing (note: 1/8" is thin for a backer board, but since we added a frame and screwed it to the wall, we're hoping that will prevent any potential warping)


Using wood glue, we laid out our chevron pattern (we let it dry overnight with stacks of tile on top, so it would dry flat).


Then, David cut off the excess on the table saw so that it was straight. We applied painters tape on top to cut through it, this helped prevent the wood from chipping.


Then we ripped down the remaining wood to make a frame.


We gave it a quick sand with a sanding block and attached the ducks! (prior to attaching the ducks, I cleaned them by soaking them in white vinegar and water for about 1 hour and the wiped them with a paper towel.)


I LOVE it!! We're currently updating our mudroom and this is the perfect addition. 


This has a similar look to our herringbone driftwood table, but A LOT less work! Since this wood was stored in a semi - wet location for ~30 years, it had a similar treatment to getting tossed around in the ocean like driftwood. 


Total cost was ZERO!! and I couldn't be happier with the finished result! 

Looking at these photos makes me miss our MD house. I can't wait to get there to finish the mudroom!! Hopefully at the mid to end of May. We're planning to be home next for the Spring "treasure sale"(where we found our last dresser) Mom just has to confirm the date! CAN'T WAIT! :)

--

and if you missed it on Friday .. 


I've decided to truncate my posts the day after they've posted. If you're unfamiliar, truncated posts will have an image and intro text then a link >> CLICK TO READ THE REST OF THE POST to view the rest of the post. 

 I know that a lot of people strongly dislike truncated posts, hopefully truncating the day after posting will help with that. I've decided to truncate for two reasons: 1. Protect my content from site scrapers more info here 2. For a cleaner home page.

If you have an opinion, I'd love it hear it! 

Friday Five | Safavieh, Shoot Fly Shoot, My fav dessert + more!


I hope that you had a good week and were out of the crazy weather. Praying for our neighbors down south!

Today I'm sharing a few things that have caught my eye this week! *links contain affiliate links 


Have you all checked out the Safavieh line at Target!? Oh my goodness, so much amazingness going on!

Safavieh Mystic Ottoman x-leg benches are one of the most difficult and time consuming DIYs, $175 is tempting! // Safavieh Kerri Accent Table they had me at faux bamboo // Safavieh Siphora Ottoman the tan is versatile so you can easily change up the other fabrics and the round shape contrasts rectangular sofas nicely // Safavieh Nadar Runner I love the simple graphic pattern! // Safavieh Double Coin Stool love the openness // Safavieh Parker Table Lamp fun pattern and color, check out I Heart Organizing DIY version here


I had a general understanding of photography when I started blogging, but I really didn't know how to use my camera in manual mode. I'm a visual learner, so reading about it didn't work for me.. I took Shoot Fly Shoot's photography 101 class and everything clicked!  The videos that make up the class are clear and concise - I was using my camera in manual mode in just a few hours!!

I was introduced to the world of blogging by Layla and Kevin, so I really can't say enough good things about them - they rock! 

If you're tired of using your camera in auto mode, take the 101 class, you won't regret it, click the banner above! 


I'm not a food blogger, and never will be .. but I just had to share one of my favorite recipes today! I love this because it's a quick and relatively healthy dessert or snack. David and I like to have dessert in the evening, but so many that you buy taste SO sugar heavy, this is great because you control the sweetness. 

I prefer not to measure, so these are just approximates.. taste as you go, when you make it once you'll know what works for you. 

Chocolate Pudding / Mousse Yogurt: ~1/2 to 1 cup plain non fat yogurt (greek makes it even more pudding like), 100% baking cocoa powder (I like special dark) to taste, you want the yogurt to be pretty dark, stevia to taste, whip cream to taste. Mix yogurt, cocoa, stevia till blended, then gently fold in whipped cream (you want it to be airy). 

Lemon Pudding / Mousse Yogurt: ~1/2 to 1 cup plain non fat yogurt (greek or regular), ~1-2 Tablespoons Lemon Curd (Trader Joes is so good!), whip cream to taste. Mix lemon curd and yogurt, then gently fold in whipped cream. 


I don't have a specific calorie count, but for about 3/4 cup, I'd guess it has under 100 calories. The great thing about this recipe is you can customize it to work with your diet and schedule. You can make it completely sugar or dairy free.. try almond or soy yogurt or making homemade lemon curd or whip cream if you have the time! 

My favorite is the chocolate, even with regular plain yogurt (vs. greek) it has the texture of pudding when mixed with the cocoa powder. You HAVE to try it, SO good! If you love pudding or mousse than you'll love this recipe! 


I've been thinking about our future kitchen reno recently. I don't think that we'll have room for a dedicated pantry, but if we can squeeze one in, I'd love something like this pantry from Oh Happy Day! Please pin from original source. Thanks!

via Oh Happy Day
The floor to ceiling white subway tile is dreamy and I love those thin shelf brackets - they look custom or vintage. 


Carlisle dining chair, set of two. Currently on sale for $79. Yes, only $79 for the pair! These would be great mixed with these mid century modern style shell chairs paired with West Elm's Parker Mid-Century Modern table 

Hope you all have a great weekend! We're hoping to have a slower weekend, enjoying some sun, relaxing and a few DIY projects mixed in! 

--

p.s. I've decided to truncate my posts the day after they've posted. If you're unfamiliar, truncated posts will have an image and intro text then a link >> CLICK TO READ THE REST OF THE POST to view the rest of the post. 

 I know that a lot of people strongly dislike truncated posts, hopefully truncating the day after posting will help with that. I've decided to truncate for two reasons: 1. Protect my content from site scrapers more info here 2. For a cleaner home page.

If you have an opinion, I'd love it hear it! 
Powered by Blogger.