
If you’re looking for a stylish way to keep your office accessories organized but within easy reach - these etched glass canisters might be the perfect solution! The etched glass partially obscures the view while adding a design element to the glass. In a few hours, with minimal effort, you can have your own customized glass canisters! These would be perfect organizing office odds and ends, bath products, craft supplies, etc. Today, I’m going to show you how to make your own with a simple stripe pattern and colorful lid. At just a few dollars each, these are super affordable!

Materials:
Glass canisters (I used Ikea Burken)
Painters tape (I used 1 3/8" cut into .5" sections (two .5" sections per piece)
Etching cream (I used less than 1/4 of the jar, so a smaller size would work too)
Plastic scraper
Spray paint (I used Valspar Exotic Sea, Gloss)
Gloves / Safety Googles when working with etching cream
1. First, prepare the painter’s tape by cutting it into .5" sections.

2. After washing and drying your canister, apply a strip of painter’s tape at the bottom.

3. Apply small pieces of .5" painter’s tape as a spacer.

4. Once all of the tape is laid out, remove the spacers.

5. Smooth the painter’s tape with a plastic scraper. It is important that the tape is securely bonded to the glass so the etching cream cannot seep underneath.

6. Apply the etching cream with a brush. Make sure that it is fairly thick and has even coverage - this prevents brush strokes. Let the etching cream sit following the manufacturer’s instructions. Be careful not to touch the etching cream with your skin, wear gloves if you’re going to come into contact.

7. Once the etching cream has set (I let mine sit for about 45 minutes), wash off all excess with water. (Etching cream is safe on stainless sinks, but not all materials, if yours is different, research first)

8. Remove the painters tape and wash canister with soap, water and a utility brush. (Once the etching cream is removed, the finish is permanent and ready to use)

9. If desired, paint the lid with spray paint.

Load up with your favorite office accessories and start organizing!
The Ikea Burken canisters have a small handle - making it easy to take the lid on and off.


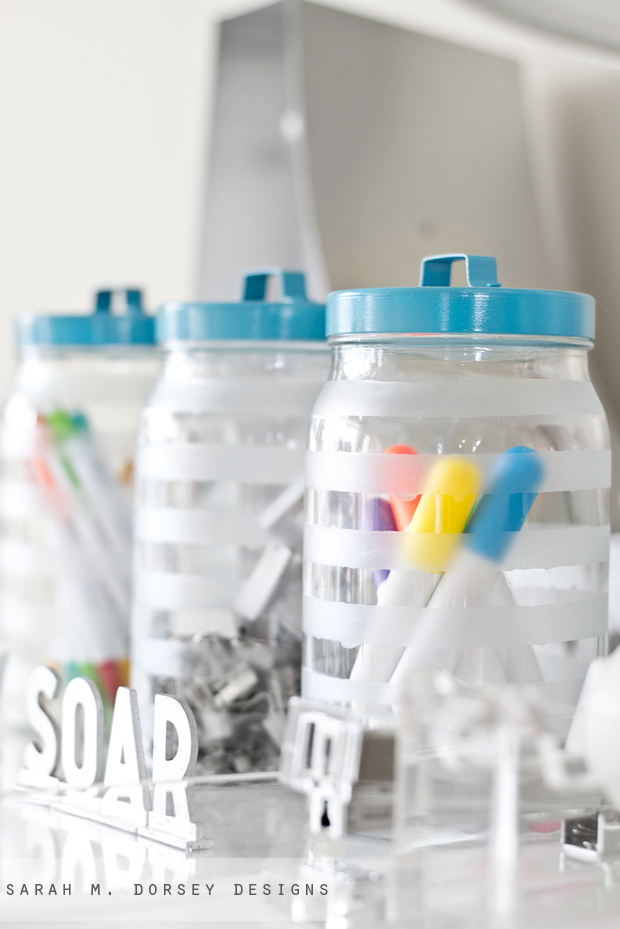
This project can be easily customized with different tape patterns, addition of text, or lid color. So get creative and organize your clutter!

Also in the photo:
--
I hope that you had a great weekend! Mine was spent grouting and finding thrifted/vintage treasures. It was Treasure Sale day at my Mom's work, again she rocked the bidding! She had a little more competition, but she got the last bid in right as time was called (auction was silent bid style). We loaded up the truck and trailer with a mid century modern dining table/chairs, china cabinet, project sofa, and bar cart. It was a good weekend! Make sure to follow on Instagram to see our recent finds, projects, and Annabelle updates!


0 comments:
Post a Comment