Leaf Stencil + Faux Roman Shade

Hey!! Today I'm sharing the final details on our entry. If I miss something that you're curious about, let me know!

First up, the stencil. If you've been following for a while, than you know that I love stenciling. It's time consuming, but it's super inexpensive! Several weeks ago, I mentioned to David that I'd like to recreate Katie Ridder's leaf wallpaper in a stencil. We spent a few days coming up with variations on the design, but we didn't come up with anything that we liked better, so we decided to go with the original. It's balanced, has contrast, organic/hand drawn look. Love it!! We knew right away that it would be tricky since the shapes in the center were floating (stencils need to have connecting pieces) so one shape would need to be done with two stencils.

To get started we traced the pattern in Adobe Illustrator, and then David figured out how to split it in two.


As you can see, it looks pretty different..

Then we imported to cut on our Silhouette Cameo, one stencil at a time.


You can see the finished shapes on the bottom and top left and the half stencil on the top right.

I wanted something organic to 1. contrast the geometric lines of the floor and 2. since there were several wall beams to work around, we wanted something that didn't have to be perfect to look good.

Here's a few issues that we had with the stencil ..

1. Since it took two stencils to make one shape, they had to line up perfectly. Which was tricky once the stencil had paint on it ..

2. Since the shapes were so tiny, they would get clogged with paint easily. We used Sherwin Williams test paint and it peeled easily off the stencil (as long as it didn't sit overnight)


We used a smooth foam roller, rolling off all excess paint first, making sure that it was even on the roller prior to applying. You want to use as little paint as possible. You can always add more paint later, but you can't (easily) take it off.


We used 4 stencils (2 complete shapes) but we should have cut more .. for the edges, we cut one set  so that it would fit easier, but we definitely could have used more since they clogged up with paint.

I wish this was a complete tutorial but unfortunately that's not really possible since everyone doesn't have access to Adobe Illustrator and a Silhouette.. so it probably wouldn't benefit too many people. Right? If you'd like to try something similar, I'd recommend trying out Gus & Lula's method with a sharpie!

Next up, something much simpler! A no sew faux roman shade.


We didn't need privacy or light blocking so a non functional roman shade was perfect!


There are several tutorials out there, so I'll just give a brief overview of my process. I cut a piece of white fabric to the size of my window (and planned it to be bunched up about half of the window) Finished the edges, I sewed them, but they could just as easily be glued with permanent fabric glue.


I cut three 4" bands of Neo Toile from Tonic Living, two to run down the sides and one at the bottom. I ironed a .5" section under on both sides.


I used Fabri Tac, permanent fabric glue to attach on both sides of my fabric and then overlapped the the edges, placing a strip at the bottom.


I cut that strip long, and secured the edges on the backside.


Then I ironed it really well with starch and installed it with tiny nails on the window. First, I secured it on the top (one tiny nail on each side, folded it in two even sections and under the fold used a tiny nail (on each side) to secure it again. I didn't want to glue my layers so I would have the option to take it down and reuse it, but looking back, I probably won't do that .. it would have been easier to glue the folds together prior to installation.


And a little more info on this wall, LOVE Pottery Barn's collapsible baskets - perfect for holding umbrellas, bags, dog leashes, etc. Garden stool is from Home Goods, Bag is Kate Spade Saturday found at TJ Maxx, and Chevron duck coat hook is a DIY project.
--

Finally, a wrap up of how I feel about the space (and DIY in general) .. Overall, I'm SO happy that it turned out just like I imagined in my head (Love it when that happens :) It makes all the bumps along the way worth it! This was our first room renovation (not in a rental) so learning along the way was to be expected .. we had a few more learning moments than I anticipated, but looking back that's ok. If I'm not learning .. I'm not moving forward. We'll take what we learned from this project to the next and hopefully continue to learn! I know that some of the tutorials from this space weren't clear cut (built-ins and stencil ..), but just wanted to thank you again for allowing us to share all aspects of our DIY process! Thanks so much for your support, it means SO much!!

Thanks to Pottery Barn, Kenroy Home, and DLawless Hardware for providing products to help this space come together! As always, I only share products that I really love!!

Entry Gallery Wall | Hump Day Giveaway | Free Downloads

Hi! Happy Hump Day! Today I'm sharing a little more info about the gallery wall for our entry.


Everything was DIYed except the D and S metal letters, which are from Pottery Barn. Love them!! They definitely make the gallery wall!


I love the size and thickness, the quality was also nice. For the ampersand, we glued left over driftwood to a thin piece of plywood and cut it out with a jigsaw.


A few week's ago, I photographed a few succulents - love the natural/organic element that it adds.


I recreated this amazing For Like Ever print and adjusted the proportions so it would work with my 16x20 frame.

The gold leaf Dorsey, was a DIY from a year or so ago, tutorial here


Using Sarah Swanson's $10 gallery wall prints as inspiration, I created a simple watercolor. If you're looking for affordable gallery wall prints, make sure to check out Sarah's Etsy shop, amazing selection!!

Here's a full list of the sources:

Smile (5x7), Hello (8.5x11), and Succulent (8x10) (created by me) available for free download HERE 

For Like Ever (created by me, original design and print available here) Out of respect for the artist, I won't be offering a download of the print.

Metal Letters | Pottery Barn silver and bronze

Driftwood ampersand (created by David and I) from left over driftwood 

Watercolor (created by me) purchase your own at Sarah Swanson Gallery Wall shop

Flamingo (created by me) free download here, BeYouTiful (created by me) free download here

Gold Leaf print (created by me) tutorial here

p.s. Since my printer isn't working - I got all of my prints done at Staples. Looking online, "photo enlargements" was the cheapest option for larger color prints. I believe 16x20 was $10, total for all the prints was under $20. The print quality was nice!

I hope that you're having a great week! I'll be back tomorrow to talk about a few more details for our entry!

Built-in for the Entry | What TO do and what NOT to do

When we started planning the entry, we knew we wanted to add a built-in, including closets, shelving and a bench. It took a good bit of planning to decide on a final design, but in the end it's perfectly tailored to our family!

Here's a little background info on the design: We wanted it to be on the far side of the room since its out of the walkway and can accommodate the lowest ceiling height of the space. Originally, we considered building it on the same plane as the original closet but at 4 feet deep, the storage was awkward and it concealed the ceiling detail. The post on the exterior wall (left) is a structural part of the house whereas the one on the right and the top beam were decorative and used to create the original closet opening. The ceiling beams divide the room into 3 sections so we wanted to repeat that in the built-in. We went through a few options for the middle but ending up deciding on shelving behind the bench so that the wall and horizontal beam were still visible.

Before:


After:


After a lot of drawing and modeling in SketchUp, I came up with a plan and David figured out the construction details. This was the part of the project David was looking forward to so I'll let him take this part!

(p.s. were were under a time crunch, so I didn't get photos of every step, sorry!!)

--

Hello everyone! I don't post much for Sarah but hope to be more involved in the near future with more woodworking and renovation projects. Although I've been a primarily silent partner in the blog, I equally enjoy your feedback and support for our projects - so thanks again for reading and participating!

I was dying to get started on the built-ins as they were the perfect reason to get more tools and start a new project. Because this is a custom project (and we would change a few key things about our process), I'll go through our process rather than a full blown tutorial. I'll start with a quick lessons learned...


When building any type of cabinet with drawers and doors - build a complete cabinet box, then place it and use trim to cover any gaps.

Our walls are not straight, so building the cabinets in place (verse building a box and then placing it) cost us a lot of extra time. This is what we did, but again, we would recommend using a similar technique, but building them outside and then placing them.

We started by cutting the sides of each closet which becomes the main structure of the built-in. Because these would support the bench and drawers, I used 3/4" birch plywood (ready to paint and very sturdy/heavy). (Sarah's note: These were HEAVY, together we struggled to get them in the cart.) We ripped the plywood to height and then cut it into 4 sections. The widths had to accommodate the 6" posts on the outer sides. and were all cut 3/4" short so we could add a solid wood edge for durability.


When fitting the side panels into place, it was clear just how bowed the drywall was, On the back wall, it protruded over 1.5" in the center. I had to cut a curved section from the whole side touching the drywall to ensure everything was square and even with the horizontal beam.


I used 3" strips of the plywood with pocket holes to attach the sides to the wall at the bottom and pocket holes (using the Kreg Jig) in the sides to attach to the horizontal beam.

I then installed maple 1x2s across the front that would serve as the top of the top and bottom for the drawer openings. I then cut square sections of plywood for the top of the closets and secured them with pocket holes from the inside of the closet sides.


For the solid edges, I ripped 3/4" strips of poplar and glued them on all of faces. One dry, they were sanded to be flush with the birch plywood. This gives a smooth surface for paint and a much more durable edge than the plywood.


Next, I installed a frame for the closet and bench bottoms. I used sections of extra 3/4 plywood and attached them to the back wall, sides and face boards to create a shelf for the bottom to sit on. I used 3/4 plywood for the bench bottom and 1/2" for the closet bottoms since they didn't need to support a lot of weight.

Now for the drawers -

Because of the 6x6 post in the rear corners, the outside drawers could only be 18" deep and the center drawer we made a full 24" deep. All of the drawers are 10" tall so I ripped and all of the sides from 1/2" birch plywood. I then ripped a 1/4 groove into the bottom of each side panel. I ripped the drawer bottoms from 1/4" birch plywood 1/2" larger than the length and width of the drawer's inside dimensions to sit in groove. The sides were glued and screwed together around the bottoms.


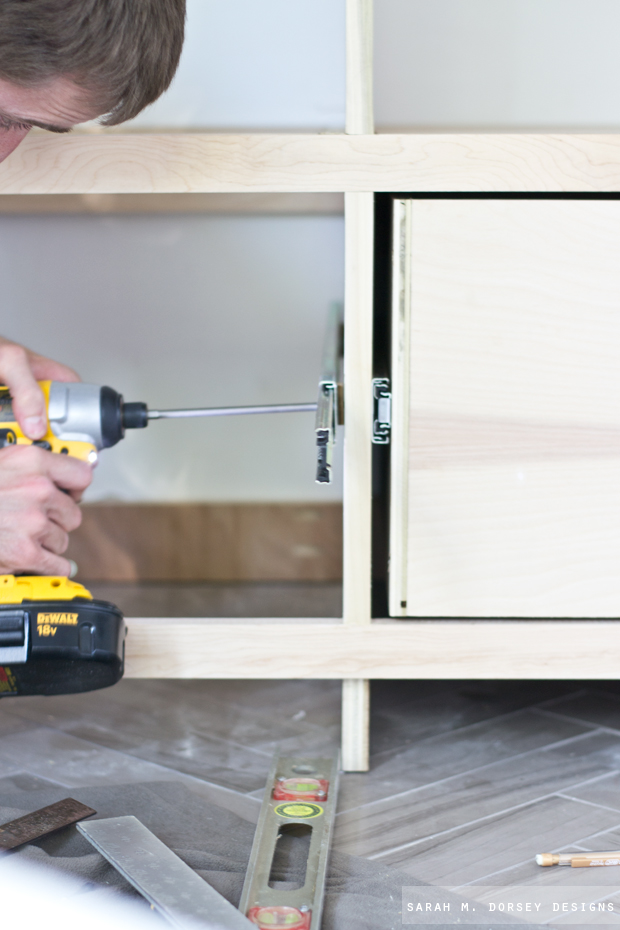
Next, I installed the drawer slides. We used These ball bearing, soft close, ones from Home Depot. I had to shim some of them to ensure they were completely square (again why I would recommend building the cabinet boxes and then installing).


Now for the front panels. I purchased this tongue and groove router bit set to make the shaker panels.

I started by ripping 3" sections of poplar and cutting them to length. I then used the groove router bit to cut a 1/4" grove on the inside of all of the edges. Next, I used the other bit to create a tongue on the outside of the shorter sections.


For the closet doors, I created a center support with a grove on the top and bottom. For the drawers, I used 1/4 birch plywood for the inner panel. For the doors, we used aluminum grating. To secure the aluminum, we cut 1/4" strip of the plywood that could be glued in the groove to create a tight fit. (Long clamps help hold it together while it dried)


We purchased this aluminum sheeting (x4) for the center inserts.


Since the groove was bigger than the metal insert, we placed thin strips of wood in the gap (on the back side) to make up the difference.


We test fit the doors, installed the drawer fronts with screws from inside the door and then pulled them off for paint. We left the inside of the closets unfinished (Sarah will probably paint them in the future ..)

Finally, for the feet, we traced a metal lid for the curve and drew the straight lines on 3/4 birch plywood and cut with a jigsaw. Then traced it for the remaining three (edges were half of the middle)

The whole built in wasn't a quick process but I think it turned out well for our first attempt. Since I didn't get into all the details, be sure to leave a comment if you want more details on any specific step!

--

Thanks David for sharing! As you can see, this wasn't easy clearcut, straight forward tutorial .. since this was our first time making built-ins it was definitely a learning process. Thanks so much for letting us share all aspects of our DIY adventures. In the end, we're SO happy that it turned out well, but we won't be repeating our process again .. p.s. David has been talking about making kitchen cabinets from the beginning (I've been apprehensive ..) I think this has made him reconsider :)


Here's a few detail shots.


The two end drawers were 18" deep (verse 24" deep like the center) due to the beam in the back and in the front)


We plan to make vertical dividers so the drawers can hold more shoes.


The bench cushion is made from Neo Toile, Coral from Tonic Living. My mom started it and then I finished it.


Hardware was provided by D Lawless, found here and here. I LOVE the large size!


Metal cubby baskets were provided by Pottery Barn, they have rubber bumpers on the bottom to prevent damage. They are the perfect size for mail, dog leashes, scarves, etc.


Woven baskets were found at Home Goods.


We decided to include shelves on the back wall instead of continuing the bench to provide extra storage. Also, since the bench isn't designed for lounging, there was no need for extra space. It's perfect for putting on shoes before going out the door!

One last before.


and after.

The built-ins were a lot of work, but we LOVE how they turned out!

Sources + Links:

Metal cubby baskets Pottery Barn
Cabinet hardware, here and here DLawless
Aluminum metal sheeting
Woven Baskets, Home Goods
Bench cushion fabric, Neo Toile, Coral Tonic Living

Tile installation post, Room reveal post 

Thanks so much to DLawless for providing the cabinet hardware and to Pottery Barn for providing the metal cubby baskets! As always, I only share products that I love!

Make sure to come back tomorrow for more info on the gallery wall!


How to Install Herringbone Marble Tile

Thanks so much for all of your comments last week, you all are the best!! Today, I'm sharing how we installed veined marble tile in a herringbone pattern. (here's our tutorial for demoing tile) We went with 3x12 Athens Gray Marble from Mosaic Tile Co., it's SO gorgeous in person, I was in love!!


A few things to keep in mind prior to selecting a natural stone ..

1. It comes from a natural source, so expect variation and some unusable tile .. we opted to get about 10% extra to account for cuts, "ugly" tiles, and damage (a few of the tiles had some chipping) but most of it is unique and super gorgeous!
2. It's pricier than ceramic tile, we spent around $1,000 for our space. Since we were completing the entire renovation ourselves, we decided to splurge! Once seeing it in person, I knew I wasn't going to be happy with anything else.
3. It may be more fragile. We were told when installing it to handle it like glass .. we did break a few (which we used for the cut edges..)


Here's our process: (*This was our first time installing tile, so a few of the tips we picked up from Mosaic Tile Co. while checking out and the rest we figured out as we went. This is what worked well for us.) 

You will need:

Marble tile (we use a 3x12 of this)
Trowel (like this, this, and this)
Grout float
Thin Set Mortar
Sealant
Grout (we used polyblend new taupe)
2 Gallon bucket (2 or 3)
Microfiber cloth / large sponge
Tile spacers (we used 1/16")
Corded drill with mixing attachment
Tile saw  
Knee pads
Eye protection / hearing protection when using the tile saw
Disposable gloves when applying sealant


1. Clean off the dust. When removed from the box, the tile has a thin layer of white dust .. we used a bucket of water and sponge / micro fiber cloth and wiped them off

2. Apply a layer of sealer. I'm not sure if this was necessary prior to installation, but we decided that it would help if any mortar got on the tile.


3. Mix up a batch of mortar (about as much as you can work with prior to it getting hard) we filled a 2 gallon paint bucket up about half way. Use a mixing attachment on a corded drill. Since our mortar came in a large bag, we sectioned it off and wrote how much water each section would need. Follow the directions for mixing (I believe ours was mix for 5 minutes, let it sit for 10 minutes) (*We were told, when selecting mortar, use the whitest that they sell, any color in the mortar will seep through the natural stone)

4. (while you wait for the mortar to firm up) Lay your tile in a herringbone pattern to get an idea of what it will look like. *Make sure it is straight. The rest of the tile will go off of this line. (Do not walk on tile prior to securing it with mortar, it will break!)


5.  Working in small sections, spread some mortar with a spackle knife / trowel.

6. Smooth it with the flat side of a notch trowel


7. Once smooth, run the notch side over the mortar.


8. Back butter the tile. On the back side of the tile, run a thin, smooth layer of mortar over the entire back side. This ensures even coverage and adhesion. (I found it easiest to hold the tile over the mortar bucket, apply extra and scrape it off of the tile in the bucket as you go.)

9. Firmly press the tile in place with spacers (we used 1/16" / 2 per side) *After it has set for a little, go back and check to make sure it hasn't floated away, you want to make sure the spacing is consistent. For the first row, Make sure it is straight. I'd recommend to let the first row firm up prior to installing more.

(*Note: we were told to expect moisture on top of the marble, which was normal after installation, but that didn't occur for us, maybe because we applied a layer of sealer first?)


10. If any mortar comes out the side, remove all excess around the edges so that it doesn't rise above the tile. (As you go, make sure to wipe off any excess mortar from the top of the tile before it dries)


11. We applied all center tiles first and saved the cuts for last. To calculate our cuts, we cut a 3x12 piece of thin cardboard and bent to fit.

12. Then we drew it on the tile (make sure to think about how the tile fits in the space, so it is right side up and the veining is the correct direction)


13. We purchased this tile saw (tile saws have water running through them to cool the blade and prevent chipping) and free handed the cuts using the previously drawn line. The guide that came with the saw wasn't long enough for all of the cuts, and free handing it worked well for us.

As you can see, the 6x6 posts complicated our cuts (baseboard trim doesn't surround the posts).. it took a while!


14. After the tile dried for the allotted time, apply grout (we used Polyblend new taupe) (non sanded grout is used for 1/8" and under spacing). (Make sure to use the correct amount of water for each batch, improper mixing can result in inconsistent grout color) Mix following directions on the package.

15. Apply by dragging a float over it. Make sure to get all the crevices.


16. Once it has sat for about 15 minutes (or what specific directions say) wipe off all excess with a sponge. Change your water frequently.

17. After the grout has cured, remove grout haze. We simply wiped it with a damp micro fiber cloth followed by a dry microfiber cloth (x2) I've heard some have had to wipe down the tile forever, but that wasn't the case for us .. not sure why (maybe because we sealed it first? since it's a natural stone?)

18. Finally, we applied a few more coats of sealant with a micro fiber cloth (the same as the first photo) and that was it.

Honestly, this took what seemed like forever .. I was excited to tile in the beginning and over it by the end .. BUT I love how it turned out!!


I'll be talking about the built-ins tomorrow, make sure to come back! 


Powered by Blogger.