Marble, Brass Side Table | Before + After

Today I'm sharing perhaps our simplest DIY project yet - a traditional marble side table to a sleek, modern brass and marble side table. (or is it a plant stand??)


Here's the before .. a whole lot of detail going on in such a small space. $15 at the thrift store. The marble was a little stained - rubbing baking soda and letting it sit for a few hours got it all off.


The wood spindles had threaded ends, so we just unscrewed it to remove. We picked up some brass parts, a threaded rod from Home Depot and Ace Hardware.

Here's what we found: Top cap, brass washer (qty 4 packs),  threaded rod (ours was 24" not 36"), brass tube (qty 7), brass nut, brass cap nut

To get started, we drilled the top holes a little larger with a masonry bit - underwater to reduce the risk of the marble cracking. This allowed the top cap to sit flush.

Then we inserted the top nut and the threaded rod from the underside.


A brass washer was placed and then the threaded rod was covered with the brass tube. Note: we did wrap electrical tape around the threaded rod at the top and bottom of where the brass rod sits to make it snug.


We added another washer and repeated the steps.
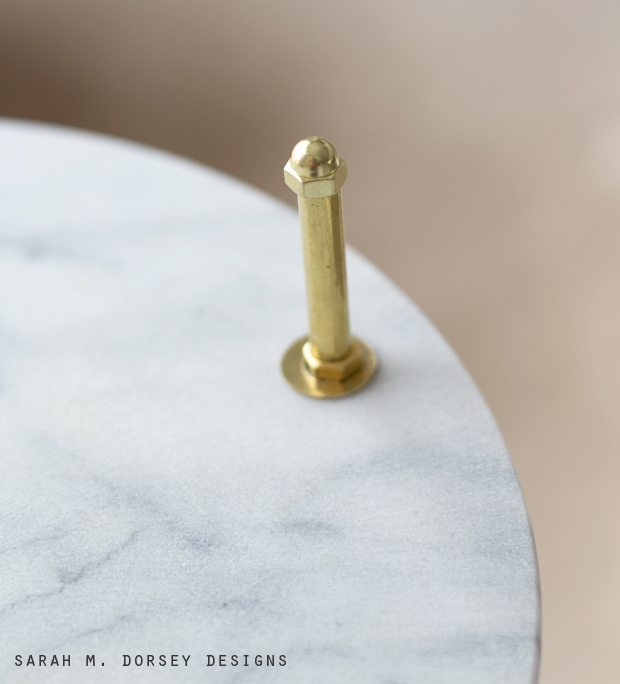

For the base, we cut the final brass rod in 3" sections with a pipe cutter - added a nut to tighten the whole base up - slipped the threaded rod over and added a brass cap nut to finish it off. We're currently using it on carpet and it is secure, but the top cap (which is flat) could also be used here - there would just be a line at the connection.


Hydrangea and and Ranunculus are my favorite flowers, second only to Peonies!


Total cost was around:

$15 Stand
$30 for Brass parts 

$45 


One last before and after.


I looooove it SO much!!

David and I finished this last night after dinner, it only too about an hour or so! Super easy! So look out for those diamonds in the rough at the thrift store - you never know what you'll find!

Mid Century Modern Nightstand

I hope you had a great weekend! Today, I'm sharing one of our latest thrift store makeovers. The other weekend we found a Mengel nightstand at a second hand store for just $15. It isn't in perfect condition, but it is very solid and well built.


This isn't a dramatic transformation, but they don't always have to be! We decided to keep the original wood (and accept the flaws ..) and paint the "stone-look" laminate top.


Top knobs were existing (I just took the pic after I removed them)

For the top, I sanded it with my orbital sander (80 grit then 120 grit) .. if you've sanded laminate you know that it doesn't typically sand well (at all!) So I used my favorite primer, Kilz Adhesion Primer - it's formulated  to stick to glossy surfaces. (I always sand before (even on wood) just so it's extra durable) It goes on super smooth, sticks well, covers well, and it's easy to sand smooth. The texture kinda feels like chalk paint.

I taped off the nightstand, below the top, and applied two coats of the bonding primer, lightly sanding with a fine 3M sanding block between coats and wiped off all dust with a micro fiber cloth (this will help get a smooth finish). Then I applied two coats of Rustoleum Glossy Oil based white paint (see my tips for using oil based paint here)


To refresh the wood, I used Restore A Finish. I liked it and would definitely use it again! (though I will say it's not as dramatic as the image on the front shows! It is much more subtle)


You can see below, (left is where it was applied) that it subtly fills in crevices where the stain has faded.


That's it! We were originally going to use this nightstand in our TN rental, but since we only have one .. and we couldn't find a second that would compliment it, we're using these (they've just been painted!!)


The bottom flips up and slides in for storage underneath.


Remember those lamps that I posted about a few weeks ago? I went back to Ross and they were still there, on sale for $17 each!


Large clamshell was thrifted for $3!


Oh You print is from Pottery Barn, Turkish towel and teal pillow are from Marshalls, and Black and White pillow is Marrimekko from Crate and Barrel (a few years ago). Leather Tote DIY, here


I'm working on finishing up our TN bedroom for the New Year, so LOTS of new projects and DIYS soon!

I'm taking some time off for Christmas, I'll be back around the New Year! I hope that you have a great holiday, spent with loved ones!! Merry Christmas!! :)

Nashville Flea Market | Guide + My Picks

If you follow me on Instagram, than you probably know that we went to the Nashville flea this weekend! Thanks for the tips, Wills Casa! I've never been to a flea market this large .. I wanted to move quickly to find the good stuff, but I also didn't want to look anything over ..

If you go, here's what to expect:

1. Parking costs $5
2. It's huge, so expect lots of junk (i.e. dollar store items) mixed in with the treasures
3. It's on the fairgrounds, so it's throughout buildings and outdoor areas, no loop or organized rows (I hope we saw everything!)

Overall, I found the prices kinda high (but there was a lot of staff there, so I'm sure booths were expensive to rent) But they were still reasonable if you find that one statement piece that will make the room! I went in looking for a real bargain verse specific pieces, so we didn't end up getting anything, but it was fun to look!!

Here are a few things that caught my eye! I'll add prices where I can remember ..

Wood slat chairs (I think $125/pair)

Italian Tole Chandelier (I'd love to see this painted one color $125)


Huge metal tray (I can't remember the price, but I kinda regret not getting it .. this would look amazing over a sofa or as a coffee table with the addition of legs)

Ceramic anatomy head (David thought this was a little weird, but I think it would be fun on a bookcase)

Vintage wood stools (I love the ones with the angled metal supports)


Vintage sign letters ($20 a piece, pretty reasonable!)

Glass chandelier


Hanging chair ($250) Isn't it gorgeous? I'd love to have one of these .. I'm still holding out for a super good deal!!

Do you have any favorite flea markets? I'd love to hear your suggestions!

Chinese Chippendale Chairs | Real Time Progress

Today I thought I would try something a little different. Rather than posting one big reveal - I'll be sharing my progress in real time. I think some projects come across as quick and easy (the nature of one post ..) but in reality, that's not always the case.

So I'll be sharing this project in real time - from finding a second hand piece to finished photos.


Last Sunday, I was browsing Knoxville Craigslist (while in Maryland) doing one of my typically searches, bamboo .. and there it was, a pair of Chinese Chippendale arm chairs ($60 for the pair) (in Asheville, NC).. I've been looking for these for about 3 years .. it was a mixture of feelings, super excited, but not wanting to get my hopes up .. We were driving back to back to TN that day, so we couldn't make it. I sent an email, saying how much I loved them, how long I've been looking for them, etc.. and asked if they would hold them till weekend. After a day or so, they said that they would hold them, YAY!!


So this Friday, we decided to take a day trip to Asheville (about 2 hours away) and visit vintage/thrift shops and the Biltmore. You can't tell from the photo, but it was a gorgeous day, the weather was perfect and the sky was a mix of the prettiest blue and clouds (except in this photo ..) I needed a day to recharge, picking up one of my bucket list furniture finds and soaking up the architecture and interior details, did just the trick!


Saturday, I started taking them apart. As you can see, the upholstery needs to be replaced.


Some of the wood joints were broken and repaired (but not well ..)


Saturday, I spent a good portion of the day removing all of the upholstery and staples from the back and seat. My preference is a small pair of needle nose pliers (I like the ones below, comes in a pack of three at Home Depot) these are great since they pop back open when you release. I also like a flat screw driver with a thin tip, it allows you to get underneath the staple easier. Though it is good to have a larger set too because it's easier on your hands (mine are still sore today ..) Pulling staples is definitely my least favorite task .. if anyone has tips to make it easier, I'd love to hear!


The seats are secured underneath with screws ..


The upholstered backs left staple holes everywhere .. the faux bamboo was also notched out ..


Sunday, I filled the staple holes and notched out bamboo with wood filler. Since the notched out bamboo requires more wood filler, I will let it sit overnight - prior to sanding.


We repaired the damage arm by stripping the old glue and nail, then re-aligned the wood, added wood glue and clamped into place with a ratchet strap (a great tip, if clamps wont work!). Clamping is the key to strong, durable bond when using wood glue. Once dry, we used wood filler to fill in the missing wood.


Purchasing these with an upholstered back (when I want the exposed back) will add a few extra days of work, but I figured I've waited 3 years, a few extra days of work will be well worth it!

That's where I'm at! Due to the damage, I'm planning on reupholstering the seat, leaving the back as is and painting the frame.

Total time invested:

Picking up chairs: 4 hours (we did make a day trip out of it .. and usually our finds are only about 10-30 minutes away ..)

Removing staples and upholstery: an afternoon

Repairing damaged wood with wood glue and wood filler: about 2 hours

Up next, sanding, priming the frame and picking out fabric for the seat.

We have lots of projects in the works .. so stay tuned!!

--

Also, don't forget to check out my latest DIY project, at Infarrantly Creative!!

Recent Thrifting + Craigslist Finds

Hey! I hope that you had a great weekend! We worked on #projectentry .. more on that a little later, but we made progress!!

Today I want to talk a little about my recent thrifting and Craigslist finds.

David and I went to Florida on vacation a few weeks ago and also did a little thrifting .. we had big hopes to find something amazing and all we found was a pair of brass duck book ends and a triangle display box (seen in this post). So our truck came back empty .. then, when we came back to Knoxville we found TONS.

So, my number one tip if you're starting thrifting is, don't give up! It takes persistence, and you strike out more than you score .. See my other thrifting tips, here

Here's what we've found recently.

1. A goodwill just opened near me .. we went opening morning (there were news cameras, embarrassing since I basically just rolled out of bed) but look at what I found!!


It pays to get there early! The diving helmet is actually an ice bucket, it's missing the top, but at a $1 I figured I could use it as a planter or find/make a top. The brass duck bookend is an exact match for the pair that I got in Florida .. The smaller items were .50 - $1.00, the bench was $12, the brass lamps were $8 and the foo dog lamp was $5.

2. We found a Campaign set on Craigslist. The quality was pretty good (brand Bernhardt).. I wish the hardware was brass, but thats ok .. $160 for the set (hutch tops are removable)


I took the pic as the sun was going down .. so David had some fun with the slow shutter speed.


3. Last weekend we went to a vintage fair in Knoxville, we found an elongated octagon mirror, a carved wood ball (seen in this post) and a expandable rack (not sure what the original purpose was, thoughts?) $27 for everything.


4. In Maryland, we found this Dyrlund desk/vanity top (top section flips up to a mirror) (legs were missing) How cool are those circle pulls!? The condition is pretty rough, my first thought was paint, but once we found out that it was a MCM Danish piece, we're definitely going to try to refinish it, the condition will never be perfect, but thats ok.

My grandmother wants a desk, so if it turns out, I'm planning to give it to her! :)

p.s. here's the dress that I posted about Friday, pretty good for $11.99!!


I hope that you have a great week! I'll be getting caught up on some projects, blog stuff and things around the house .. love going to Maryland for the weekend, but I get behind!!

Projects!! | A pair of chairs, a chair, and a desk + Houzz Article

I've been in project planning mode! Yesterday, I was looking for a piece to convert into printer/paper/office storage and found a pair of chairs in instead. Ohio has been the land of chairs, since we've been here, I've bought 5 chairs. Mostly for our new house.

It is reeeeeally cold and windy here and winter hasn't started, I'm scared. Yesterday I had to fight the wind to get to the front door and when I got inside I realized that half of my shopping bag had blown out in the driveway.

BUT the thrifting is SO good!! Look at those arms!! I just about died. Getting closer, I saw the $35 price tag, I was so excited. I was on the fence because I wasn't sure about the front legs (no pic, but there is more detail on the front, I figured if it bugged me too much I could fix them somehow). Good condition, price, and there was a pair! Sold!

Project 1:


We're planning on replacing the back cushion for one that is square and no tufting. Those arms are so pretty, I don't want too much competing with them.


When I got home, I came up with a few fabric options and shared on Instagram (thanks for your input, insta friends!). I'm leaning towards a solid velvet (maybe a print on the back panel, but probably not). The stain is worn, but not horrible, I might leave it as is for now, or I might paint it white or black. 

Project 2: 

My office (in Ohio) 

Last week I worked on an article for Houzz on panels to conceal those pesky wires (see end of post for link)

I'm finally getting around to reupholstering my chair (legs have been spray painted black). 

I've narrowed it down to black and white stripe. I picked up some fabric from Ikea, it's heavy weight, like duck cloth. Has anyone used it to upholster furniture? I want to make sure the quality is good before spending time .. 


and Kravet Xu Garden (sorry for the bad photoshop, I just dropped it in there) 


Project 3: 

Also, I'm probably going to be swapping my desk for this one (found at Goodwill). If I do, I'll use my existing desk as a side table. Unfortunately the top corner is damaged so it will be easiest to paint, I'm thinking about leaving the drawers wood. We are currently without a t.v. stand so we temporarily had it here .. since then, it's been sanded and waiting for primer. 


So, tons of project ideas floating around my head! David is going to Baltimore at the end of the week for work .. so I'll have lots of time on my hands, hopefully I'll get a few things done!

--

Here's a first look at my office (first image is before :)! Make sure to check out my article on Houzz - how to have an open desk and hide wires! 


Remodeling, decorating, and more ∨

Home improvement can start with something as minor as installing track lighting or a ceiling fan.
Work with a home decorator when choosing floor rugs or hanging new window shades in your home.

Goodwill Finds

Want to know what my favorite part of Ohio is so far? My local Goodwill!! In California, I would find something pretty good every few months. And everything below? Amazing finds in only 1 week!!

First up this side chair for $9.99. I almost walked away from it because I thought that it would be too hard to reupholster. My Instagram friends thought the price was too good to pass up, even if it didn't work out - so I went for it. I'm thinking to replace the back channeling with tufting - I'd probably need a special sewing machine to duplicate it. LOVE the front legs!!


This coffee table is pretty big, 30" W x 50" L. We've already started working on it - I love how it's coming together! Stay tuned.

 How about this mid - century modern floor lamp!? Amazing, right? The finish is a little worn, so it will need something. Or this large french provincial mirror, love it! The frame is plastic, but still worth it. I can't  believe this little octagon frame was only .99! Finally, this little silver bowl. I think I could use it pretty much anywhere!


All of this for just over $35! Pretty good, right? Thoughts? What would you do with some of my finds?

p.s. we made two trips one in our little volvo and one in our little mini .. but everything fit, barely .. David's been looking at trucks online recently, so maybe we'll have a thrifting friendly vehicle soon! Plus with all the rain we've been getting, looks like it might be a snowy winter ... so a truck would be good!
Powered by Blogger.