Mid Century Modern Vanity | Adding Custom Legs

Hey! Happy Monday! Over the weekend we finished our latest project and I'm in love! p.s. I'll be back later today with a second post, make sure to come back! 


The other weekend, David found this Mid Century Modern vanity / desk at Goodwill for $25, it was buried and I walked right by it .. so glad that he spotted it! (sorry I forgot to take a better before photo!)


It was missing the legs and the wood veneer was pretty rough. I was hoping to leave it wood, but the damage was too extensive .. the veneer was dry and chipped even more once I sanded. I was hoping to find wood filler that would be a good match, but it wasn't right (upper right photo). So I decided to leave the front wood and paint the outside white.


I love the white and wood combo!

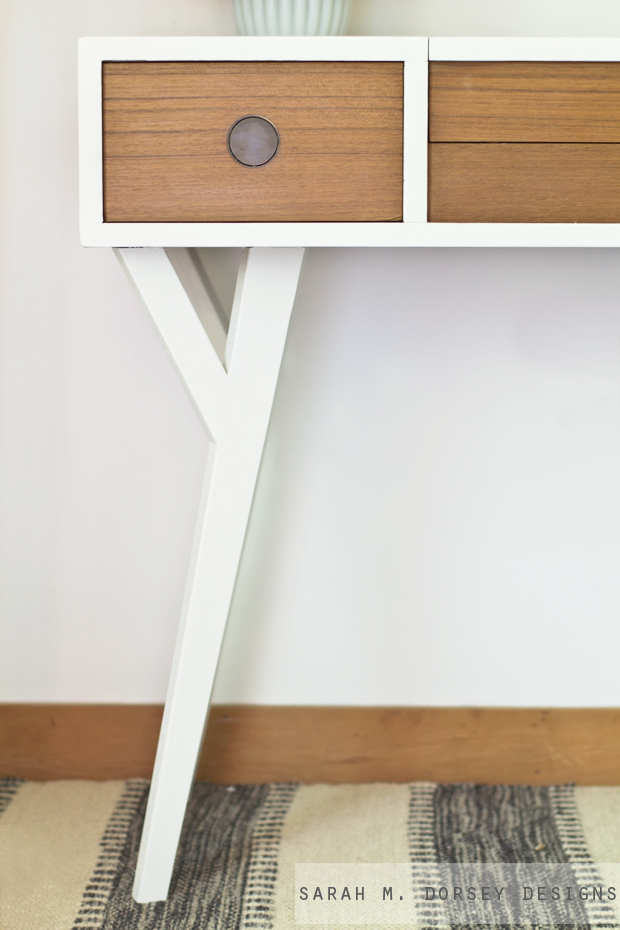
But lets talk about the real star, the amazing legs!


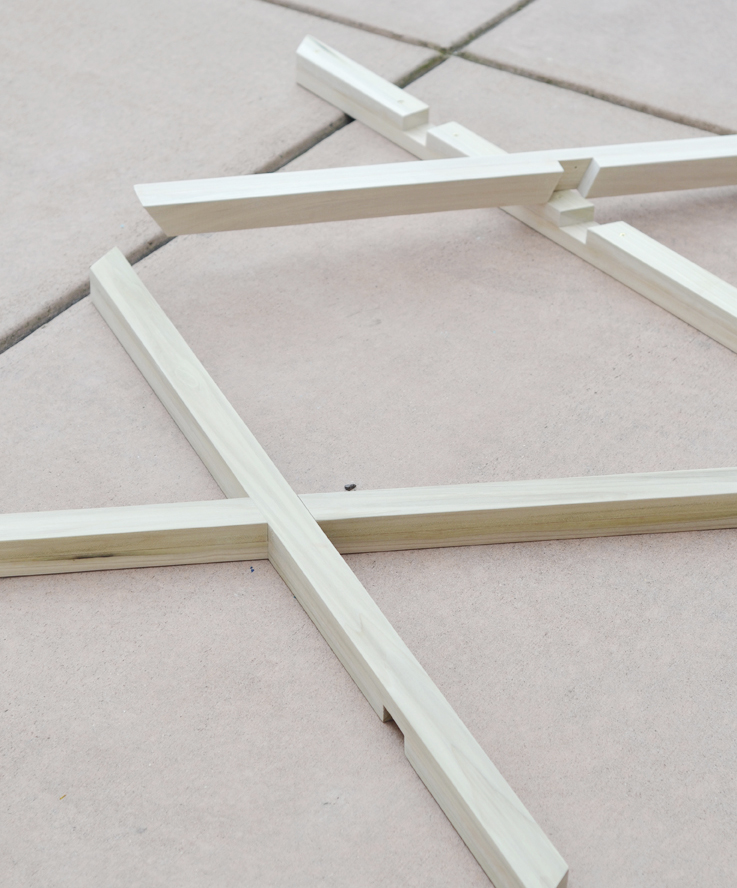
Inspired by West Elm's Parker table, David rocked it again and figured out the tricky angles (our first set of custom legs, here). Due to the complexity and a lot of figuring it out as we went, this won't be a full tutorial, but about our process.


The base is constructed of South Carolina oak. Years ago, after a storm, my Grandfather brought in a portable mill to mill several trees after a storm.

First, David ripped the board down to remove the rough edges. Then David cut the bottom section of the leg, since it's wider at the top and skinner at the bottom, we attached it (on an angle) to another piece of wood with screws and cut it on the table saw.


I routered the edges with an 1/8" bit. then we attached the top section with wood glue and screws going through both pieces of wood.


Center supports were added and the entire piece was attached to the desk with screws.


To match the top, I primed (Kilz Adhesion Primer) and then painted with Sherwin Williams Pro Classic in Alabaster. The wood veneer was sanded and waxed with Briwax, clear.

I LOVE the original circle pulls .. I made a quick gif to show you how the open .. aren't they cool!?

47vxRI on Make A Gif, Animated Gifs


Love!


The top flips up to a vanity (it was covered in stickers, which I removed with Goo Gone) 


The ceiling is looking very orange in this photo ..


If you've been reading my blog for a while, than you know that I love accessorizing with fresh flowers. I love the color, texture, and shape that they add - I think they make a home smile :) I was recently introduced to Bouqs - an online flower source. When asked if I'd like to review flowers, I instantly said yes! I went with Dawn - they come straight from the side of a volcano in South America, pretty neat, huh?


I took these photos 5 days after they arrived and they look just as good as they did on day 1. This would have been a great option for that LONG winter in Ohio, I definitely tried and failed to find nice flowers locally..


I picked up these brass pineapples the other weekend at the flea market, aren't they perfect!? I ran towards them!


One last before ..


and after.


Obsessed with those legs!! I think they are perfection - don't they look like they've always been there?

Make sure to stop by later today for a second post, I'll be sharing something new about me .. and yes, it's a little embarrassing! You won't want to miss it! 

p.s. Don't forget to enter last week's giveaway for the pendant in my entry! 

How to Build a Campaign Style Desk


On Monday's post I shared a few photos and why this desk wasn't a weekend project and how it could be. Today I'll talk about how we built it. Again, a big thank you to David for doing most of it, I was more of an assistant on this project!

First, we calculated the amount of wood we needed and off we went to Home Depot to pick up our supplies:

1x12 Poplar (about 10')
1x2 Poplar (about 48' - we made a second trip for more wood, so I think this is about right :)

For those not familiar with American terminology for wood, for some reason a 1x12 isn't actually 1" tall x 12" wide it is really 3/4" tall x 11 1/4" wide. Same applies for other sizes too, like a 1x2 is really 3/4" x 1 1/2". I know, weird. Just wanted to go over that upfront since I talk about measurements below :) 

Anyways, total for the wood was around $100

We also needed: 

Brass Screws

Wood Glue

Then the two 1x12s were cut and glued together and held with a clamp. Once dry, 5 supports were cut out of 1x2 poplar, the same width as the top and attached to the bottom of the desk with glue and screws and clamped to dry (The last support should be snug against the leg so make sure to account for that- see photos towards end of post). Then 1x2s were cut at a 45 to make the outer frame, glued and  then clamped in place to dry. If you have any gaps use a small amount of wood filler to fill them. 


After everything had dried, all the edges and where the wood meets was sanded with the orbital sander  (120 and then 220 grit) 


Next, we calculated the angle of the X legs. On the table, we started at the edge of the 1x12 (not the very end at the trim) and measured 29.25" for a 30" standard desk height accounting for the .75 top too. We laid two 1x2s on top of each other in an x on the desk top. Lining the top board with the outside of the trim and the bottom with the inside of the trim. We marked with a pencil where the boards intersect in the middle and a straight line at the top and bottom. 

Next we cut the angles (which were just marked) for the top and bottom for eight boards (4 for each x-leg).  We then cut the center sections (drawn where the legs cross making the X) on four of the boards. 

If you use a wood like poplar with a lot of variety in color and grain, you will want to spend some time to match similar boards for each leg. 

Last, we cut a 1.5 inch section out of the inner rear leg to later attach the center brace. 

Now to assemble the legs!  We applied wood glue to all of the pieces, clamped them together and screwed them from the inside. We assembled the four pieces as shown below and then sanded them to make sure the connections were seamless. 


After sanding, we applied glue and screwed the individual legs together creating the X. 


Once the X sides were complete, we applied glue to the corners and sides and set them in place. 


For extra support, we added wood angles to lock the legs in place. David cut a few angles to find the perfect fit and then cut the angle so it would sit flush with the trim. it was glued and clamped in place.


After the legs were set, the center brace (going between the X sides) was glued into place. The center brace was constructed of two 1x2s cut to the width of the table minus three inches (for the trim and outer board of the x-leg)

And that was it! You can see that we used a combination of wood glue and hidden (or less noticeable screws) for the construction. As long as the wood glue dries thoroughly and is clamped to dry, it is very strong! For areas that have more stress, like the legs and table top center supports, we also used screws in addition to the wood glue. I'll take more photos once we have the office complete, but since I took the photos, I also have my large Mac desktop on top and it is very solid. 


I love the grain of the poplar! It probably isn't for everyone, in fact as I was looking at hardwoods online, I saw some references to it as the ugly hardwood. The nerve! I'm thinking they were referencing the extreme difference in grains ... so it does take more time to pick out ones that are similar.  

The desktop looks like one piece of wood because we chose wood where the grain would match, also sanding it until it was smooth helped even out the line. 


I think the legs look pretty seamless too ...


If we were building this again, I probably would use oak due to it taking less time in sanding, see Monday's post for my full explanation of why wasn't a weekend project and how to turn it into one!

The total cost was around $100 for wood and about $10 more for screws and wood glue if not already owned. So about $100 cheaper than the World Market equivalent  

I'm off to get supplies and work on my next project ... follow me on instagram @sarahmdorseydesigns for sneak peaks! 
 

Campaign Desk

This weekend we finished our campaign style desk! I didn't really do much on the desk other than working on the design, holding things in place while David clamped, and some sanding (of both desk and finger, ouch!) It was kinda a one person job, and since he works in front of a computer almost all day, I was happy to let him have at it! Especially once it got a little tricky ... more on that below. David did a great job!

We decided to build a desk because 1. our old desk was too big with everything else we needed in the space, the credenza and sofa table   2. we couldn't find one on craigslist  3. we like building things :)

Once we agreed on the design, I instantly thought of Jennifer's X-benches from The Chronicles of Home for how to connect the legs. Jennifer has a great tutorial! We modified the center support since it is a desk, and lowered it so our knees don't knock it.

I'll be back with a full tutorial, but for now I'll explain why this took longer than a weekend project and if we were doing it again, how we would turn it into one!

We picked up some poplar from Home Depot. Since poplar has so many different shades, (purple to green and a light wood color) we carefully picked out boards that were the same color.

Why it wasn't a weekend project:

We looked at the boards to make sure that they were straight, but here comes the issue. Since the entire desk consists of 1x12s and 1x2s glued and screwed together, having them line up perfectly was important. We decided on poplar because we liked the uniqueness of the color and wood grain. It's a hardwood, but not as hard as oak, so that combined with being stored vertically (instead of flat) caused them to be warped slightly, which = lots of gluing and SANDING to make sure that it was level where the boards meet. All of ours were very close, but to get it absolutely level it took a lot of sanding ...   

How it could be ... 

To turn this into a weekend project, I would recommend using oak or maybe even poplar from a local lumber mill that stores it flat. Having extremely straight wood will save lots of time!

Ok, hope I haven't lost you! Here are a few pictures in the office.


We definitely need to cover up the carpet, way too much beige going on! And still waiting until we can get to Ikea to pick up a sheepskin for the Eames chair cushion, to bring those up. btw anyone know of an affordable sheepskin option online?


It lines up with the credenza instead of going halfway into the first door like the old desk.


We still have to add a few coats of polyurethane to protect it. It was about $9 cheaper on Amazon than I was able to find at any local store, so I decided to order it through there. My thriftiness got the best of me! 

I'll be back soon with how it was made!

Addition of Legs

This weekend we added legs to our Parson's table to make it a standard desk height, 30". I was originally thinking that I liked the solid sides, but once David held the two options up it was pretty obvious (at least to me :) that the 4 legs looked more cohesive.


We got these legs a few months ago from Habitat Restore for a few dollars each. They were about double in height (you can barely see it in the photo above) so David cut them down so that the table would measure 30" in height.

We added a 1x2 underneath the table so that the legs would have something more substantial to attach to. Then we primed and painted them Sherwin Williams Overjoy, the same from the console table on the other side of the room. 


I'm waiting till I finish the draperies to decide if I like the relationship of the ottomans to the table ... 


I wish the table was a little wider, so we will see. Once I add height (the draperies) to the window I may change my mind :) 

I took these photos early this morning, please excuse the weird lighting! 

--

Tomorrow and later this week: Eames chair update (hint I have a very cramped hand), Valentines Day prints/gifts from my Etsy shop, and a kitchen and master bedroom suite design to maximize space, storage and functionality!


Powered by Blogger.