Friday Five | 02.27.15


Hey! I hope that you had a great week! We got lots of snow this week in TN .. which is very rare. Normally it's spring by the end of February here .. so hopefully warm weather is on it's way soon! I'm tired of being cold!

Here's a few of my favorites from the past week!


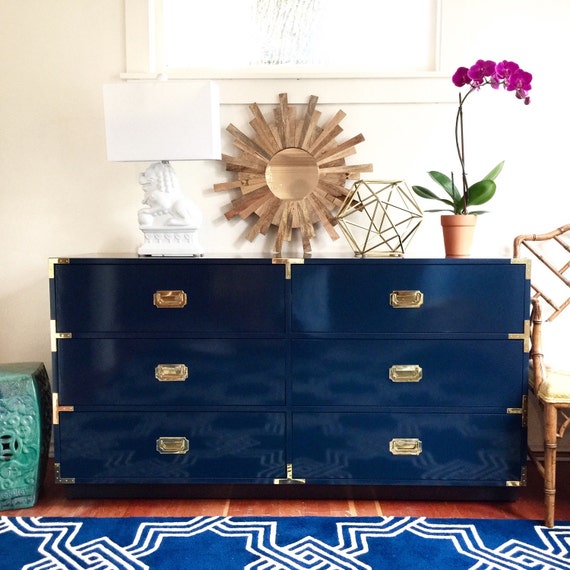
Papaya Tree custom builds furniture from scratch! They offer so many styles of furniture that I love - campaign, bamboo, asian inspired and Mid Century Modern with lacquer finishes! Check out their selection here

Please pin from original source, here, thanks! 

papaya tree


Have a black thumb? Check out Apartment Therapy's list of houseplants that are easy to keep alive. I've had my fiddle leaf tree (which is on the list) since November and it's still alive! Though I have heard that they're finicky .. 

Please pin from original source, here, thanks! 

apartment therapy

I'm anxiously awaiting the arrival of this cherry dog collar (for Annabelle) and this macaroon dog collar (for Charlotte).  


Aren't they the cutest!? 


Love this gorgeous living room designed by Jen Stagg!! It's full of neutrals, metallics and texture - super pretty!! 

Please pin from original source, here, thanks! 

with heart


This pendant kit is currently on sale for $14.97 at Land of Nod - it comes in lots of fun colors too! 


How neat is this solid teak accent table from Target!? 


I hope you all have an amazing weekend!! :) 

Grasscloth Mat + Succulent Prints + Walls Republic

Today, I'm sharing a super simple DIY project that anyone can do! I recently completed a project with grasscloth wallpaper (coming soon!) and I had some left over. So, I decided to use it as a background in a frame.

With vintage frames, often the sizing is off for traditional photo sizes, so using wallpaper is a great solution to fill the white space and add a little texture!


A month or so ago I found a pair of vintage frames at a thrift shop. It's very rare to find a pair of semi large frames, so I scooped them up! Just in time too, a women was making her way around, grabbing ALL the frames. She was eyeing mine at check out.. I think mine were $6 each, so a pretty good price!  I just spray painted the mat white and the frame gold. I broke one of the pieces of glass when removing it, so I photographed them without glass, but I'll get another cut to fit.


The grasscloth wallpaper is from Walls Republic, you can find it here. It's nice and thick, has a slightly yellow, creamy tone with darker natural bands. I love the variety of stripes!

Make sure to order samples (up to five free!) prior to ordering, since they can look different on your computer than in person.


I found this spider cactus (I'm not sure what the actual name is) at Home Depot!


For the prints, I purchased a few succulents and photographed them over the summer. Since then, they've all died :( But, at least I have these photos!! Prints available in my Etsy shop, here.

p.s. This is a little peek of our dresser that I finished a few months ago .. I still haven't found a solution for the two handles that are missing, so I put it on the back burner for a little!

Thanks so much to Walls Republic for providing the wallpaper. As always, all opinions are 100% my own!

So I Married a Creative | 20 Questions

Today, I'm David's happy to participate in 20 questions- So I Married a Creative, hosted by Primitive and Proper and Bliss Ranch! David gets his chance to tell all about me and my creative process! 


Here we go! Take it away David! 

1.  What is your favorite project  Sarah has done, and why?

My favorite project was the driftwood coffee table. It was a lot of work but was the perfect way to bring a piece of our time in CA with us.


2.  What is your least favorite project, and why?

The fabric wrapped table - We made this table to fit over our lack ottomans and didn't make any drawings before starting (more on this later). After building it and Sarah perfectly applying the fabric, we put it over the ottomans and thought - why in the world did we make it so short?? We then proceeded to add legs to get the height we needed. Although they didn't look bad, it would have been much better if we planned before building. 

3.  What is the one creative item or tool that Sarah cannot live without?

Sketchup - she always uses it to plan everything before we start building a project or moving furniture around. When we skip the planning, it always costs time and quality.

4.  What is your biggest pet peeve about Sarah in the real world or the project and decorating realm?

Nothing - She's perfect :)

5.  If you could take Sarah on a vacation anywhere, where would she want to go?

She did just mention driving across the country in a Uhaul, filling it up with our finds. Or a beach with crystal clear water .. that one has my vote. 

6.  Sarah finds $100.  What does she do with it?

Probably go to Marshalls / TJ Maxx / Home Goods and come home with loads of accessories. Or hoard it for the thrift store. 

7.  What is YOUR favorite room in your house and why?

Our MD living room - a sunny southern exposure and open layout makes it a great place to hang out and enjoy family and friends. 


8.  Creativity is messy, but for the most part blogs show the pretty picture.  Can you tell us how Sarah is a secret slob?

Projects are messy, we pretty much live with tools, supplies, projects all around us - especially in our small rental. It's the norm and I have to accept it for what it is. Living between MD and TN makes this extra challenging since the tool or part we need always seems to be at the other place. I have big plans for a shop at our house that I am dying to start building which will hopefully keep our mess contained.

9.  Name a project or decorating adventure that you thought would be a flop but was fabulous? 


There has been several times when I've been very skeptical that a project will come together but it somehow comes together and amazes me. The fluorescent diffuser pendant made me nervous from the start but Sarah pulled it off and it has been one of my all time favorites. 


10.  Blogging takes a lot of time.  Do you ever pass by Sarah while she is on the computer and secretly feel neglected?


Sometimes I feel like projects consume all of our free time. Fortunately, I really enjoy helping.

11.  Before, during, and after photos are an important part of blogging, do you remember to do that while working on projects for Sarah?


Not at all (that's the main reason Sarah takes most of the process photos). Photography has never been something I enjoy and I manage to forget to take photos of any steps I complete without Sarah. If you see a project with a lot of drawings for steps - its was likely a project I worked on without Sarah for a few steps...

12.  How often do you read Sarah's blog and do you have a favorite post?


I get an advance preview of every post - my favorite is coming soon so stay tuned.

13.  Before changing a piece of furniture, hanging new curtains, or planning a whole room redo, does Sarah consult you or do you come home and it's done?


She would consult for major things like painting or buying something major but otherwise free run.

14.  Does Sarah discuss her blog with you,  stories from other blogs or friendships with other bloggers?


We're always talking about projects, her blog, and other blogs. I know many of you by name.

15. Where do you think Sarah gets most of her creative inspiration; tv, magazines, online, you, or was she just born that way?


Online and born that way - When Sarah is working on a space she often has a Pinterest board and a mood board with loads of ideas and concepts and then has a way to pull it all together and come up with original ideas to make it her own.

16.  Do you know what Pantone's color of the year is and how do you feel about so called "girly" colors for your walls?


Yes - only because Sarah told me and suggested that they should have chosen oxblood. I don't think I'll ever need to worry about having girly colors on our walls.

17.  If you could change one room or area of your home with no decorating advice from Sarah what area would you choose and why?


I havent gotten there yet but when I re-do the garage and shop, I will not need any advice. Otherwise, I'm ok with Sarah taking the lead. 


18.  Are you ever worried Sarah will share too much personal information or that blogging might invade your private life?


I trust that Sarah will maintain the correct line here and if there's a question, I know we would talk about it before I would see it online.

19. Have you ever helped Sarah style photos for her blog or offer input on how you think a vignette should look?


I'm not much for helping with these parts... A few times Sarah has asked me to move stuff to the left or right to get the right placement. She likes to look at things from a distance to see how everything works together. Bookcase to secretary here


20.  There is a saying "If walls could talk...", what would yours say about the decorating in your bedroom?


Our bedroom walls would say - make up your mind already. In no time flat, our bedroom looks like a different place, again and again.

--

David's too nice :) He's very patient with me and most of the projects on the blog wouldn't be possible without him - he really is the best! Though he didn't say it .. I'm thinking that my indecisiveness might be a pet peeve (at least it is for me!)

Finally, Here's a full list of everyone that's participating! Stop by to hear their spouses dish! 


Friday Five | 02.20.15


Happy Friday! Here's a few of my recent favorites!


I was recently introduced to One Life and their handwoven Burmese pillows. I was instantly struck by the colorful woven pattern and the cause - proceeds from sales go towards bringing clean water in Myanmar. 

The colors are vibrant and the quality is super good! 

For more information on One Life and their pillows, visit their site here


Trying to navigate Ikea's kitchen cabinets? Check out I Heart Organizing's tips! 

Please pin from original source, here, thanks! 

i heart organizing

I love this space - it's pulled together, yet casual. The warm wood beams are great and the accessories are perfect! 

Please pin from original source, here, thanks! 

domino

These faux built-ins using Ikea bookcases by The Makerista look original to the house, SO good!! 

Please pin from original source, here, thanks! 

the makerista


How cute is this Serena & Lily shower curtain!? It's on sale for just $18.99!


I'm also loving this border standard sham from Serena & Lily! Select colors on sale for $18.99! 

Enjoy the weekend! I hope it's a great one!!

Nailhead Metallic Linen Headboard | Tutorial

Thanks so much for your sweet comments on my post yesterday! Your support means so so much!

Today, I'm sharing our most recent headboard - a nailhead and metallic linen square headboard.


Nailhead can seem intimidating, but since working on several projects with nailhead (including this massive nailhead feature wall) we've found a few tips that make it go faster! 


Here's how we did it!

First, we used (for a queen bed)

Plywood (1/2" cut to 60" x 36")
2x2s for the frame (qty 4)
Metallic linen look table cloth (found at Marshalls) (I think it was around 76" x100", if you're buying yards, you need about 2)
Nailhead (UPS is the only shipping option listed online at DIY Upholstery, if you call, you can get USPS shipping which is about half the cost)
Cardboard upholstery strip
Upholstery stapler

First, we simply framed the back with 2x2s by creating a box on the outside of the backside of the plywood (legs extend from the top of the plywood to the floor. The total height of our headboard was 55"

We secured the plywood to the 2x2s by screwing from the top.


Since our fabric was semi transparent, we primed the plywood so you couldn't see any knots through the fabric.


We ironed and cut the fabric to size - enough so it could wrap around the sides.


Outside, we applied spray adhesive to the front of the plywood. Make sure to cover up anything that you don't want the adhesive on since it gets everywhere!

Then, we centered the fabric and applied it to the plywood, smoothing it. We lifted the fabric up and re smoothed as we went. Having two people for this step really helped!


You could just staple the fabric on the back, but for a more finished look we used a cardboard upholstery strip and an extra strip of fabric, stapled along the edge and then folded it over and stapled on the back.


Next, the pattern. We did a couple of versions and then landed on this fretwork inspired design. You can download our design HERE (it's a 10 page PDF, 1st page is the entire design, remaining 9 pages are the design, arranged top to bottom, left to right) Carefully tape them together. 


First, we poked holes through the center of each circle (we use an awl - used to mark metal) off of the headboard. Next, we centered and leveled the pattern - we took a lot of time ensuring it was even so the pattern would stay consistent. Then, we taped it to the headboard and marked each hole with a pen.


So here's the trick to make the nailhead super easy and fast. With a small drill bit (compare to the end of the nailhead and test on scrap wood first - you want the nailhead to sit in the hole, but it should be snug) Drill each previously marked hole a small amount - you want the nailhead to go in about half way. Again testing on a piece of scrap would is recommended till you get the hang of how deep to go.

It's an extra step, but trust me, it makes applying the nailhead SO much faster! Not shown in the image, but we covered the tip of the hammer with leather (for durability) and then painters tape to secure the leather in place - this protects the smooth surface of the nailhead. We replaced the leather and painters tape combo a few times throughout. They also make hammers specifically for applying nailhead, but this was a great substitute since we didn't have one.


We like to insert a few at a time (spaced at least one apart - otherwise they are too close and go in properly) and hammered a few at a time. This is so much easier than picking up hammer up and down every time you insert a nailhead.

I made a quick video to show how fast it is!

Note: A few of the nails went in crooked, so we used those to go in sideways in the few spots where the screws were underneath the placement of the nailhead on the edge of the plywood.


Depending how the light hits it - the fabric shows a subtle metallic glow.


I'm obsessed with the pattern!


The lumbar pillow is a hair on hide from Marshalls (Tahari) I love the cut out and subtle natural ombre. 


So if you've been wanting to tackle a nailhead project, don't be scared! It really is easier than it looks - dare I say, kinda fun!? 

Coral shams Crane & Canopy // Stripe pillows Nate Berkus // lumbar pillow is from Marshalls // Duvet is Marimekko for Crate and Barrel a few years ago // Print is from Artfully WallsTwos Company urchin found at the thrift store!! // lamps are from Ross. 

Powered by Blogger.