Roadside find


The other day I was driving home and saw this table dropped in front of our house.

I didn't think much about it, but then when David got home he said there's a table outside, and then I said oh yeah, I wanted to look at that.

So we checked it out, the top was wobbly and laminate, but the base was oak. It was late and we weren't sure, but when in doubt, I say pull it into the garage!

I'm thinking ...

a. it was a coincidence or
b. someone has seen our garage and knew that it would fit right in ...

Most definitely the latter :)

Maybe some paint (a stenciled top?) and either sell it or find some place to put it upstairs since extra workspace would be nice. In any event, it could just stay in the garage. David put new brakes and struts on my car this weekend and used it as a worktable. If you think it looks bad now, you should of seen it with dirty car parts, tools, etc on it.

So is it worth the time to refinish or too ugly? I figured since it is all straight surfaces it wouldn't take long ... If you vote keep, what color or stencil would you do? I'd like to design a new stencil and would love to know what you think! 

BUY or DIY - poufs

Moving into my second year of blogging, I want to start including a few weekly or bi-weekly series. If you've been following for a little bit, you probably know that I DIY a lot, though there are also times where buying is better.

So here's my take on BUYing or DIYing. I'll be looking at cost of material, time invested and the probability of pulling your hair out.

First up, the pouf. Poufs are a staple in so many homes because they are incredibly versatile (perfect for a foot rest, extra setting, a step up when needed, etc.), affordable, and often the perfect accessory to finish a room.

the Moroccan pouf:

via
Buy - available from serena and lily, overstock, ebay among others ($110 - $450)

via
or DIY, tutorial via Better Homes and Gardens 

The tutorial is very clear and easy to follow; however, it does require a good bit of more complicated sewing (like more complicated than sewing in a straight line :). I don't have a lot of patience with sewing, so while I think that it is completely doable, it's probably not for me. Maybe when I move closer to my mom (aka sewing genius!)

Also depends if you would like leather or fabric, leather can be pricey and more difficult to sew.

So for the Moroccan pouf, I would say BUY (unless you rock at sewing!) In fact, I just bought one from here 

Square Dhurri Pouf:


Buy - West Elm Ansalusia Dhurri Pouf $249 (currently on sale for $199)


or DIY - tutorial via retropolitan. Easy to follow instructions and $9 for rugs from Ikea (and filling of your choice) will get you a large square pouf. If you can sew in a semi straight line this should be fairly easy to try. The only thing that concerns me is that my lower end sewing machine can't handle the thickness of the rug...  I would want to test a thicker material first.

So for a Square Dhurri style pouf, DIY, but maybe with a lighter material! Although, the West Elm ones are gorgeous ... it may be worth it if you are in love with the pattern and can't find a good substitute!

What's your take, would you like to try either of these DIYs or would you rather buy?

New Year, New Look

Over the weekend we starting working on the new blog design. We have limited web design experience, so we're kinda learning as we go, it's pretty slow, but we're getting there! We still have to update/add some pages and other features, sorry if there are any broken links or weird spacing!

I wanted something more simple and easier to navigate with contrast more continuity.


Stay tuned for a few more updates soon!

Sarah M. Dorsey Designs Turns 1!

via
I can't believe that it's already been a year! I started this blog shortly after we moved to CA as a way to stay connected with our family and friends on the east coast and to become more involved in the online design community.

I've met so many amazing bloggers and friends this past year! Thanks so much for commenting, pinning, and following along! You're the best!!

I created a short questionnaire below and would love to know what you think! All answers are anonymous. Feel free to check all that apply.


Quizzes by Quibblo.com


We're currently working on a new blog design, so look for that soon! And as always, I have about 10 projects going on in my head :) Stay tuned! 


How TO apply greek key trim to a pillow


Victory! Yesterday, I successfully applied the greek trim after my first failed attempt. My process was very similar, but a few key differences that made ALL the difference. 


Here's how I did it. 


First, I got out my cutting mat, metal ruler with cork backing (for anti-slip), and my xacto knife. I used basically the same measurements as my first attempt, with a few tweaks to accommodate the new shams. For a standard sham (mine are these), I used {16} 4", {8} 6", {2} 7", and {2}14" pieces of ribbon (diagram a few images down). My ribbon is 7/8" pewter grosgrain ribbon from Joanns, Wal-Mart has the same though.

I started by cutting the end at a 45, the cutting mat made this easy because I could line the ruler from corner to corner of the 1" square. For the edge to be clean and straight, it helps to hold tightly on the ruler and change your blade frequently (I have a pack of 100 I purchased on Amazon since buying a few at a time is so expensive and I use them a lot) 


Then measure your desired length for the straight edge. Again, the cutting mat helps with this too, since each square is 1". My measurements above are from the tip of the 45 to the straight edge. and repeat this for all of your pieces.


I love putting my hiccups on here because you help me figure them out! A big thank you to Jani for giving me the idea to burn the ends!


I found that using a lighter gives the most control since you want it to be as even as possible. I did use a candle (to save my finger) for a lot of the ends. Since that gets covered, it isn't as important if it is straight.


Then I centered it on the pillow (adding up the entire width and height and subtracting the respective difference from the ends). It's really easy to get the spacing off, I recommend laying it all out and double checking your measurements before adhering.

 * pink outline shows original ribbon and how the edges meet.

I started with the long 14" piece on the bottom (45 pointed left and straight edge right) and worked right overlapping the 45s on the straight edge. After testing two samples of adhesive that I had (to make sure that it didn't show through) I used one roll of 3/4" heat n' bond super. Last time I used heat n' bond regular and had issues with it showing through, but I'm thinking that it's because I had to iron so many corners that it got too liquid and bled through. The important thing is not to iron too long. I had my iron on fairly hot, pressed for a few seconds and then if it felt pretty secure, I would move to the next. It's hard to tell until it is cool if it is really adhered, so I went back at the end and touched up any spots that were a little loose. For the touch up spots, I flipped the sham over and ironed from the back. The extra layer of fabric helped prevent it from getting too hot and bleeding through. Make sense? :)

I tried to make the heat n' bond as close to the edge as possible, but after I was finished, I put little pieces in the corners that needed a little more and then ironed. and make sure that your iron is dry (I had just dumped out the water in mine).

and that's it! This was so much easier to get precise then folding every corner and ironing!!


It took about 30 minutes to cut and seal the trim per pillow and about an hour to hour and a half to lay it out and iron it down. So about 1.5 to 2 hours per pillow.

Also, for those who don't want to cut at a 45, cutting straight with scissors would also work well and give a very similar look!

Price breakdown:

Ribbon - pewter grosgrain 7/8" x2 = $4.00
Heat n' Bond 3/4" Super = $2

Total = $6

So is it worth the time or would you rather buy? I think it's worth it, but that may be because I enjoying doing this kinda stuff :)

Also, I haven't forgotten about the trim on the draperies for the bedroom ... just trying to find something that doesn't cost more than the draperies themselves ... looks like I may be adjusting my idea!

--

Update: Also see my latest tutorial on how to apply greek key trim with one continuous piece of ribbon, here


Home Stories A2Z

TDC Before and After

Weekend in Photos and My Favorite Ikea Finds

For the long weekend we decided to drive down to LA. You can't beat the stretch near Santa Barbara, nothing but blue skies and glittery water. First we went to the Paramount Studio tour. Paramount studios is neat because it is the only studio in Hollywood, and you can see the Hollywood sign throughout their huge lot. Other highlights, seeing a sunken parking lot that they flood to film water scenes (I guess the ones that are too tricky to do on the ocean?) and their New York set up, it looks a lot like New York but it's mostly just facades of fake brick and fire hydrants that you can pick up with one hand. 

We then headed to Beverly Hills and stopped at one of my favorite cupcake shops, Sprinkles. I have a slight obsession. Everything in moderation though, right? Next door they are also putting cupcakes in ice cream ... David and I split a red velvet and dark chocolate, seriously, best ice cream ever! A must if you are nearby! A fun addition was the quote to the right, "rodeo drive is a giant butterscotch sundae" - andy warhol. 


After fighting a lot of traffic that day, we finally made it to Ikea, which involved quickly grabbing something to eat and racing through the levels to find another display Rens sheepskin (all out of stock) before closing. We made it out with one and a faux one too ... we'll decide later which to use for the eames chairs.  

We picked up some draperies, dishtowels, a rug, and a few wire baskets. A few exciting projects in the future :) 

And before heading home, we spent some time in Laguna Beach. Beautiful calm water (people were swimming down the coast, paddle boarding, and scuba diving), neat tide pools, and rocks to climb on. 

Finally, a few of my favorites from Ikea:

Iris dishtowel in coral and Beskuren dishtowel in yellow and taupe stripe (not on the website, but in photo above) 

Raskog kitchen cart: fun colors and super versatile. I could see this in a kitchen, playroom or office for easy storage. $49.99

Knood bin: again fun colors versatile! (colors looks better in person) This could be great for a waste/recycling bin, storage, or maybe dog food container. $14.99

via
Ikea Stockholm Rand rug: Perfect for adding a punch of contrast! $299
Alvine Strata duvet cover: Simple white with subtle lines, nice quality for the price. $39.99 full/queen

What did I miss? Do you have any other recent favorites from Ikea?  

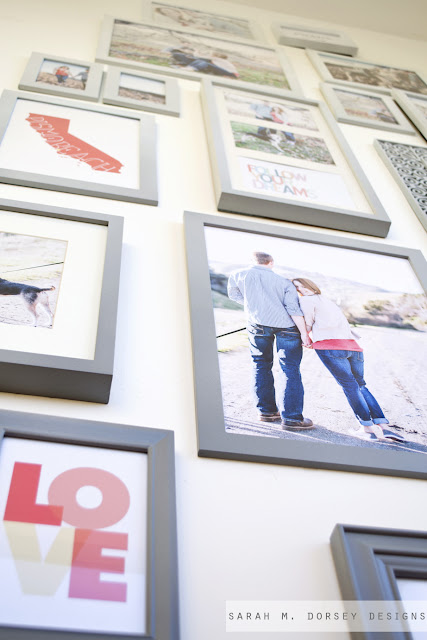
TALL Ombre Gallery Wall for the Landing

In case you missed it over the weekend at Kristen's, we recently added a tall galley wall to the last landing going upstairs.

When I first saw this 12' wall, it was just screaming to be a gallery wall! After collecting frames from various places, we decided paint them with a subtle ombre from white to dark gray. I love how it unifies the different frames, but adds a little visual interest.

We recently had family photos taken by the talented David Pascolla, so this was the perfect place to hang them! David was super easy to work with and I just love his style! Be sure to take a look his gorgeous portfolio.


To start, we used a combination of frames from my stash (mostly Ikea), and slightly damaged frames on clearance at our local craft store. 

After lightly sanding them, we laid them out on brown kraft paper (the height and width of the wall) and sprayed the frames with primer. 


We picked up a sample of BM Amherst Gray and also a sample of white to make a few lighter shades.


Then starting with the lightest shade at the top, we used our airbrush to make a gradual transition to the darkest shade at the bottom. We've purchased our airbrush a few years ago for another project and use it pretty frequently now. It is good for painting smaller surfaces but for larger areas it takes way too long! This went pretty fast (considering the area to be covered), probably about 2 hours. 

I know using an airbrush isn't practical for a lot of people. For those without an airbrush, a similar effect could be achieved by brushing on and blending as you go. A subtle color transition would probably be easiest. 


Once dry, we finished with a few light coats of water based polyurethane for extra protection.

Spraying on the kraft paper was perfect because the frame outlines were already there. We just made a mark for the nail placement, attached the paper to the wall with painters tape, hammered the nails and then took down the paper. So much easier than measuring each individual frame!


Taking photos with Annabelle was challenging because she is SO active, but we got a few great ones!


I also like mixing prints in to break up the photos. I made a few new ones for this project.


Like a Pismo Beach CA state outline.


and a large scale Love print.


I love this shot of Annabelle jumping, it really captures her happy spirit! 


I'm loving the new addition to our rental, I was hesitant to make a gallery wall that was so big because it will be a lot to take down/patch when we move out, but I couldn't resist! I'm thinking that it was worth it :)

We made a stop at Ikea this weekend to prep for some new projects, can't wait to start! Check back soon for updates!

Sarah M. Dorsey Designs at Kristen Duke Photography

Just a quick reminder that I'm sharing a new project over at Kristen's today. Make sure to stop by and check it out!


Happy Valentine's day!

Happy Valentine's Day! Here's a little peak of the project that I did for Kristen Duke Photography February series, decorating with portraits. Check back Saturday at Kristen's for the full post!


We keep it pretty simple for Valentine's day, just a nice meal at home and maybe a small gift or two. Maybe I'll get around to decorating next year :)

Wishing you a love filled day!

Updated Master Bedroom Pillows


Yesterday I made a new sham for the throw pillow on our bed. I knew better than to photograph it with the Greek Key sham ... because now I really like it. I think I'm going to have to find a way to make the Greek Key work. Check out yesterday's post for more info on what went wrong with my sham.

For my new pillow, I used the same fabric, Waverly Enlightened Pumice from the fabric wrapped table and added a small yellow pom pom trim.

I've gone over simple envelope shams before, but in case you missed it, here's how to make one:

Measure the existing sham or use the measurements from the pillow (mine was 25"x15"). For a fuller pillow you want to shrink the measurements by about an inch (based on the pillow measurement or if the existing sham is baggy.)

Add about .5 inch for seam allowances on all sides. Cut the front (26"x16") and the back should be a few inches longer. Cut the back into two pieces (14"x15" and 17"x15") or total 5 inches longer than the front. Remember to allow fabric for seam allowances and try to make your cuts as straight as possible, this will help in lining it up later.

I purchased half a yard and didn't have enough for the back piece, so I took the extra width from my first cut and sewed it on the end of the back piece. I covered it by the top of the envelope, but could be fun in a different color too!


For the back pieces, finish the edges that will make up the envelope enclosure by folding .5 inch ironing, and folding another .5 inch, pin and then sew those two edges.


Assemble the pieces inside out.


Pin and get ready to sew!


I started the pom pom trim by pinning just the first few inches in place, I then sewed slowly and put it in place as I went. Since the pom pom trim is so skinny, it can be very easy to miss when you are sewing. Once I placed it, I found it helpful to guide it through with two fingers on either side of the pom pom, a few inches in front of the needle. A reminder to go very SLOW so you don't accidentally sew over your finger, always move your finger when it is close to the needle.

I did miss a few spots, so I went back and hand stitched the openings.


Isn't the pom pom trim fun? I love texture that it adds!


I also added new sheets (Tahari from TJ Maxx) ...


I did a little more research and think I have a better idea of how to make the Greek Key trim work, I'm about 90% sure it will work ... check back!
Powered by Blogger.