My Favorites From 2012

I'm super excited for 2013 - to finish some projects that we've been working on and start some new ones! But first here is a recap of some of my favorite projects from 2012.

Our tufted headboard with wings and nailhead head trim. This was also one of the most pinned projects from my site, so one of your favorites too! I like this project because it was low on cost and effort but has a big impact. Click here for more details.


An 80's chandelier turned into a large beveled glass mirror. What I like about this project: We were able to transform something that we were planning on throwing away to one of my favorite things in our house! I also love the large size! Click here for more details. Additionally, it was named one of Apartment Therapy's Before and After: That was a What? Best of 2012. Such an honor! Thank you!


Coral chalk paint dresser. Why I like it: The color was the perfect pop to liven up our bland rental. Also, cutting off the water damaged bottom and adding legs helped to keep it from looking too heavy at the bottom. Click here for details.


Ikea Lack tables to upholstered ottomans. One of my other favorite trash to treasure projects! Why I like it: Our Lack tables were in such bad shape, by adding foam and fabric we were able save these from the trash. Click here for more details.


Office credenza with a modified chevron design on the front. What I like about this project: I love how all of the office supplies can be neatly tucked away at the end of the day since it doubles as our living room. I also love the soft blue and how easy the chevron was to lay out! Click here for more details


Finally, our moroccan stenciled rug. What I like: By choosing a deep blue and a large pattern, we were able to get a lot of impact to minimize our boring beige carpet. Click here for more details.


2012 was an exciting project year for us! I'm looking forward to many more projects in the next year. Bring on 2013!

We'll be leaving for CA tomorrow, sad to say goodbye to family, but at least there will be a furry face to greet us in CA. We've missed this girl so much!


Happy New Year!

This past week

I've been away for the past few days, enjoying catching up with family and friends as well as relaxing! I'll be back to a more normal blogging schedule soon.

Here's a little of what I've been up to. We drove down the coast to fly out of LAX. Surprisingly, it wasn't too busy, but in any event the drive was pretty! 


I didn't take many photos on the plane since I wasn't by the window (and my neighbor didn't appreciate me leaning over him), but I did snap this one going over the southwest. We left the sunshiny west and was welcomed to DC by wind and rain, but we were just happy to see our family!


The next morning I had a snuggle with my favorite kitty (don't judge my Christmas pjs :) Can't believe that it's been a year since I've seen her.


Christmas Eve we had a little snow ... 


and a little more on the day after Christmas.


I did a little shopping.


Love Target's new spring lamp collection!


and finally tonight, we had an amazing dinner at Range, Bryan Voltaggio's new restaurant in Chevy Chase. We sat at the chef's table so it was fun to see the chefs at work!

It's been a fun and relaxing week in MD! I'll be back to a more regular blogging schedule after New Years. Can't wait to finish some of the projects I've been working on!!

Wishing you and your family a happy and healthy new year!

DIY Christmas Gift: Framed Prints

Today I'm sharing with you a super simple last minute Christmas gift that you could easily get done in 30 minutes. All you need is a frame and a printer (or kinkos, staples, etc)!

I'm including a few prints that I made last week for my gallery wall to download.


They are sized at 8.5 x 11 and can be used in a mat for an 8x10 photo. The file includes high resolution images, so just download, print and frame. It's that easy! Click HERE to download the PDF.

Please let me know if you have any issues downloading and I'll send it through email :)

Enjoy!

and a very Merry Christmas to you and your family!

Gallery Wall Update


I made a few updates to the gallery wall in the Living Room and Office. Still a work in progress but here are a few additions.


Home is wherever I'm with you. I created in Illustrator by editing the font and adding a few lines. The abstract dots print was created in Photoshop with the brush tool. 


I used the Silhouette Cameo to cut state outlines with a gold background, like I did before. I then used spray adhesive to attach it to a piece of matte black poster board. The text was a little small, or my paper was too thick, so the letters got a little choppy. Next time, I'll make the font bigger. Oh and the cities still need hearts.

I'm thinking about adding these to my Etsy shop, so used this as a test run.


I also added this vertical Love to the far left of the gallery wall. I prefer the letters touching and vertical layout compared to my first go at it. I think I was so excited to try it, that I wasn't thinking about the layout :)

I'll include more photos when I finish the Gallery Wall, but for now, I am loving the new additions!

Today we are headed for Maryland to spend Christmas with family. We had the crazy idea to fly out of LAX, when we have a small no hassle airport here. At least we will get to stop at a few places while we are there. I've been trying to go to Ikea for the past few months, so I'll finally be able to cross that off of the list!

I'll be back this weekend to share my final (last minute) DIY Christmas gift :) 


Eames Chair and other Project Updates

You may be wondering why the Eames chairs have been taking us forever, I promise we aren't lazy just busy and learning as we go :)

David has some experience polishing car parts, so he has a basic understanding of what to do, but still needed to try a few things to see what way would be best. We first started with the dremel tool, but the attachment that worked well, wore out too fast and was too expensive. So David decided that hand sanding would be the best way to go. We stopped by our local hardware store down the street, and found a large a large assortment of sandpapers specifically designed for metal and a metal polishing compound. I'll ask David to go into more detail later on each step, but basically he started with a medium grit sandpaper and finished with a super fine. Then the polishing compound enhanced the shine and protects it. 

Here is the first one done (yellow is the reflection from the garage door light) Doesn't it look amazing? This took him several hours, but now that he knows the steps, it should go a lot faster!


and here is the before. Hard to believe it is the same chair!! David did an amazing job!


Here is the fabric with the seams removed and the plastic that connects the fabric to the shell.

Looking at a close-up of the fabric you can see the original fabric color (upper right) and yes, it was that bright! Also, after removing the seams, I could see that the fabric is intact in the center and then the spacing allows it to lay flat, but when sewn conforms to the curve of the seat. After taking it apart I am pretty sure I can handle the fabric, but I have no clue how I'm going to get the plastic back on.


It was sewn to the fabric with an industrial sewing machine (at least I think so) and then clips tightly onto the fiberglass shell. I considered using something else to finish the edges, but as of now I have no good ideas. I'm planning on taking it to an upholster to see if they could do it, hopefully at a pretty good price? I have no clue what something like that would cost.


So that is where we are with the chairs. Hopefully it makes a little more sense why we are taking forever! We'll pick this project back up in January when we get back from the east coast.

and in other project news ... I guess my wreath wasn't meant to be. I'm thinking the extra weight from the fabric combined with the cooler weather caused the 3M hook to fall off the door. I hung it with the same gold ribbon from the Christmas tree (see it below the the top ring?)

I saved the rolled fabric flowers for later and trashed the rest ... oh well, better luck next year!


and I finally decided how to finish my project made out of two doors ...


I think it's going to look amazing! But that's all I'll say for now, considering that I'm trying something new :)

I'm wrapping up my Etsy orders to go out before we leave on Thursday and then I'll get a chance to work on a few projects that I'm hoping to get done before we leave!

DIY Christmas Gifts: Jewel Coasters


Today I am sharing a simple DIY gift that is easy to make and airplane carry on travel friendly. We are headed for Maryland on Thursday and it got me thinking about how hard it is to get gifts home without checking bags. These coasters are compact, sturdy, and lightweight - all must haves for carry on! 

Last week I found these jewel coasters from Kate Spade and instantly fell in love with the simple design, as well as the gold accents that make them extra special! These would be a great hostess gift, or something that your mom, sister or friend might enjoy!

While $20 for the Kate Spade coasters isn't terribly expensive, these only took about a hour and a half from start to finish, plus you can say that you made them yourself! Also, making them out of wood instead of paper (like the Kate Spade ones) will increase their durability.

Here's what I used:

1. 1/4" MDF squares (mine were 4")
2. craft paint/spray paint or acrylic paint
3. gold paint marker
4. polyurethane or clear spray paint 

Another plus for this project was that I had everything on hand, so it ended up being free!!

Here's how we did it:

David cut 4" squares with 45 angles cut 1" from the corner using the chop saw. We used MDF that we had left over from the credenza shelves. 


I then painted them with craft paint. Once dry, I drew the faceted design with a pencil and ruler.


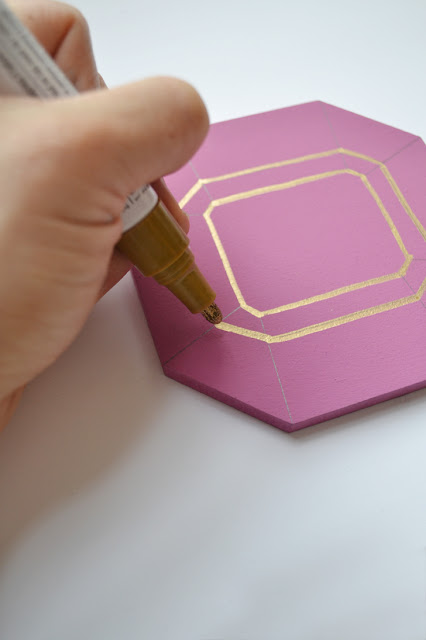
Then I traced the lines carefully with a gold paint pen. Again, once dry, I repeated with a second coat to get better coverage.


Finally, I gave it three thin coats of polyurethane to protect it from water and then let it cure/off gas in the garage for a few days.


Wrap with a pretty bow and you are good to go!


Aren't they fun?

Tips for supplies:

Wood: Don't have extra wood laying around? Ace Hardware often has scraps that they will sell for under a dollar (depending on size). They may even cut them out for you for free or a small price per cut, depending on how many cuts you have. 

I also found these squares from Michaels for $1.99. Use a holiday coupon to get them for 40% or 50% off. I've also seen an extra 20% off your whole order coupon floating around!


Paint: Any fast drying paint should work fine, I used cheap craft paint that I had from projects past.

Gold paint pen: I purchased mine from Michaels (Craft Smart brand) for about $2 (I've also used some from Wal Mart, but they dried out too quickly)

I had all of these items on hand, but if you didn't, expect to pay:

Wood: $1-3 (if you are lucky and Ace Hardware has scraps)
Craft paint: .50 a tube
Paint pen: $2
Polyurethane/Clear coat spray paint: $3-7  

Don't like the jewel look? Customizing with polka dots, chevron, stripes, or maybe a name/favorite quote would look great too!

Hope you enjoy!

Next week, I'll have one more super last minute DIY Christmas gift that would be easy to put together the day before or even the day of!

Looking for more ideas? Click here to see my other DIY Christmas gift ideas :) 

--

Linking up to The 36th Avenue

Giveaway Winner!!

Congrats to Ashley L. for winning last week's giveaway!


and a big thank you to everyone who entered!

Also, I'll be closing my Etsy shop this Sunday, the 16th, if you are planning an order for Christmas, make sure to do so before Sunday! I want to make sure to get all of the orders out before we leave for Maryland on Thursday to spend Christmas with our family!


What's going on

It was raining yesterday, so I wasn't able to finish the Christmas wreath. Instead I worked on a few projects inside. 

The fabric for the Eames chairs came yesterday from West Elm. Delivery was a little slow, but it was packaged so nicely and was exactly what I was expecting so that more than made up for it! A welcomed change, since I've received a lot of things recently that were not as described or packaged improperly.


The plan is to work on the chairs the rest of the week and weekend. I am a little nervous to start on the fabric because of the way it curves with the seat, but I guess I just have to start. Since the existing fabric has seams, my plan is to pull the seams out and use it as a pattern, fingers crossed it works!


and last night I worked on a few new prints for the gallery wall in the living room/office. I'm getting tired of what is up there, so it is time for a change!

It is sunny this morning, and Annabelle is staring at me since we didn't get to go for a long walk/dog park yesterday, so first things first, a little exercise with her! Then maybe I'll start tackling the chairs. If I can work up the courage! 

TJ Maxx Finds

This past weekend I stopped into TJ Maxx and found lots of great finds. So many would make great gifts!

Here are a few of my favorites:


Amazing trellis and chevron pillows. The inserts weren't feather, but at $19.99, worth it!


found one in gray too.


Moroccan trellis coverlet, $29.99. I snagged this one for the guest room, but I'm not sure if it will work with the headboard. It may be going back...
 

Mercury glass lamp, $39.99. They brass base seems a little large to me, but at $39.99 that could be the price of the shade alone! Maybe it could come off?


Finally, a rattan ottoman $59.99. This would be great to add warmth and texture to a room. Perfect for extra seating when you don't have the space for a chair too!

What did I miss? Have you found anything recently that was too good to pass up at TJ Maxx or Marshalls?

If this isn't motivation to clean up the garage, I don't know what is!


Warning, this post does not contain anything creative or inspiring, but hopefully it is somewhat entertaining and feel free to laugh with me :)

If you follow me on instagram @sarahmdorseydesigns you might of seen this last week. Yes, that is paint splattered in the garage on the dresser, wall and ceiling. It was actually everywhere, but I couldn't fit everything in the picture.

 The culprit.

How did it get there? As I was pulling into the garage I ran over a paint can and it exploded. EVERYWHERE. If this doesn't make you want to run out to your garage and clean up everything, I don't know what will! Why couldn't of been white?

Anyways, I spent the next few hours cleaning off the dresser. I didn't make it to the wall in time, so I decided to let it fully dry and then sand it down prior to painting.


This weekend David and I picked up a plastic shelf from Home Depot and got all of the paint off of the ground. I was previously storing it in a cabinet, but it was awkard to get in and out, so a lot of the time it got left out. Obviously.


We primed it first and then applied about 3 coats of paint.

This weekend we also made piles: to throw away, to give away, and to sell. It took all weekend and while the garage isn't beautifully organized, it will do! We are most likely moving in 6-9 months, so we don't want to invest money in organization things that we don't know will work in the next place.

It feels so good to have the garage clean! No more worries about running over paint cans!

and in other organization news, a few weeks ago we repaired my broken closet rod with gorilla glue. I folded and put away some of my clothes that I don't wear as often to lessen the load. So far so good!

Thank you for the advice on how to redo my closet! Like the garage, we didn't want to spend money on something that we aren't sure will work in the next place.  

and finally, to leave you with something pretty. 


Saturday we had the most gorgeous sunset (with no filter/edits applied). The iPhone camera doesn't do it justice!

 Hope that your weekend was more fun than ours! 

So I am the only one who has run over a paint can? Probably. What is your worst painting disaster?

Powered by Blogger.