This weekend we finished upholstering our old Ikea Lack tables into skirted upholstered ottomans.
As you can see, they were in rough shape. This was the first piece of furniture that I painted before I did some research. This is proof that using the right paint and good techniques are important! See this post and this post for some tips that I've picked up along the way.
Back to upholstering! I've wanted to do this project for a long time, since we moved the desk into the guest room. That spot in our bedroom has been begging for something! Once we built the credenza and moved the printers off of the lack tables, it was definitely time!
I found two of these shower curtains at TJ Maxx for $14.99 and thought that they would be perfect for the ottomans. At 72x72, $14.99 is a great price for 2 yards of fabric (at a larger width than normal too!)
Here's how we did it:
The table was placed on the foam, and cut out with a sharp knife. David's knife of choice is the filet knife since it is sharp and gives a straight cut. This is by far the easiest and most accurate way that we've found to cut foam.
The fabric was centered on the top so that the pattern was even, thick batting was placed underneath (you want the kind that you can't see straight through, so it isn't too stretchy). These were cut to size and stapled in place. We stapled in the center on all four sides first (pulling enough to round the corner, but not too hard because we still wanted it square), and then stapled the rest of the way to the corners, pulling down evenly as we went.
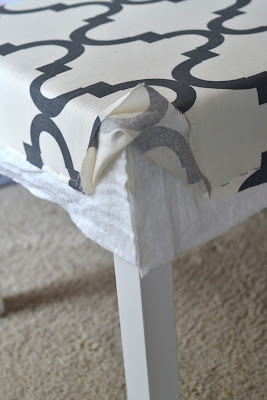
Here's how we did the corners:
the excess batting was cut off
fabric was folded back
and then folded down and stapled.
Legs were wrapped in fabric (like a present :)
A simple cording was made out of the top part the shower curtain which was solid gray. I was able to get enough, but cutting the gray part in half (lengthwise) and then sewing together to get the 88" needed to go all the way around. The cording was stapled on the side of the table where we wanted the skirt to start (3.5" from top)
Typically you want to cut fabric for cording on a diagonal, so that it bends easily around the corners. Since this fabric is a twill (weave that runs diagonally) and the corners weren't too extreme, it bent fine for us.
We laid the fabric on the side (with a piece of cardboard underneath to hold it in place) lined up the pattern, marked the finished size by folding the fabric and pressing with an iron and then cutting out with 1" seam allowance. The raw edges were sewn and the panel was stapled just underneath the cording.
The panel was folded back down and pressed. We used the iron a lot in this project, it helps with accuracy and giving professional looking results.
Finally, the corners were left looking like this.
So with a needle, I went up through the underside of one panel through the bottom of the cording and down through the inside of the other panel and made a loop.
Then I sewed down the panel for about 2-3 inches until the skirt wasn't gaping. I sewed on the inside, hiding my stitches, only going through the first layer of fabric.
and done! whew!
I think Annabelle is going to like looking out the window here ...
Each ottoman probably took around 3-4 hours. This would of been faster if we didn't line up the pattern (use a smaller print to avoid) but we felt with such a large pattern, it needed to line up. and I love the result!!
Total cost:
Shower curtains: $14.99 x2 = $30
Foam: $20 (camping pad at Home Depot, we only used about half)
$50 total
We had a lot on hand, but if not Ikea lack tables are $7.99 ($5.99 for Black Friday I hear), I like the batting from here and the cording from here
Also, this could easily be turned into a no sew project by using no sew adhesive. I like heat n' bond
I've found at Joann Fabrics and Wal Mart. Just make sure to test on a scrap piece of your fabric, since sometimes you can see through it once ironed.
I love love love our new ottomans! I'm hoping to add a few more things to this wall (especially draperies) stay tuned!
--
Linking up to!


0 comments:
Post a Comment