TJ Maxx + Target | Shopping with Sarah

Here's a few things that have caught my eye this week.


This mirror. I've been looking for one forever, $50 // TJ Maxx.


Serena and Lily Highland Knot fog pillows, $20 each // TJ Maxx.


$130 // TJ Maxx - great color, size, tufting - yes please!


$150 TJ Maxx // West Elm look-a-like table


Lots of great accent rugs, I think this one was about $30 // TJ Maxx


Love this white and orchid Moroccan hamper, TJ Maxx // $17


Glass Canisters, TJ Maxx // $8 - $20


Frames, TJ Maxx // $8


Serena and Lily letter pillows - perfect for a kids room! // TJ Maxx $15-$30 (not sure why they were priced differently)


Target upholstered ottomans $18 // buy now, return later if needed! Great price!

Master Bath Plans + My Design Thought Process

Over the weekend, David and I were talking about future plans for the master bath in our Maryland house, so I thought I'd share a little about my thought process when designing the layout of a space.

Here it is now - not horrible, but outdated, and the configuration could use some help..

The master bedroom / bath is located on the second floor. There is only one bedroom on the second floor, so it is a private bath, but doesn't have a private entrance. Making it an en suite would be ideal.


Here's our main issues with the space.

Currently, the entrance door and closet bifold doors open into each other, so while it's not cramped it feels cramped. Originally, there was a door between the sink and tub / toilet, but it was removed by the previous owner and is just a cased opening -- but it still feels cramped. The tub is also on the smaller side..

Here's the existing floorplan. (I have the overall measurements, but I didn't have time to measure the whole space, the rest are approximated, but close)
and here's what I came up with .. 


It solves all of the issues and the flow feels much better.. I'm not sure about is the shower width, I'd like to make it as wide as possible, but we're restricted to 8' total width, so it may have to be a little narrower (the measurements are to code, but it may feel a little tight, so we'll have see)

Here's a 3D drawing of the proposed space #1 (not the exact finishes .. limited options in Sketch Up) .. we could fit two shower heads on the other wall .. we could also have three walls of glass verse two, but since the toilet is on the other side, it may be best to keep that solid .. lots of glass to clean, so I'll have to think about that too!
I love the idea of adding a little make up vanity on the end.
Towel bars would be added next to the new entrance..

I think in the long run, having a private entrance would be better and increase resale value, BUT moving walls and plumbing would be a lot more work probably a lot more money too (but cost would be cheaper since we'd be doing the labor ourselves ..)

So we're also considering less invasive options.
By switching the door swing and bifold doors, the flow is much better and it feels a lot more open. Enlarging the cased opening to the maximum width would also make it feel more open.. Removing the shelving next to the tub would allow for a longer shower (it could be slightly wider too in the existing foot print). and two smaller sinks could fit at the existing vanity.

Proposed 3 is the same as proposed 2, but the closet across from the vanity would be converted into a make up vanity and tall cabinet. It still has a good bit of storage in the bathroom, but the closets outside the door could supplement.

The main problem with proposed plan 2 + 3 is that they don't answer the problem of the lack of a private entrance .. Originally, I thought the new door placement has to be where the existing shower is due to the window / furniture placement in the bedroom, but If I remove the small closet outside of the bathroom, I should have just enough room.


Something like this, might be the answer to a private entrance, while not moving everything around!

*Update - since the new closet would hold extra linens / bath items, we'd only be accessing it about once a week. The every day items would be held in the vanity, so we weren't bothered by the proximity of the closet door to the sink. 

So, that's my thought process! I didn't go into how this would affect the ceiling - since it's a cathedral ceiling .. but I've been thinking about that too .. I have plans/dreams to utilize the space above .. so I'm considering that too, but that's another post!

3D drawn in Sketch Up // 2D drawn in Floorplanner

What do you think? Is the lack of a private entrance a deal breaker? or not too bad?

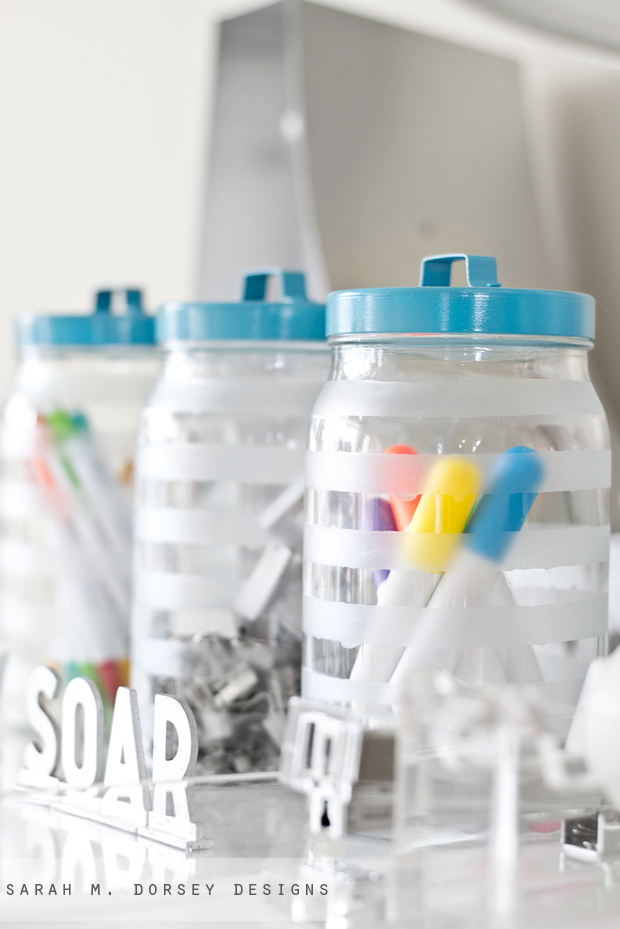
Striped Etched Glass Canisters | Tutorial

If you saw my large cork board tutorial at Infarrantly Creative last week, you may have noticed a few etched glass canisters, today, I'm going to share how to make them! 

If you’re looking for a stylish way to keep your office accessories organized but within easy reach - these etched glass canisters might be the perfect solution! The etched glass partially obscures the view while adding a design element to the glass. In a few hours, with minimal effort, you can have your own customized glass canisters! These would be perfect organizing office odds and ends, bath products, craft supplies, etc. Today, I’m going to show you how to make your own with a simple stripe pattern and colorful lid. At just a few dollars each, these are super affordable! 


Materials:
Glass canisters (I used Ikea Burken)
Painters tape (I used 1 3/8" cut into .5" sections (two .5" sections per piece)
Etching cream (I used less than 1/4 of the jar, so a smaller size would work too) 
Plastic scraper 
Spray paint (I used Valspar Exotic Sea, Gloss)
Gloves / Safety Googles when working with etching cream


1. First, prepare the painter’s tape by cutting it into .5" sections.


2. After washing and drying your canister, apply a strip of painter’s tape at the bottom.


3. Apply small pieces of .5" painter’s tape as a spacer.


4. Once all of the tape is laid out, remove the spacers.


5. Smooth the painter’s tape with a plastic scraper. It is important that the tape is securely bonded to the glass so the etching cream cannot seep underneath.


6. Apply the etching cream with a brush. Make sure that it is fairly thick and has even coverage - this prevents brush strokes. Let the etching cream sit following the manufacturer’s instructions. Be careful not to touch the etching cream with your skin, wear gloves if you’re going to come into contact.


7. Once the etching cream has set (I let mine sit for about 45 minutes), wash off all excess with water. (Etching cream is safe on stainless sinks, but not all materials, if yours is different, research first)


8. Remove the painters tape and wash canister with soap, water and a utility brush. (Once the etching cream is removed, the finish is permanent and ready to use)


9. If desired, paint the lid with spray paint. 


Load up with your favorite office accessories and start organizing!

The Ikea Burken canisters have a small handle - making it easy to take the lid on and off.


This project can be easily customized with different tape patterns, addition of text, or lid color. So get creative and organize your clutter!


Also in the photo:

Large marquee letter here // credenza with overlays here // gold geometric lamps here 

--

I hope that you had a great weekend! Mine was spent grouting and finding thrifted/vintage treasures. It was Treasure Sale day at my Mom's work, again she rocked the bidding! She had a little more competition, but she got the last bid in right as time was called (auction was silent bid style). We loaded up the truck and trailer with a mid century modern dining table/chairs, china cabinet, project sofa, and bar cart. It was a good weekend! Make sure to follow on Instagram to see our recent finds, projects, and Annabelle updates!

Friday Five


Happy Friday! Here's a few things that have caught my eye recently!


I love my Crane & Canopy bedding! They recently came out with a black and white colorway - LOVE! I also love the pug in the photo .. if I could only get Annabelle to do that (recently she hates getting her pic taken)


We'll be referring to these tips to remove grout haze when we grout.

Head over to Chris Loves Julia for all the details. Please pin from original source, here thanks! 

via chris loves julia

As silly as it sounds, I love my plain Iphone case .. It's thin while giving pretty good protection and the rubbery material helps it stay in my hands, so I hardly ever drop it. I have the mint - it's ALOT more subtle in person, definitely a softer mint. It also doesn't get dirty looking, and after several months, it's still in perfect condition! For $7, you can't go wrong!


These DIY watercolor marble paper look-a-like painted drapery panels are pretty amazing! See how Julia hand painted them here

Please pin from original source, here thanks!

via cuckoo 4 design

Obsessed with these pillows from Urban Outfitters!! 


haters gonna hate pillow from urban outfitters 


geo medallion pillow from urban outfitters 

*Contains affiliate links

Have a great weekend friends!! :) 

Foo Dog Lamp + DIY Lampshade Kit

When I saw this foo dog lamp at the thrift store, I had to have it. $5 .. check, different than any of my other lamps .. check

Honestly, I have more lamps than I know what to do with .. but that's ok. After all, it is one of the easiest ways to change up your space!


Here's the before. Not too bad, but I thought the two tone wasn't working .. 


So, I wiped it down, taped up the socket and cord and gave it a few thin coats of this primer. (First, I attempted to sand it .. the bottom sanded, but the ceramic didn't due to the crevices .. applying a heavy duty primer should help with the durability) 

Remember to wear a respirator when sanding/spray painting! 


Then a few thin coats of Rustoleum Seaside, gloss 


I let it cure in the garage for a few days, and that was it! Spray paint is probably the easiest/fastest dramatic update. 

Next, the shade! 

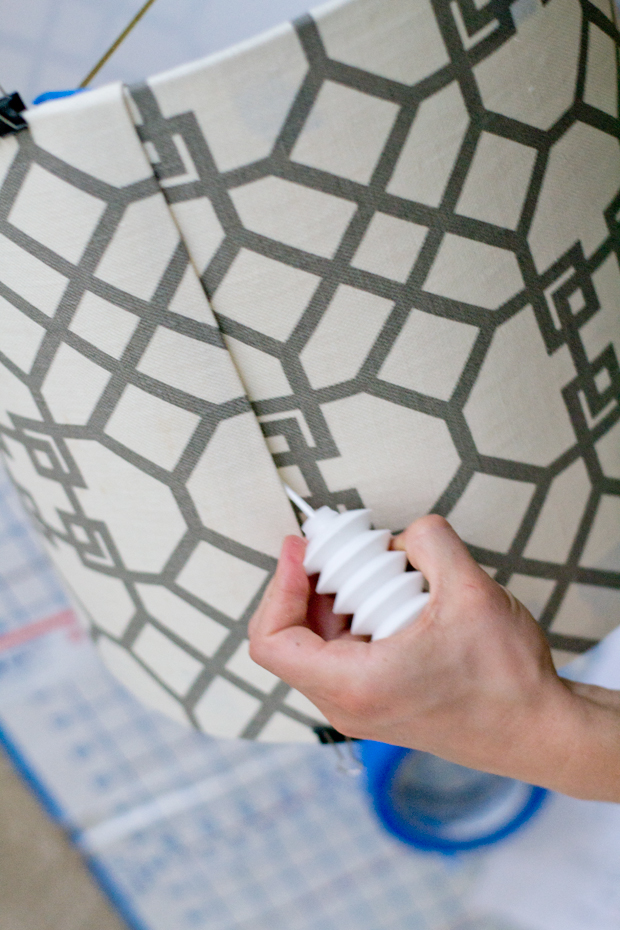
A few weeks ago, I Like That Lamp sent me a kit to make my own lamp shade. Since this lamp didn't come with a shade, this was the perfect opportunity to try it out! I've wanted to make my own lampshade for a while, but the materials aren't readily available in store (sometimes isn't half the battle finding supplies for a project?) Having a kit that I could customize was a great solution! 


The kit comes with detailed instructions, thin plastic with adhesive backing, top and bottom rings, glue, binder clips, and an orange stick. My finished lamp shades measures 12" diameter x 12" high. 

You will need, fabric (about 1 yard), fabric scissors, iron


First, you want to iron your fabric super well with steam. If there are any creases, they will show on your final shade! I used this fabric from Kravet. 


The thin plastic comes with adhesive, you just pull off the backing and stick - so easy! Make sure that your fabric is straight prior to sticking.


Trim around the thin plastic leaving .5". 

Finish one of the short edges by applying glue and folding the fabric over. 


Next, secure the top ring. An extra set of hands helps with this step. 


In addition to the binder clips, we used painter's tape too - this isn't necessary, but just helped hold everything down. This step was repeated for the bottom ring. 


The finished edge was placed overtop the raw edge and was sealed with a little glue.


Straight drum shades can be hard to find in store - they are pricer to ship since you can't stack them, so stores tend not to stock them. 

I typically prefer a straight drum shade, so this was perfect! 


Thanks so much to I Like that Lamp for sending me this kit, all opinions are 100% my own! 

If you're interested in browsing the kits, click here and if you're not sure what size shade your lamp needs, there's a guide for that too! (my finished shade measures 12" diameter x 12" high). 


Lamps are like musical chairs in my house. I'm constantly moving them around - such an easy way to change up a space! For now, this one happily sits in my office!

p.s. I'm over at Infarrantly Creative sharing my latest project, stop by to take a look! 
Powered by Blogger.